小型サイズのフラットベッドインクジェットプリンターメーカー

3D Raised Logo Printing Troubleshooting: White Ink, UV Curing, Registration & Varnish
A 3D raised logo can fail before it ever reaches the heat press.
The raised effect may be too low. White ink may become weak or inconsistent. CMYK can shift away from the white structure. Varnish may show visible bands. Thick layers may wrinkle, remain soft inside or become too brittle after curing.
These problems should not all be treated as “printhead problems.”
Most 3D raised-logo printing defects can be traced to four main systems:
White Ink Delivery
UV硬化
Multi-Pass Registration
Varnish Output
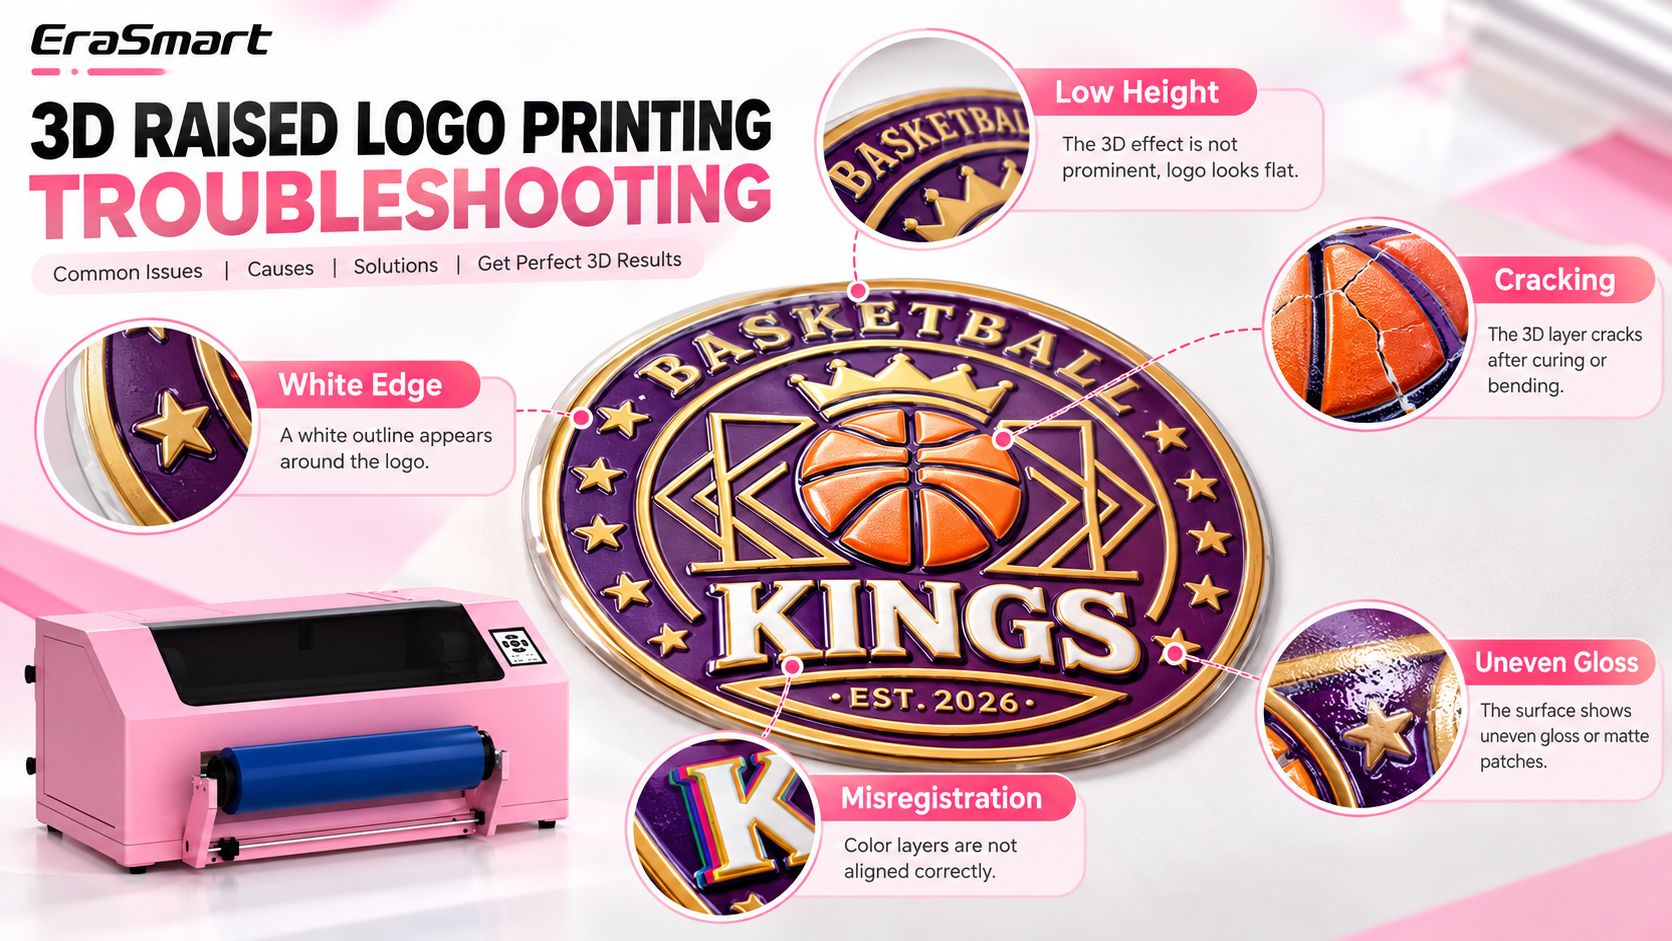
The best troubleshooting method is therefore:
Identify the symptom first, isolate the relevant system, and change only one production variable at a time.
Do not immediately increase white passes, UV power or cleaning cycles without first understanding the actual cause.
If you are still learning the complete production sequence, start with UV DTF プリンターで 3D 浮き彫りロゴを作成する方法。
Quick Troubleshooting Table
| 症状 | First Area to Check | 考えられる原因 |
|---|---|---|
| 3D height too low | White output | Wrong mask, missing nozzles, weak white flow, insufficient build |
| White ink becomes weak | Ink delivery | Settling, circulation problem, air in line, restricted flow |
| White edge around logo | Artwork / registration | White mask too large or layer shift |
| CMYK shifted from raised base | 登録 | Film movement, feed error, alignment, RIP position |
| Surface wrinkles | UV硬化 | Surface cure too aggressive, excessive build, unstable internal cure |
| Surface remains soft / sticky | UV硬化 | Insufficient curing or excessive ink thickness |
| Badge becomes too rigid | Build / curing | Excessive total thickness or curing |
| Varnish has stripes | Varnish output | Nozzle, pass pattern, motion or curing inconsistency |
| Gloss varies across logo | Varnish / curing | Uneven output, contamination, cure inconsistency |
| Varnish shifted from color | Registration / RIP | Varnish mask or channel alignment problem |
Start with a Controlled Diagnosis
Before changing printer settings, perform a basic inspection.
1. Check the Artwork and RIP Preview
次のことを確認します。
- the structural white mask is correct
- CMYK is positioned correctly
- varnish coverage is intentional
- all production layers have the same scale
- スポット/チャンネルマッピングは正しい
A production defect cannot be fixed by printer maintenance if the file itself is wrong.
For detailed prepress guidance, see the 3D 浮き彫りロゴ アートワーク ガイド: ホワイト、CMYK、ワニスレイヤーのセットアップ。
2. Run a Nozzle Check
Determine whether:
- White is complete
- CMYK channels are complete
- Varnish is complete
Do this before evaluating height or gloss.
3. Identify Which Layer Is Actually Failing
聞く:
Is only White affected?
→ investigate white ink delivery.
Is only one CMYK color affected?
→ investigate that color channel.
Are all layers shifted?
→ investigate registration or media feeding.
Is the print correct but the surface finish poor?
→ investigate varnish and curing.
This prevents unnecessary adjustments to unrelated parts of the system.
Problem 1: The 3D Raised Effect Is Too Low
A low raised effect is one of the most common problems in this application.
But the wrong response is:
“Just print more white layers.”
Before increasing the structural build, confirm why the height is low.
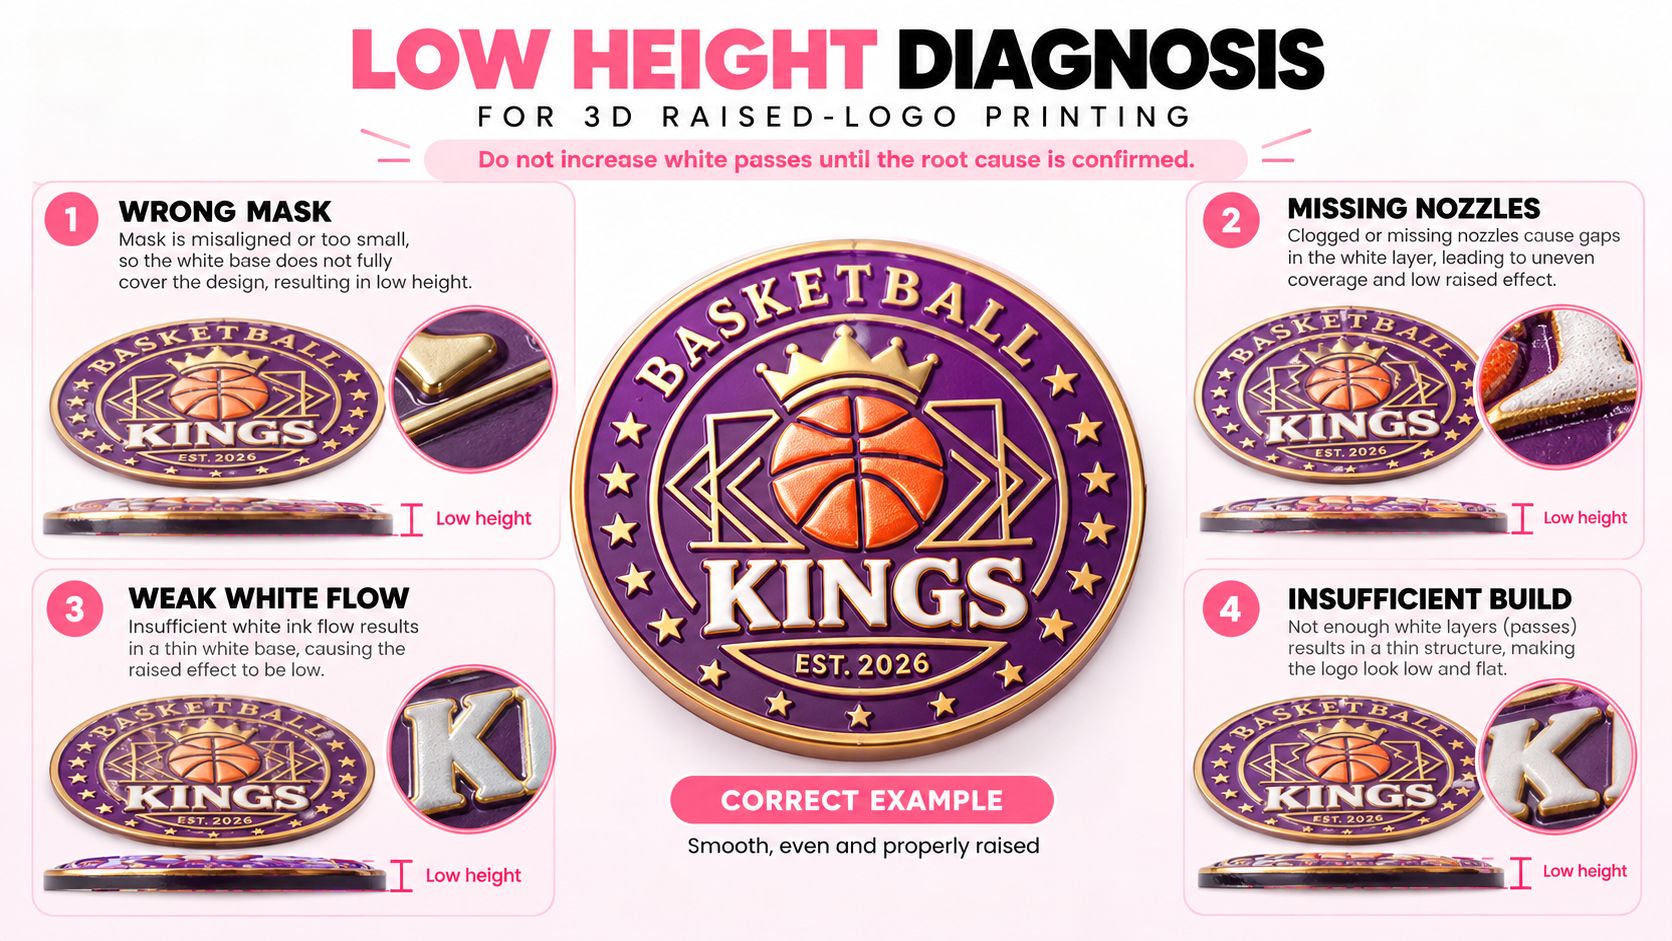
There are four major possibilities.
Cause 1: The Structural White Mask Is Wrong
The printer can only build height where the file tells it to print structural white.
If the White Mask:
- misses part of the artwork
- is too small
- contains unintended gaps
- is mapped incorrectly in the RIP
the final badge will have weak or incomplete height.
Compare the White-only RIP preview with the intended raised structure.
If the geometry is wrong, correct the artwork before changing print parameters.
Cause 2: White Nozzles Are Missing
Repeated white printing multiplies the effect of nozzle loss.
A small missing section in a normal underbase may be difficult to notice.
In a multi-layer 3D build, the same missing nozzles can repeat through multiple passes, producing:
- 不均一な高さ
- visible channels
- weak edges
- inconsistent structure
Run a nozzle check before adjusting white pass count.
Cause 3: White Ink Flow Is Too Weak
The printhead may be functioning, but the ink-delivery system may not maintain enough white flow during continuous high-build printing.
Possible signs include:
- the first logo looks good
- later logos become thinner
- white density gradually decreases
- nozzle check deteriorates during long jobs
This points toward ink delivery rather than simply insufficient RIP buildup.
Cause 4: The Build Profile Is Too Conservative
Only after:
- White Mask is correct
- nozzle condition is good
- white ink flow is stable
should you consider whether the structural white build itself needs adjustment.
The correct goal is not maximum thickness.
それは次のとおりです。
Enough stable white buildup to reach the target 3D height while maintaining flexibility and curing stability.
For the underlying height-building principle, see UV DTF 印刷で白インク層が 3D 隆起効果を作成する方法。
Problem 2: White Ink Looks Thin, Gray or Uneven
White ink is more demanding than CMYK because the flexible high-build white system contains a high concentration of pigment and solids.
That is why stable white-ink movement is especially important in 3D raised-logo production.
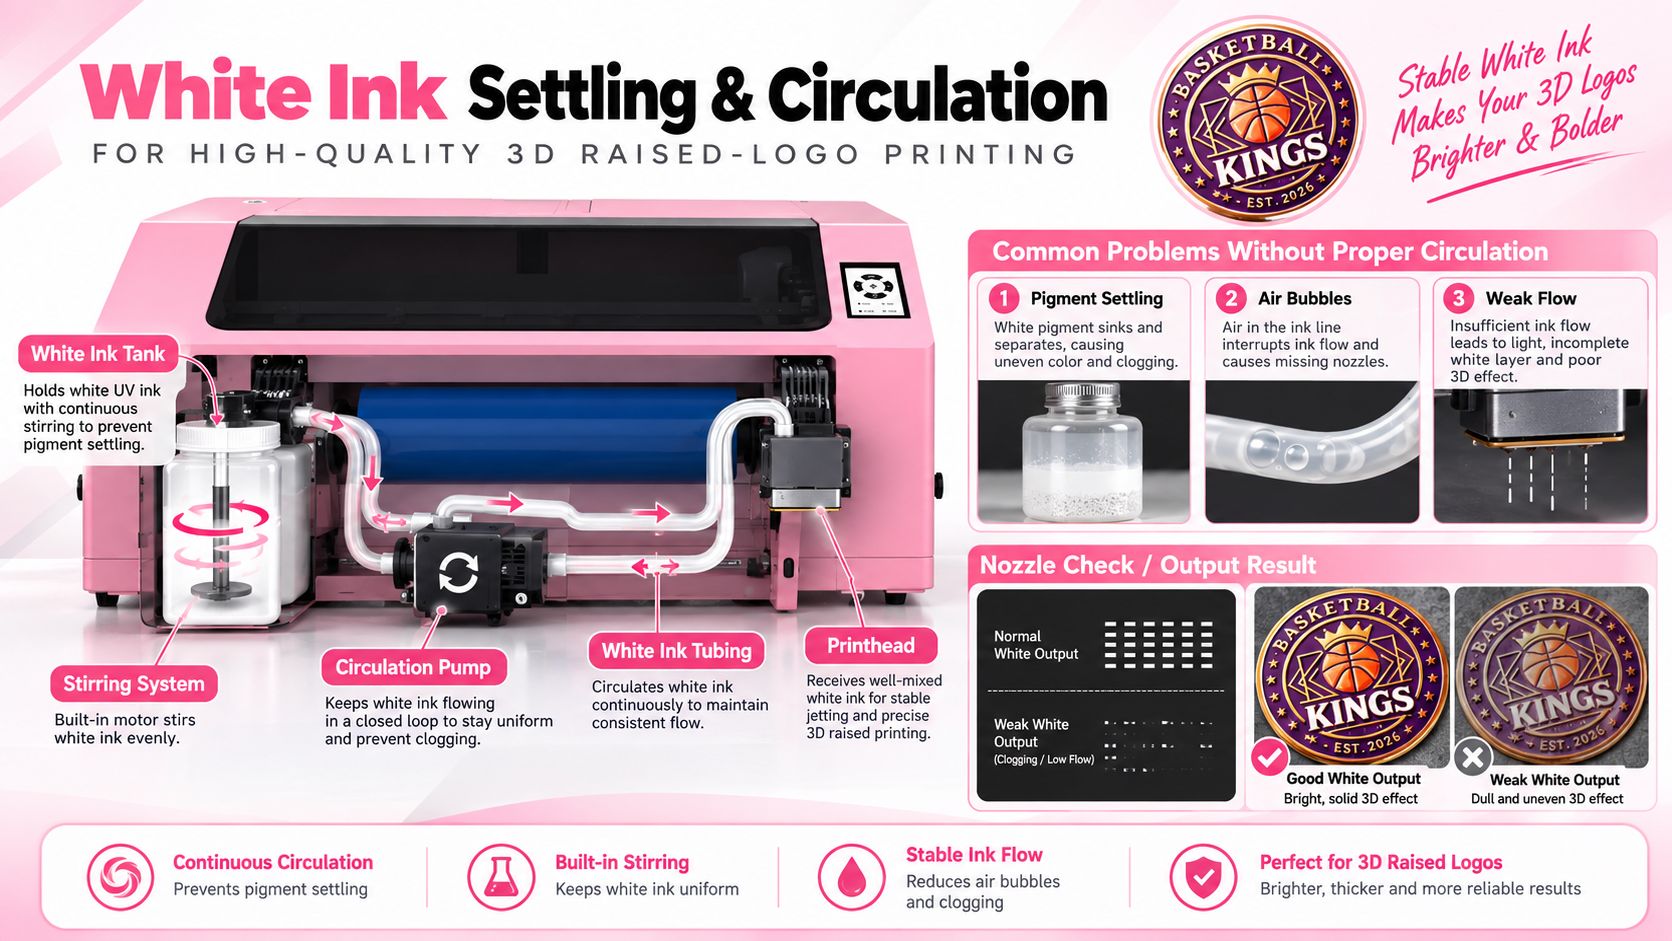
Check the white ink system in this order.
White Ink Stirring
High-build white ink should remain uniform rather than allowing heavy pigment to settle in the ink container.
If the ink separates:
- the upper portion may become weaker
- pigment concentration may become inconsistent
- print density can change
- sedimentation can increase the risk of flow problems
白インク循環
The circulation system keeps ink moving through the white-ink path.
For repeated high-white production, this helps maintain more consistent ink concentration and delivery.
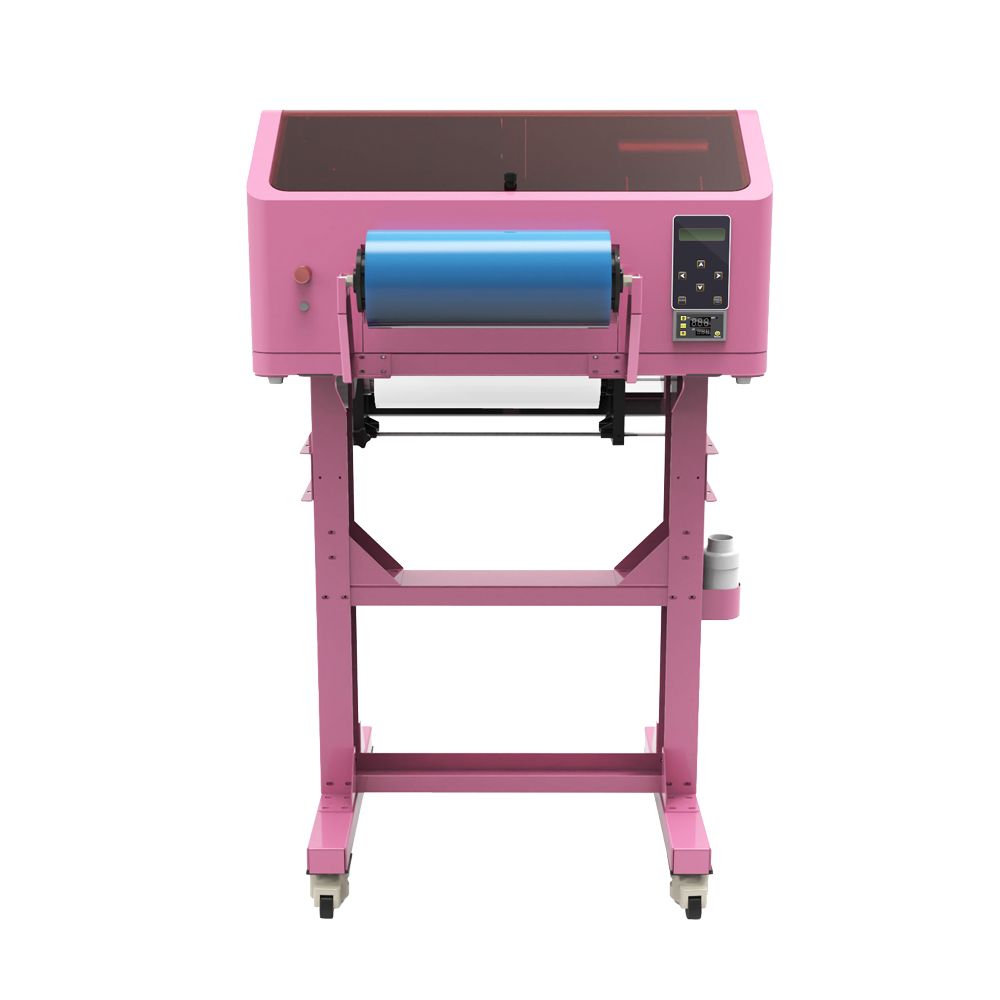
エラスマート A2 UV DTFプリンター is designed with white-ink stirring and circulation functions to support white-ink stability.
Check for Air in the Ink Line
Visible air bubbles can interrupt ink delivery.
考えられる症状は次のとおりです。
- random missing white output
- unstable nozzle check
- white output that suddenly weakens
- inconsistent density during long printing jobs
Do not confuse air-related supply instability with a permanently damaged printhead.
Check Whether the Problem Appears Over Time
This distinction is useful.
Weak White from the First Print
チェック:
- ink condition
- ノズルチェック
- RIP output
- ink delivery
White Starts Strong and Becomes Weak Later
Pay additional attention to:
- sustained ink flow
- 循環
- air
- supply restriction
A time-dependent problem often points toward delivery stability.
Problem 3: White Ink Keeps Dropping Nozzles
Repeated nozzle loss does not automatically mean the printhead must be replaced.
Before making that conclusion, check the complete white-ink path.
Possible causes can include:
- 顔料の沈降
- unstable circulation
- air bubbles
- restricted ink flow
- damper or filter restriction
- poor capping condition
- 汚染
- unsuitable ink condition
A practical diagnostic sequence is:
ノズルチェック
↓
White Ink Condition
↓
Stirring
↓
循環
↓
Ink Line / Air
↓
Damper / Filter / Supply
↓
Capping & Cleaning
↓
Print Again
Avoid repeatedly performing aggressive cleaning without understanding the actual supply problem.
Excessive cleaning wastes ink and may not solve a circulation or air issue.
Problem 4: Layers Wrinkle or Separate During UV Curing
Thick flexible UV ink does not behave exactly like a thin conventional UV layer.
When high-build white ink is printed repeatedly, the printer must stabilize a much thicker structure.
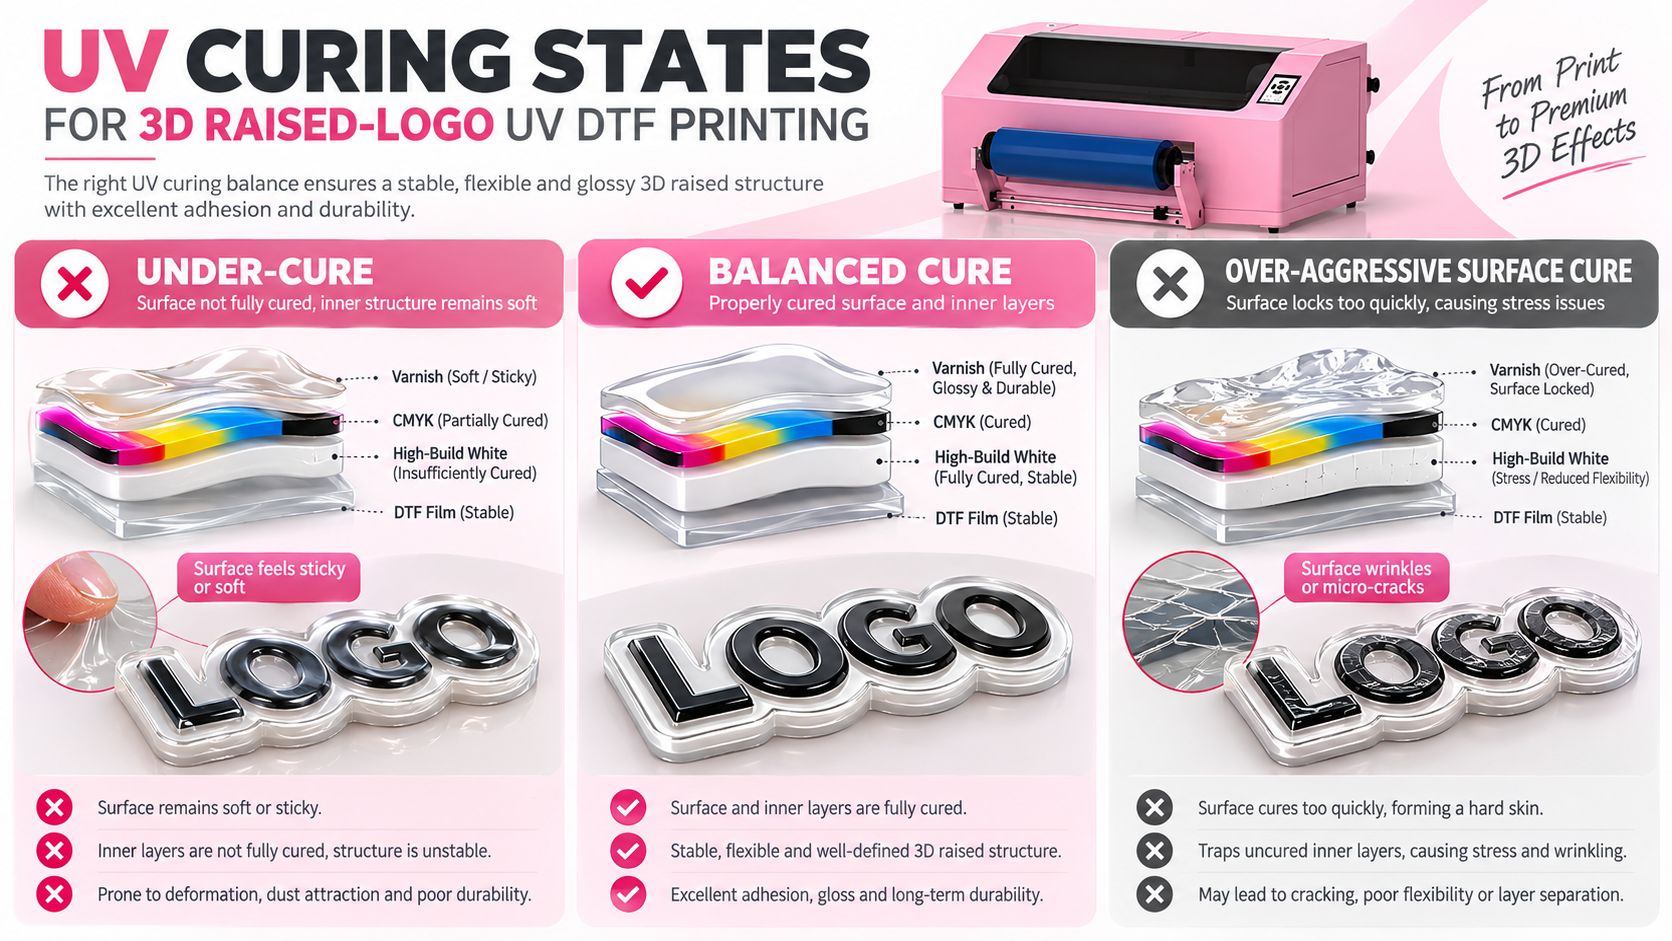
There are three important curing conditions to understand.
Under-Cured
考えられる症状は次のとおりです。
- soft surface
- sticky feel
- 変形
- unstable structure
- weak internal cure
This can happen when the ink receives insufficient effective UV energy for the total deposited thickness.
Balanced Progressive Cure
The ideal process stabilizes the printed layer while allowing the complete structure to cure properly.
The finished result should be:
- structurally stable
- flexible
- clearly raised
- properly surfaced
- suitable for downstream cutting and transfer
Over-Aggressive Surface Cure
Another problem can occur when the surface is locked too aggressively while the thick internal structure has not developed correctly.
考えられる症状は次のとおりです。
- wrinkling
- internal stress
- brittle surface
- micro-cracking
- 層分離
The correct solution is not to copy one universal UV-lamp percentage.
UV curing depends on the complete combination of:
- インク
- layer thickness
- carriage speed
- pass strategy
- LED-UV system
- total build
For this reason, EraSmart recommends using a validated curing profile for the actual 3D ink and film system.
Problem 5: The Surface Feels Sticky
If the finished printed badge remains sticky before heat transfer, stop production.
考えられる原因は次のとおりです。
- incomplete UV curing
- excessive total ink deposition
- incorrect cure profile
- UV lamp output issue
- incompatibility between ink and production settings
Do not assume that a sticky thick print can simply be fixed later during heat pressing.
The UV print itself should first reach a stable condition suitable for contour cutting and handling.
確認すべきこと
- Confirm the ink is the correct flexible 3D UV ink system.
- Check LED-UV operation.
- Check the production profile.
- Reduce uncontrolled excessive buildup.
- Produce a small test badge.
- Inspect the surface and internal stability again.
Do not continue a batch if curing is clearly unstable.
Problem 6: The Printed Logo Is Too Hard or Cracks When Bent
A dramatic 3D height can look impressive, but maximum height is not automatically the best production setting.
The EraSmart raised-logo workflow is designed around approximately 00.3 ~ 1.2 mm of raised structure, depending on the artwork and validated profile.
If the badge becomes too rigid before transfer, investigate:
- excessive white buildup
- excessive total ink thickness
- overly aggressive curing
- incorrect ink system
- excessive varnish
- design areas that are too thick for their size
A good apparel badge needs to balance:
身長
Visual Definition
柔軟性
A logo that looks excellent on the film but cracks immediately during a bend test is not a successful textile product.
Problem 7: A White Edge Appears Around the CMYK
A visible white edge can come from two different causes.
These should not be confused.
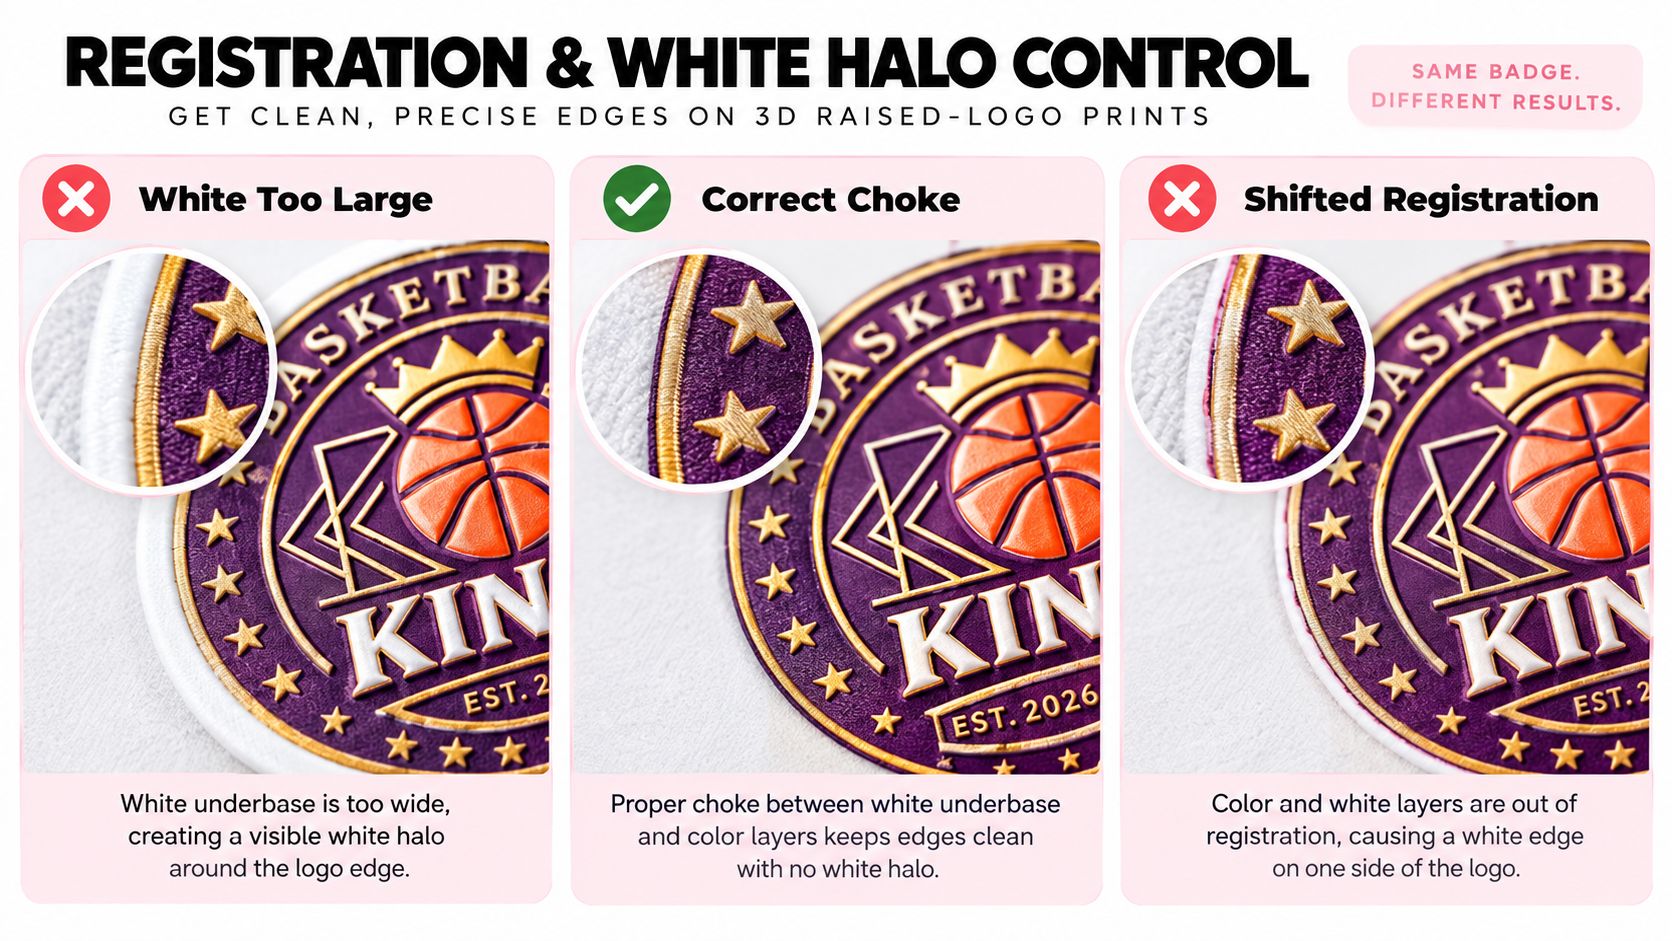
Cause A: White Mask Is Too Large
If white appears relatively evenly around the design:
suspect the White Mask / choke relationship.
The structural white may extend beyond the visible CMYK artwork.
This is primarily a prepress problem.
Cause B: Registration Is Shifted
If white appears mainly on one side while the opposite side is too close to the color edge:
suspect registration.
考えられる原因は次のとおりです。
- layer positioning
- メディアの動き
- 印刷位置調整
- multi-pass accumulation
- RIP position
This is not solved simply by applying more choke.
簡単な診断ルール
White around most sides
→ check mask size.
White mainly on one side
→ check registration.
For detailed White Mask and choke preparation, see the 3D 浮き彫りロゴ アートワーク ガイド。
Problem 8: CMYK Is Shifted from the Raised White Structure
A small positional error can become much more visible in multi-layer 3D printing.
なぜ?
Because the same structural region is printed repeatedly.
Even small deviations can produce:
- stepped edges
- 凹凸のある側壁
- exposed white
- CMYK offset
- varnish offset
チェック:
Media Feed Stability
The film should move consistently during repeated printing.
Printhead Alignment
Verify the applicable alignment settings.
RIP Position
Confirm that the White, CMYK and Varnish planes share:
- the same dimensions
- the same origin
- the same scale
- the same orientation
Repeated-Pass Accumulation
Determine whether:
- the first passes look aligned
- later structural passes gradually shift
If the error increases with each pass, the issue may be related to repeated positioning rather than the original artwork alone.
Problem 9: White Halo vs Registration Error
These two symptoms deserve separate diagnosis because they are often confused.
White Halo
The white layer is correctly centered but too large.
Typical appearance:
uniform white outline
Likely area:
White Mask / Choke
Registration Error
The white layer is not centered beneath the CMYK.
Typical appearance:
white visible on one side, color overhanging on another
Likely area:
alignment / feed / positioning
Do not solve a mechanical shift by aggressively shrinking the entire White Mask.
That may hide one edge while creating insufficient support elsewhere.
Problem 10: Varnish Shows Visible Bands
Varnish defects can be especially obvious because reflected light makes surface variation easy to see.
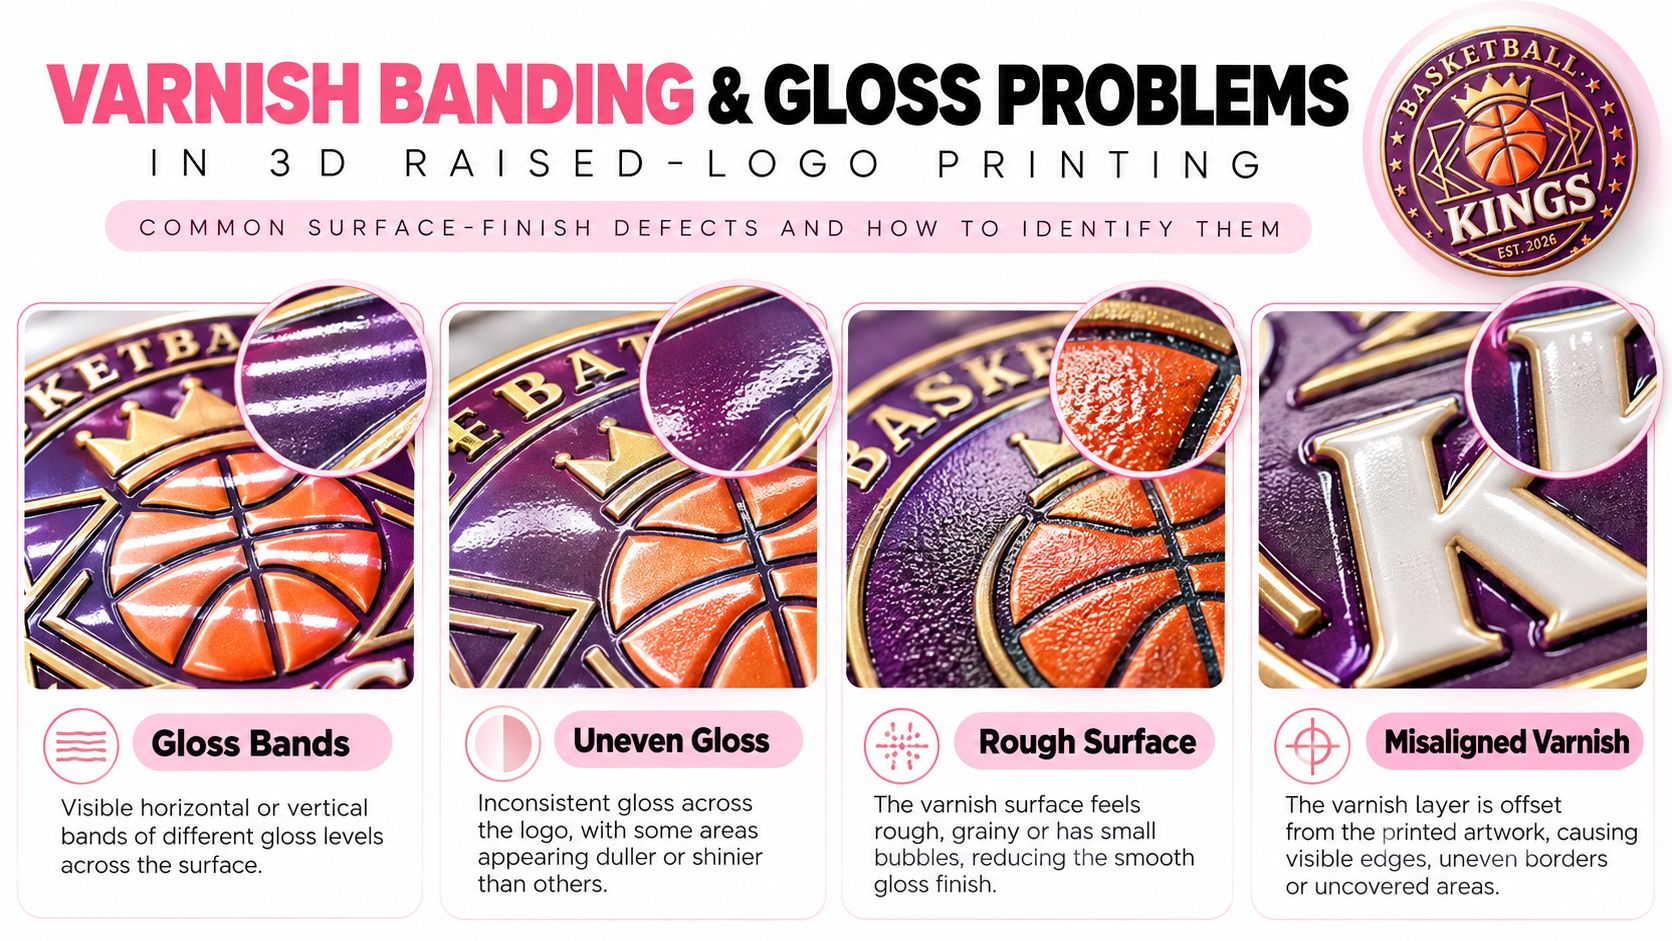
If the surface shows repeated glossy and dull bands, check:
- varnish nozzle condition
- pass pattern
- output consistency
- carriage movement
- curing consistency
First determine whether the banding exists in the varnish output itself or appears only after curing.
Inspect Under Angled Light
A useful inspection method is to tilt the badge under directional light.
Varnish defects often become much easier to identify because the reflected highlight reveals:
- bands
- missed areas
- rough texture
- inconsistent gloss
Problem 11: Some Areas Are Glossy and Others Are Dull
Uneven gloss can have several causes.
Varnish Output Is Inconsistent
Check the varnish nozzle pattern.
UV Curing Is Uneven
The same amount of varnish can appear different when the cure state varies.
Surface Is Contaminated
Dust, oil or debris can interfere with the finishing layer.
Film Is Not Stable or Flat
Surface position can affect print and curing consistency.
Do not immediately increase varnish density until these basic conditions are checked.
Problem 12: Varnish Surface Looks Rough or Grainy
A rough surface may indicate:
- poor varnish atomization/output
- 汚染
- excessive material deposited in one stage
- curing behavior that does not match the varnish layer
- nozzle instability
Compare the defective area with a known-good sample.
Check whether the roughness:
- follows nozzle direction
- appears randomly
- appears only in high-varnish areas
- appears only after curing
The pattern itself can help identify the system responsible.
Problem 13: Varnish Is Misaligned
If varnish extends beyond the intended artwork or misses part of the logo, determine whether the problem exists in:
the file
または:
the physical registration
Check the RIP preview first.
If the Varnish Mask is already shifted in software, fix the artwork or channel mapping.
If the preview is correct but the printed result is shifted, inspect registration, feed and alignment.
Problem 14: Banding Appears in White or CMYK
Banding can come from more than one system.
A useful first diagnosis is to ask which channels are affected.
Only White Has Bands
Focus first on:
- white nozzle condition
- white flow
- stirring
- 循環
- air
- white supply
Only One CMYK Color Has Bands
Focus on that specific color channel.
All Colors Have the Same Repeating Pattern
Investigate:
- film feeding
- 印刷位置調整
- carriage movement
- 印刷モード
- RIP / pass behavior
Only the Gloss Appears Banded
焦点を当てる:
- ワニス
- 硬化
- 表面仕上げ
This channel-based approach is faster than treating every banding problem as a generic nozzle issue.
Problem 15: The Logo Looks Good at First but Changes During a Long Batch
This is an especially useful production clue.
If the first badges look good but later badges show:
- lower white height
- weaker white density
- ノズルがありません
- inconsistent varnish
- more banding
investigate systems that change during sustained printing.
These can include:
- ink supply
- white circulation
- pigment stability
- air entering the line
- supply restriction
- ink temperature / operating stability
- accumulating contamination
A defect that grows gradually during production often has a different cause from a defect that appears identically on the very first print.
A Better Troubleshooting Order
When several problems appear at once, use a fixed diagnostic sequence.
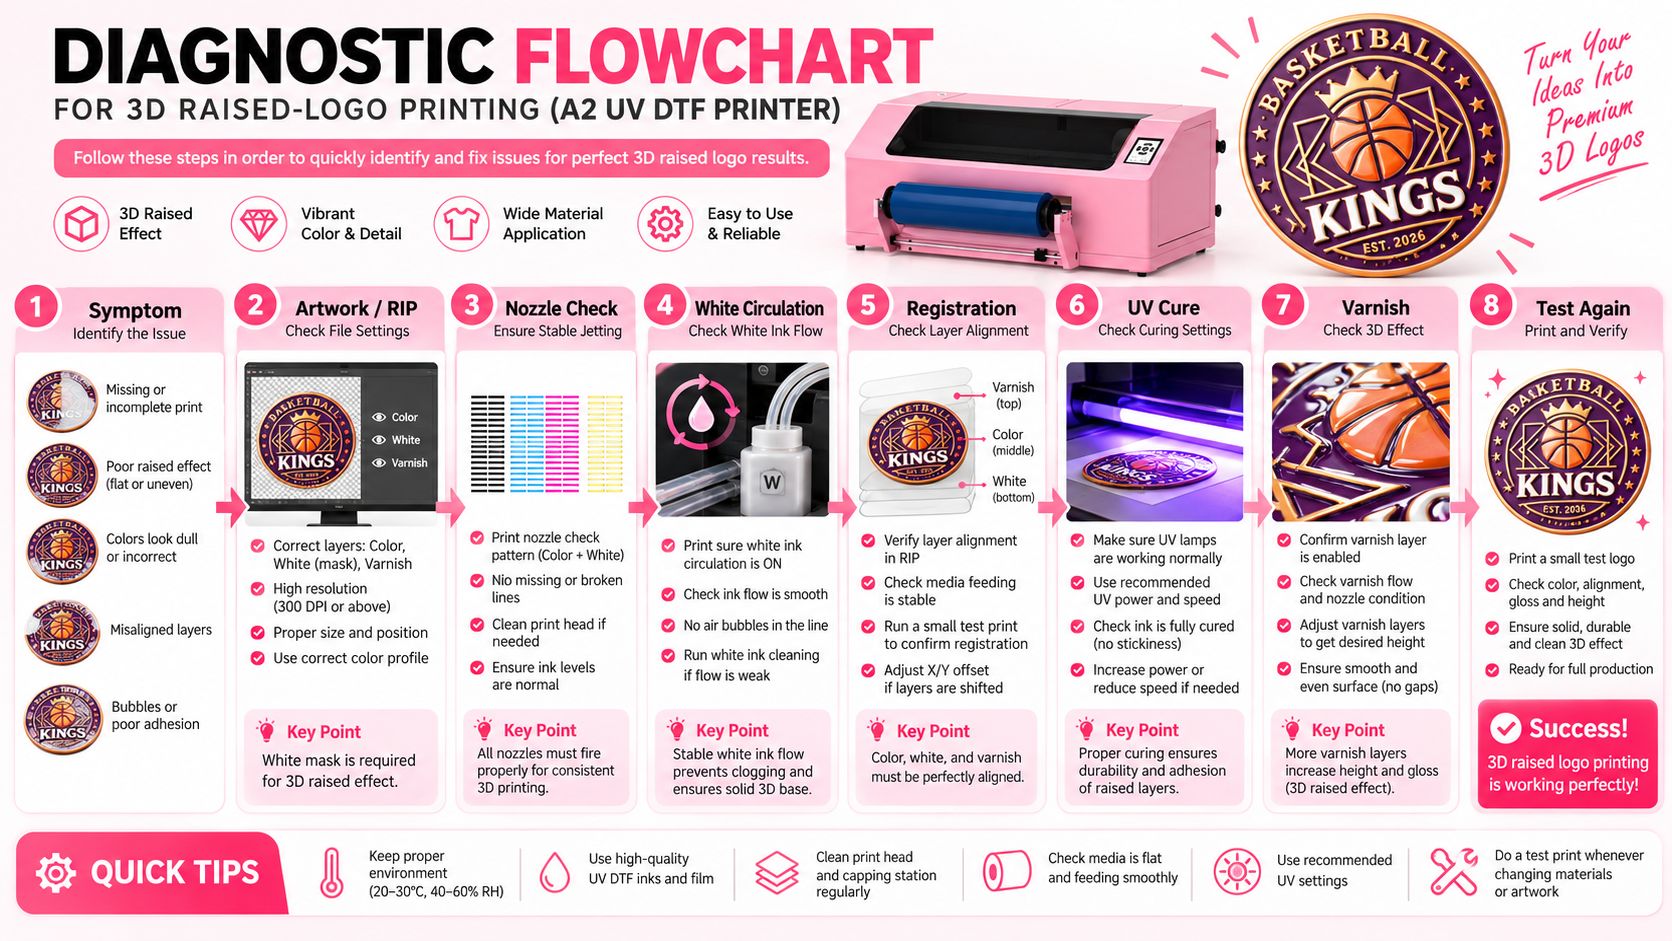
Step 1 — Identify the Symptom
Do not start by changing settings.
First describe the problem precisely:
- low height
- missing white
- バンディング
- white halo
- shifted color
- sticky surface
- ひび割れ
- poor gloss
Step 2 — Check Artwork and RIP
確認する:
- structural white
- cmyk
- ワニス
- layer position
- spot mapping
Step 3 — Run a Nozzle Check
Determine whether every required channel is complete.
Step 4 — Check White Ink Delivery
For white-related problems inspect:
- stirring
- 循環
- ink condition
- air
- flow
Step 5 — Check Registration
探す:
- feed stability
- layer shift
- repeated-pass error
- アライメント
Step 6 — Check UV Curing
Confirm the thick structure is curing progressively and consistently.
Step 7 — Check Varnish
検査:
- varnish nozzles
- mask
- アライメント
- gloss consistency
- 硬化
Step 8 — Print a Small Test
Do not restart full production immediately.
Print a controlled sample.
チェック:
- 身長
- 登録
- 柔軟性
- 光沢
- 硬化
Then change only one additional variable if necessary.
Do Not Change Multiple Variables at Once
Imagine a low-height badge.
If you simultaneously:
- increase white passes
- increase white ink density
- increase UV power
- slow the print mode
and the result improves, you still do not know what solved the original problem.
Worse, one change may have solved the problem while another created unnecessary rigidity.
A better production-development process is:
Change One Variable
↓
印刷
↓
検査する
↓
Record Result
↓
Keep or Revert
This makes the final production profile repeatable.
When Is the Problem No Longer a Printing Problem?
This guide focuses on problems that exist before the badge is transferred to the garment.
If the printed badge:
- has correct height
- is properly cured
- has clean registration
- has good varnish
- remains flexible
- passes pre-transfer inspection
but problems occur only after heat pressing, move to the heat-transfer workflow.
例としては次のものが挙げられます。
- logo edges lifting from the garment
- hoodie transfer bonding unevenly
- carrier peeling incorrectly
- ポリエステルの染料移行
- press marks
- 衣服の焦げ
- cap pressure problems
Those issues are covered in the T シャツ、パーカー、キャップ、ジャージ用の 3D 浮き彫りロゴ熱伝達ガイド。
この区別は重要です。
Do not keep changing printer settings to solve a problem caused by the heat press.
Recommended Pre-Production Quality Check
Before contour cutting and heat transfer, inspect every new 3D raised-logo profile.
White Structure
チェック:
- required height
- uniform buildup
- no missing areas
- no severe sidewall defects
cmyk
チェック:
- 色
- 詳細
- 登録
- no exposed structural white
ワニス
チェック:
- intended gloss
- smooth surface
- correct registration
- no visible banding
硬化
チェック:
- no sticky surface
- no unstable internal structure
- no obvious wrinkling
- reasonable flexibility
曲げ試験
Gently flex the sample.
探す:
- ひび割れ
- 層分離
- excessive rigidity
Only after the print itself is stable should the badge move to contour cutting and garment transfer.
Why Printer Configuration Matters for 3D Raised Logos
A 3D raised-logo workflow places different demands on a UV printer than a simple thin-layer decorative print.
The production system needs to support:
- independent high-build white output
- 柔軟なCMYK
- ワニス
- 繰り返しの構造印刷
- 制御されたLED-UV硬化
- stable white-ink stirring and circulation
エラスマート A2 UV DTFプリンター can be configured as the printing platform for this application when paired with the appropriate flexible UV ink, TPU film and production workflow.
For the broader application system, see UV DTF テクノロジーによる 3D 浮き彫りロゴ印刷。
Final Troubleshooting Checklist
Before changing the structural white profile, confirm:
アートワーク
- White Mask correct
- CMYK correct
- Varnish Mask correct
- layers registered
- RIP mapping verified
プリントヘッド
- White nozzle check complete
- CMYK nozzle check complete
- varnish nozzle check complete
ホワイトインクシステム
- ink properly mixed
- stirring operating
- circulation operating
- no obvious air in line
- stable flow during continuous printing
Mechanical / Feed
- film feeding consistently
- print alignment correct
- repeated passes remain registered
UV硬化
- surface not sticky
- structure stable
- no obvious wrinkling
- no excessive brittleness
ワニス
- no banding
- gloss consistent
- mask correct
- registration correct
Only then should you increase or reduce the structural build.
最終的なポイント
3D raised-logo troubleshooting becomes much easier when every defect is assigned to the correct system.
覚えて:
Low Height does not always mean too few white passes.
It can also mean:
- wrong White Mask
- ノズルがありません
- unstable white flow
A White Edge does not always mean insufficient choke.
それは次のようなものかもしれません:
- mask size
- 登録
Wrinkling does not always mean too little curing.
The thick structure may also be experiencing an unsuitable curing balance.
Poor Gloss does not always mean more varnish is required.
It may come from:
- nozzles
- アライメント
- 硬化
- 汚染
The most reliable method is:
Diagnose → isolate → test → change one variable → verify again.
For the full production workflow, continue with UV DTF プリンターで 3D 浮き彫りロゴを作成する方法。
For white height building, read UV DTF 印刷で白インク層が 3D 隆起効果を作成する方法。
For White / CMYK / Varnish file preparation, see the 3D 浮き彫りロゴ アートワーク ガイド。
And if the print is good but the transferred garment fails, use the 3D 隆起ロゴ熱伝達ガイド。
よくある質問
Why is my 3D raised logo too flat?
Do not immediately add more white passes. First check the structural White Mask, white nozzle condition and white ink delivery. If those are stable, then evaluate the structural build profile.
Why does my white ink become weak during long printing jobs?
Possible causes include pigment instability, poor circulation, air in the ink line or restricted white ink delivery. Compare the nozzle check before and after sustained printing.
Why does white ink need stirring and circulation?
High-build flexible white ink contains a high concentration of pigment and solids. Stirring and circulation help maintain uniform ink concentration and reduce settling-related instability.
Why do I see a white outline around my logo?
If the white outline is visible relatively evenly around the logo, the White Mask may be too large. If white is mainly visible on one side, investigate registration and feed stability.
Why is my CMYK shifted away from the raised white structure?
Check media feeding, print alignment, RIP positioning and repeated-pass registration. Small positioning errors become more obvious when multiple structural layers are stacked.
Why does the thick UV ink wrinkle?
Possible causes include excessive material buildup or a curing strategy that does not match the thick flexible ink structure. Avoid changing UV energy blindly; validate the complete ink, pass and curing profile.
Why does the printed logo crack when I bend it?
The badge may be excessively thick, overly rigid, improperly cured or produced with an unsuitable ink system. The target is controlled height plus flexibility, not maximum thickness.
Why does my varnish have visible lines?
Check varnish nozzles, output consistency, pass pattern, registration and UV curing. Determine whether the bands are printed into the varnish or appear mainly after curing.
Why is part of the logo glossy and another part dull?
Possible causes include inconsistent varnish output, uneven curing, contamination or surface instability. Check the Varnish Mask and nozzle condition before simply increasing varnish.
Should I increase UV power if the surface is sticky?
Not automatically. A sticky surface indicates that the curing system and total ink build need to be checked. UV power, carriage speed, layer thickness and ink system all interact.
When should I stop troubleshooting the printer and check the heat press?
If the badge has correct height, registration, gloss, curing and flexibility before transfer but fails only after application to the garment, the problem is likely in the heat-transfer stage rather than the printing stage.
Can the same troubleshooting settings be used for every 3D logo?
No. Logo geometry, total build, ink, film, print mode and target height can change the optimal production profile. Establish and record validated settings for each major product type.
あなたも好きかもしれません
著作権2020©Erasmart。 | サイトマップ