小型サイズのフラットベッドインクジェットプリンターメーカー

木材に印刷する方法: UV 印刷、準備、カスタム製品の実践ガイド
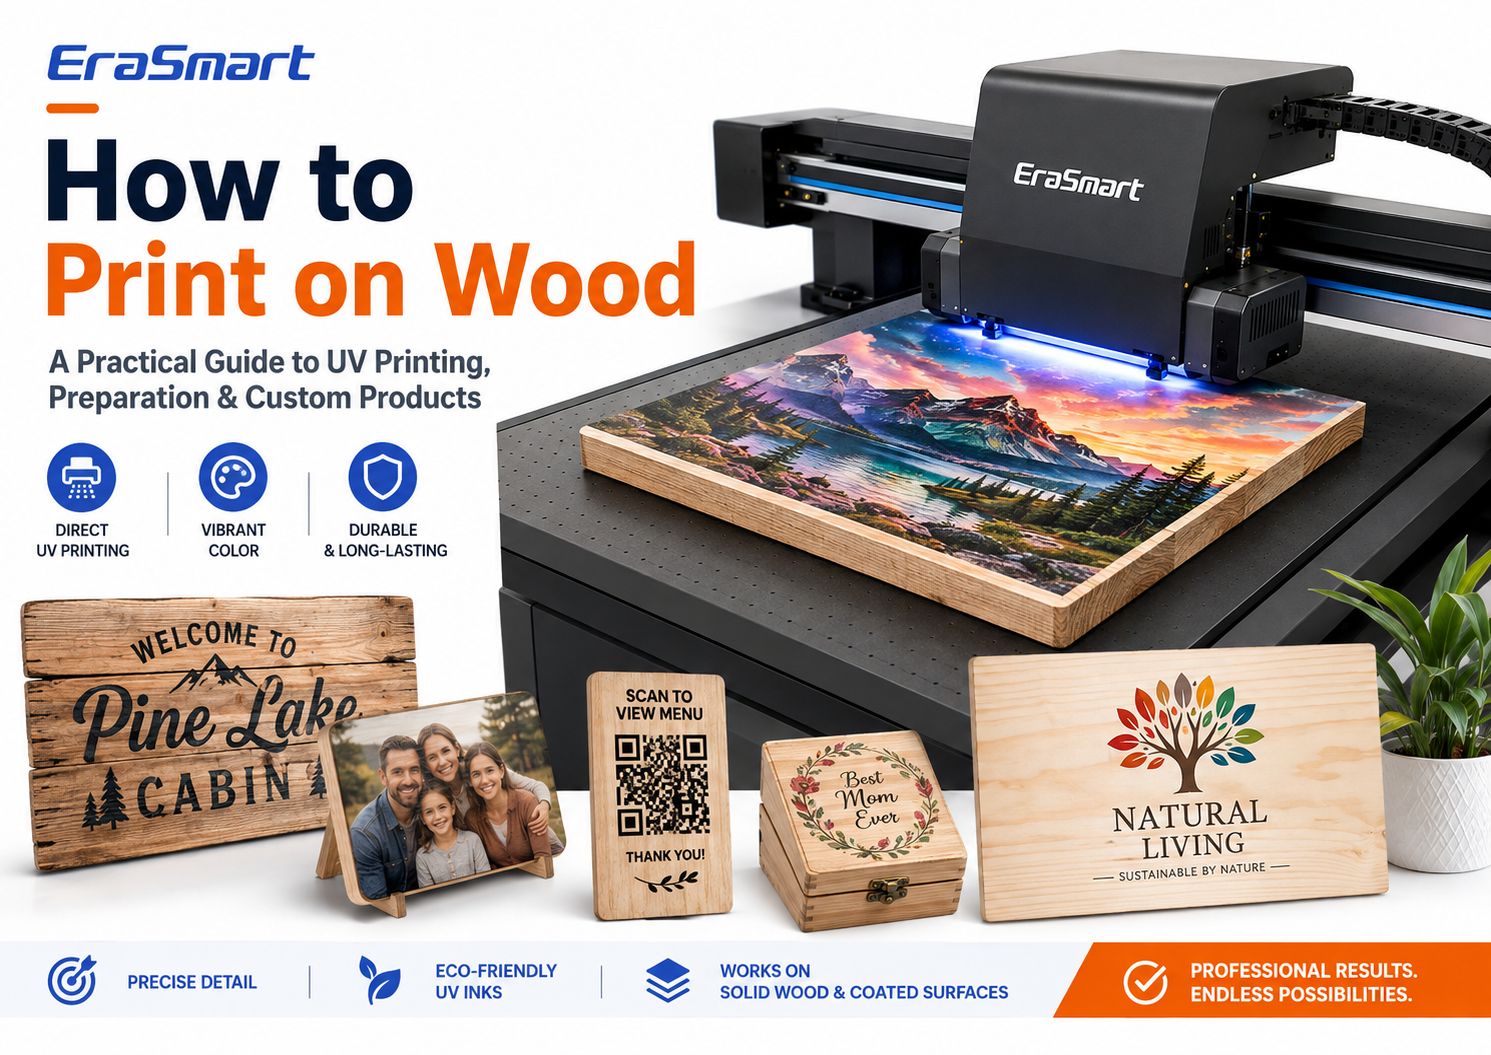
はい、木材に直接印刷できます。
プロのフルカラーカスタマイズの場合、UV フラットベッド印刷は、転写紙を使用せずに CMYK、白インク、およびオプションのワニスを適切な木製の表面に直接配置できるため、最も実用的な方法の 1 つです。
これにより、木製看板、写真楯、QR コード ディスプレイ、賞状、ギフト ボックス、コースター、メニュー ボード、室内装飾品、ブランド製品、パーソナライズされたギフトなどを小規模または中規模のバッチで生産することが可能になります。
しかし、木材印刷を成功させるには、単に木の板を UV プリンターに置き、印刷ボタンを押すだけでは済みません。
木材は天然素材です。粒子、多孔性、ほこり、湿気、表面コーティング、平坦度、油、ワックス、質感はすべて、印刷品質とインクの付着に影響を与える可能性があります。
滑らかなバーチ合板パネルは、粗いパイン材とは非常に異なる動作をする可能性があります。生の竹板は漆塗りの竹製品とは異なる動作をする場合があります。見た目が似ている 2 つのウッドブランクでも、コーティングが異なれば、異なる結果が生じる可能性があります。
したがって、専門的なアプローチは次のとおりです。
表面を準備する → 素材をテストする → 適切な白インク戦略を選択する → サンプルを印刷する → 接着力をチェックする → ワークフローを標準化する
このガイドでは、木材に印刷する主な方法、ダイレクト UV 印刷の仕組み、印刷しやすい木材の表面、材料の準備方法、白インクをいつ使用するか、再現可能な生産ワークフローの作成方法、およびどのような製品を構築できるかについて説明します。EraSmart UV プリンター。
簡単な答え: 木材に印刷する最良の方法は何ですか?
すべての木製品に最適な唯一の方法はありません。
適切な方法は次の要素によって決まります。
- 木材が生か塗装されているかどうか
- フルカラーが必要かどうか
- 白インクが必要かどうか
- 注文数量
- 表面形状
- 設計の複雑さ
- 必要な仕上げ
- 生産速度
- 製品が DIY 工芸品であるか商業製品であるか
平らな木製製品の商用フルカラーカスタマイズの場合、ダイレクト UV 印刷は最も柔軟なオプションの 1 つです。
アートワークを表面に直接印刷できるため、次のような場合に特に便利です。
- フルカラーグラフィックス
- 写真
- ロゴ
- 白インク
- 小ロット生産
- パーソナライズされた名前
- 可変デザイン
- 繰り返される商品テンプレート
ただし、他の方法にも独自の用途があります。
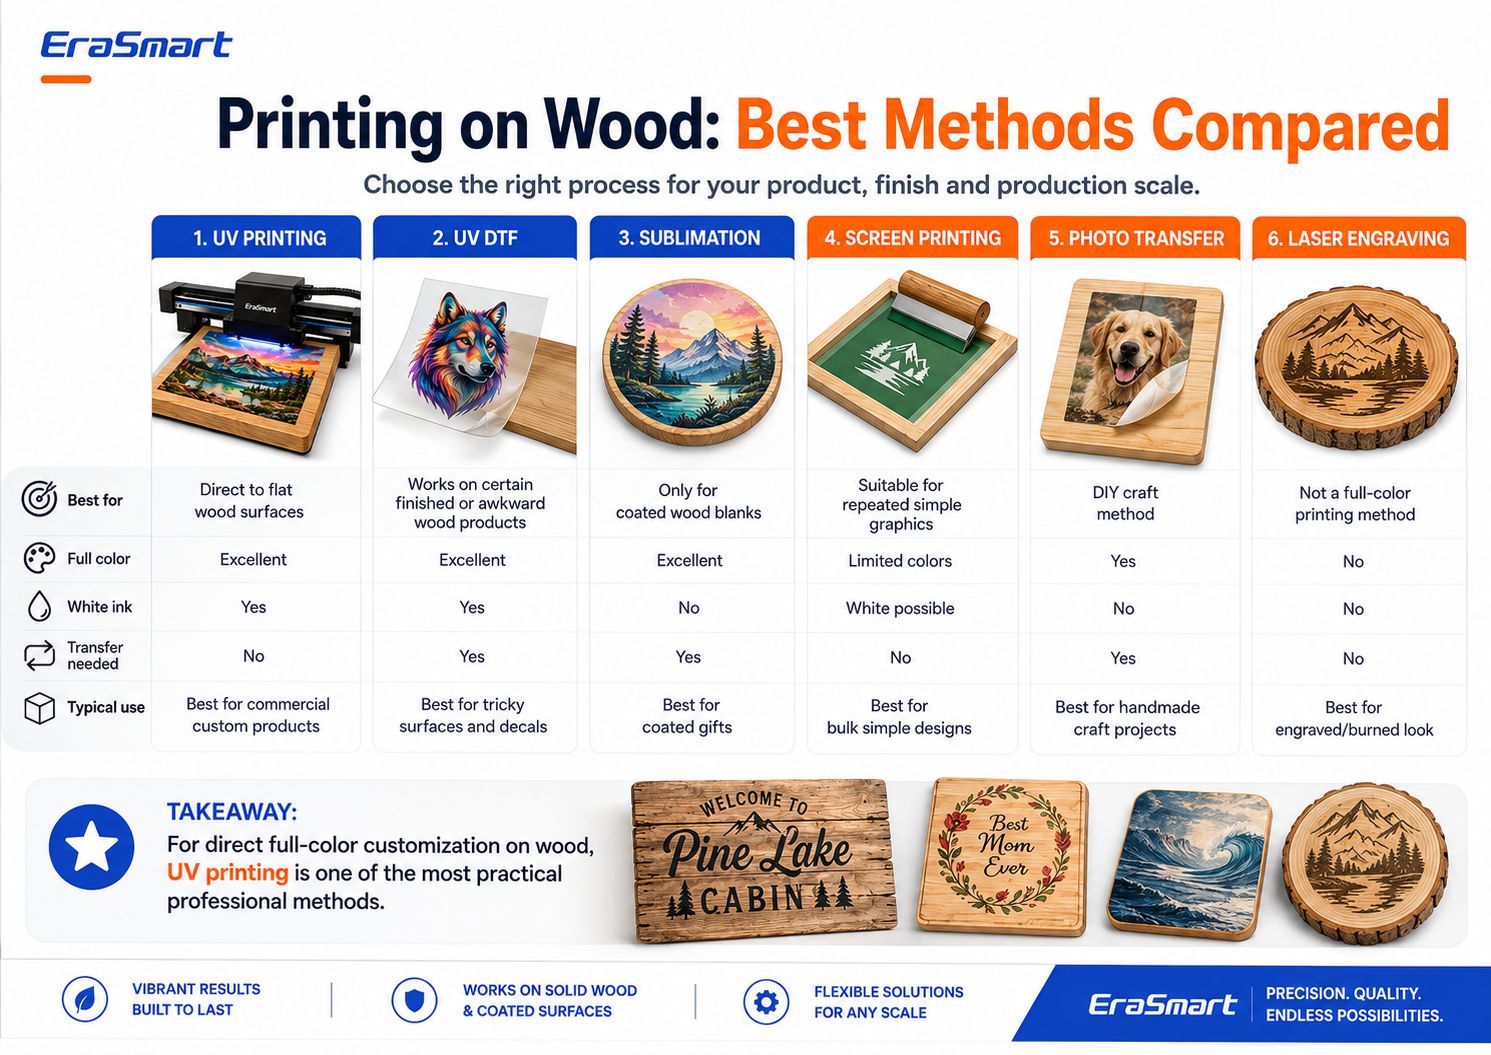
| 方法 | フルカラー | ホワイトインク | 転送が必要です | ベストユース |
|---|---|---|---|---|
| UV印刷 | 素晴らしい | はい | いいえ | 商用直接木材カスタマイズ |
| UV DTF | 素晴らしい | はい | はい | 完成品や位置決めが難しい製品 |
| 昇華 | 素晴らしい | いいえ | はい | 昇華コーティングされたウッドブランク |
| スクリーン印刷 | 設定による制限 | 可能 | いいえ | 繰り返されるシンプルなグラフィック |
| 写真の転送 | はい | いいえ | はい | DIY クラフト プロジェクト |
| レーザー彫刻 | フルカラーなし | いいえ | いいえ | 焦げたまたは彫刻された木の効果 |
重要な点は、木に印刷する単一のプロセスではありません。
販売したい完成品に応じて方法を選択してください。
UV 印刷が木材に適している理由
UV プリンターは、印刷プロセス中に UV 光によって硬化するインクを使用します。
転写紙に頼らず、プリンターが木の表面に直接インクを噴射します。
適切な木材製品の場合、これによりいくつかの利点が生まれます。
直接印刷
アートワークはボードに直接印刷されます。
これにより、以下が必要なワークフローと比較して、生産ステップを削減できます。
- 転写紙
- 別途接着剤
- 熱伝達
- 手動で写真を転送
フルカラーのアートワーク
UV 印刷は次のようなデザインに適しています。
- 写真
- カラフルなイラスト
- ロゴ
- 風景
- 結婚式のグラフィックス
- 装飾的な模様
- QRコード
- パーソナライズされた名前
- 製品のブランディング
ホワイトインク
天然の基材は白くないため、白インクは木材に特に役立ちます。
白インクを使用すると、より強い不透明度とより予測可能な色を作成できます。
ワニス効果
互換性のある UV プリンタ構成では、次の目的でワニスを選択的に追加できます。
- スポットグロス
- 詳細を浮き彫りにした
- ロゴのハイライト
- 装飾的なアクセント
- プレミアムな表面効果
小バッチのカスタマイズ
デジタル印刷により、以下の製品の生産が容易になります。
- 写真プレート 1 枚
- 十の異なる名前
- 複数の QR サイン
- 短期間のギフト商品
- パーソナライズされたウェディングアイテム
- 地元企業の看板
デザインごとに従来の印刷スクリーンや版を個別に作成する必要はありません。
UV印刷できる木材の種類は何ですか?
UV プリンターは多くの木製および木質素材に対応できますが、木の種類だけで印刷品質が決まるわけではありません。
表面の状態も同様に重要です。
一般的な材料には次のものがあります。
- 白樺合板
- メープル
- 松
- 竹
- MDF
- 塗装された木材
- 塗装された木材
- 封印された木
- 準備された広葉樹パネル
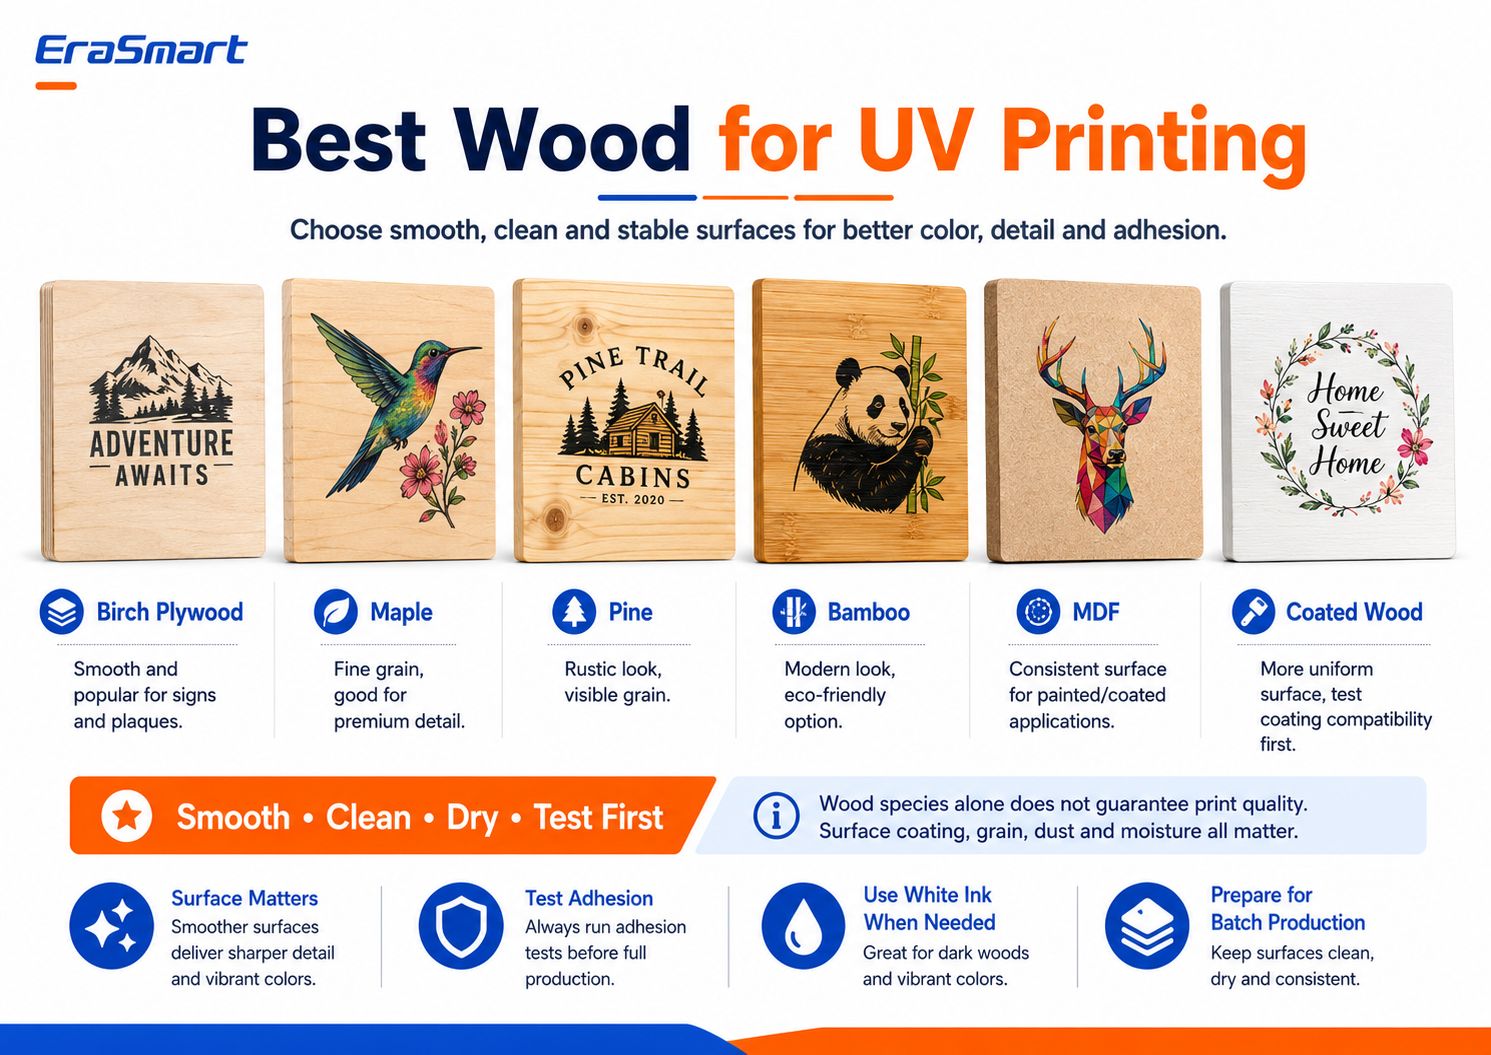
バーチ合板
バーチ合板は次の用途で人気があります。
- 兆候
- プラーク
- 装飾品
- パーソナライズされたギフト
滑らかな合板の表面は、詳細なディテールと予測可能な位置を提供します。
ただし、合板の品質は異なります。反り、表面の欠陥、ベニヤの一貫性を確認します。
メープル
メープルは比較的木目が細かいため、細部が重要な製品に適しています。
次のような場合に適している可能性があります。
- プレミアムプラーク
- 写真製品
- 小さな標識
- ブランドギフト
パイン
パイン材はより素朴な外観を提供します。
特に完全な白い下地なしで印刷する場合、目に見える木目や節がデザインの一部になることがあります。
ただし、粗いパイン材の場合は、追加のサンディングと準備が必要な場合があります。
竹
竹製品は次のような用途で人気があります。
- ギフト
- 装飾
- キッチンアクセサリー
- プラーク
- ブランド品
完成した竹製品の表面コーティングは異なる場合があるため、製造前に正確な製品をテストしてください。
MDF
MDF は、天然の木目よりも均一な製造表面を提供します。
次の場合に役立ちます。
- 塗装されたパネル
- 看板
- 装飾
- ディスプレイ製品
未加工の MDF は多孔質であるため、その表面状態とコーティングまたはシーリングプロセスを製造前に評価する必要があります。
コーティングされた木材
コーティングまたは塗装された木材は、より均一な外観を提供できます。
ただし、コーティングによって別の変動が生じます。
UV インクはそのコーティングに適切に接着しますか?
光沢のあるコーティング、ワックス、ラッカー、ペイント、シーラント、または低表面エネルギー仕上げは、接着に影響を与える可能性があります。
必ず実際に完成した材料をテストしてください。
最も重要なルール: 滑らか、清潔、乾燥、安定
UV 印刷用の木材を選択するときは、次の 4 つの特徴を確認してください。
スムーズ
一般に、表面が滑らかになると、テキストが鮮明になり、線がきれいになり、画像の詳細がより一貫したものになります。
クリーン
サンディングや取り扱いから出る粉塵は、印刷や接着を妨げる可能性があります。
ドライ
湿気は表面や製品の長期安定性に影響を与える可能性があります。
安定した
プリントヘッドのクリアランスが安全かつ安定するように、ボードは十分に平らに設置する必要があります。
これは、単にリストから種を選択することよりも重要です。
UV 対応基板の詳細については、EraSmart を参照してください。UV プリンター材料ガイド。
生の木材とコーティングされた木材
生の木材と塗装された木材は、異なる機会を生み出します。
原木への印刷
原木は自然素材の特徴を保ちます。
これは、木目を意図的にデザインの一部にしている場合に便利です。
利点は次のとおりです。
- 自然な外観
- 素朴な効果
- 目に見える木の質感
- ユニークな製品バリエーション
課題には次のようなものがあります。
- より大きな気孔率
- 不均一な木目
- ほこり
- 表面繊維
- 可変吸収
- 一貫性のない接着
生の木材は通常、慎重に研磨して洗浄することで効果が得られます。
塗装または密封された木材への印刷
コーティングされた木材は、より均一な視覚的な表面を提供できます。
考えられる利点:
- より滑らかな仕上がり
- より一貫した外観
- 目立ちにくい粒子
- 場合によってはより予測可能な色
ただし、コーティング自体が UV インクと互換性がある必要があります。
潜在的な問題には次のようなものがあります。
- 粘着力が弱い
- 引っ掻く
- ピーリング
- 互換性のない表面にインクが残っている
このため、最も安全なアプローチは次のとおりです。
木材の名前だけを根拠に、その木材の製造を承認することは決してありません。正確なブランク製品または完成品をテストします。
UV印刷前の木材の準備方法
表面処理は、プロセス全体の中で最も重要な部分の 1 つです。
ステップ 1: ボードを検査する
チェック:
- 平坦度
- 傷
- へこみ
- 結び目
- 緩い繊維
- コーティング
- 反る
- 水分
- オイルまたはワックス
どの表面を作業しているのかがわかるまでは、印刷を開始しないでください。
ステップ 2: 必要に応じて研磨する
ボードが粗い場合は、軽くサンディングすると、より安定した印刷面を作成できる場合があります。
必ずしも天然木の特徴を取り除くことが目的ではありません。
目標は以下を排除することです。
- 緩い繊維
- 大まかな最高点
- 破片
- 望ましくない表面欠陥
通常、細かいサンディングは、粗い未仕上げの表面を残すよりも、プリントの準備に適しています。
ステップ 3: サンディングダストをすべて除去する
このステップは過小評価されがちです。
木の粉塵が次の障害を引き起こす可能性があります。
- インクの配置
- エッジの鋭さ
- 接着力
- 最終的な外観
適切な糸くずの出ないクリーニング方法を使用し、印刷前に表面がきれいであることを確認してください。
ステップ 4: 油と汚れを除去する
一部の完成した木製製品には次のものが含まれる場合があります。
- 油
- ワックス
- 研磨剤
- 指紋
- 製造残渣
これらによりインクの付着が減少する可能性があります。
ステップ 5: 既存のコーティングを確認する
製品が塗装、シール、ラッカー塗装、またはコーティングされている場合は、接着テストを実行してください。
すべての塗装または密閉された木材製品が自動的に UV 印刷可能であるとは考えないでください。
ステップ 6: 実稼働前にテストする
同じものを使用して小さなサンプルを印刷します。
- 木材
- 表面処理
- アートワークの種類
- 白インク戦略
- 硬化設定
最終的な顧客の注文に使用する予定のもの。
特定の基材に必要な場合は、適切なプライマーまたは前処理により接着性が向上する場合があります。
すべての木材に自動的にプライマーを使用しないでください。
材料がそれを必要とすることがテストで判明した場合に使用します。
ウッドプリント用のアートワークを準備する
優れた木版画は、材料が印刷機に届く前から始まります。
チェック:
- 最終製品寸法
- アートワークの解像度
- ロゴ
- 文字サイズ
- 画質
- 白インク層
- ワニス層
- 透明な領域
- 出血する
- 安全マージン
ラスターアートワーク
写真や詳細なイラストについては、最終印刷サイズで 300 DPIは、クローズビュー製品の実用的な出発点です。
ベクターアートワーク
ベクター ファイルは次の場合に適しています。
- ロゴ
- QRコード
- 文章
- アイコン
- 線画
- ブランドグラフィックス
サイズ変更しても鮮明なままになるためです。
画面だけでなく木材にも配慮したデザイン
白いコンピューターキャンバスで作成したデザインは、天然木に印刷するとまったく違って見える場合があります。
これが、白インクの決定が非常に重要である理由です。
ホワイトインクとナチュラル木目、どっちを選ぶべき?
これは、木材への UV 印刷において最も重要な創造的な決定の 1 つです。
現実的なアプローチは 3 つあります。
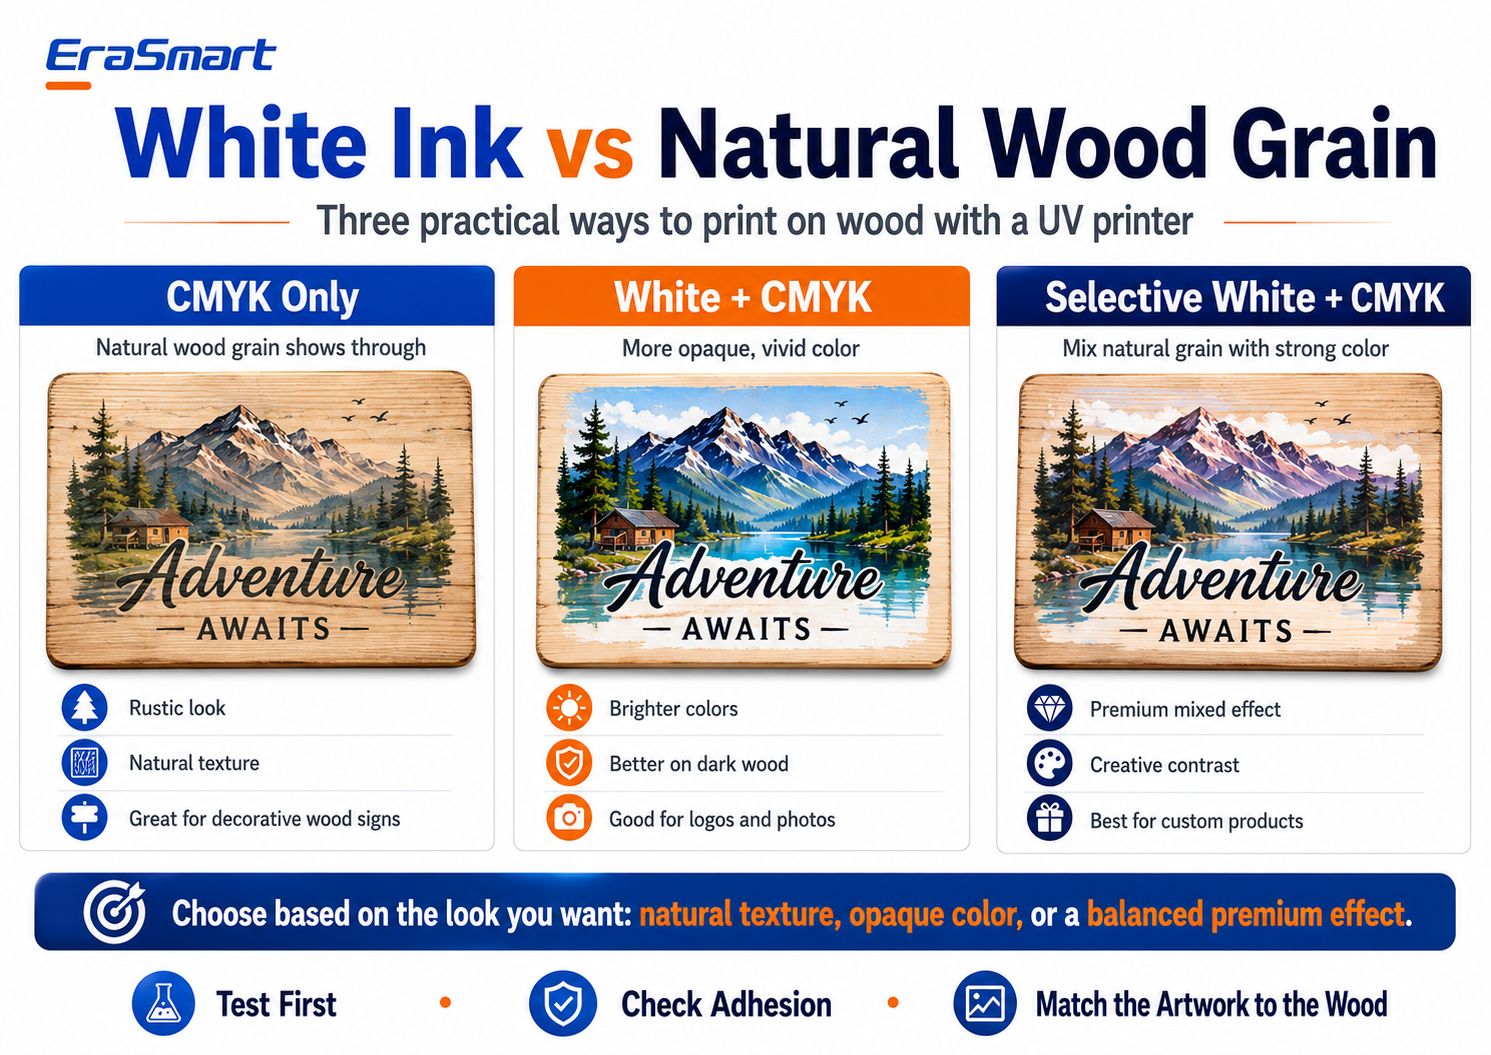
オプション 1: CMYK のみ
CMYKのみの印刷では、アートワークの明るい部分を通しても天然木が見え続けます。
これにより、次のものが作成される可能性があります。
- 素朴な外観
- ヴィンテージの外観
- 自然な質感
- 手作り感
これは、木の背景用に意図的に作成されたデザインに特に適しています。
適切な製品には次のものがあります。
- キャビンサイン
- 装飾プレート
- カフェの看板
- 素朴な贈り物
- 自然な家の装飾
重要な制限は、色の予測可能性です。
基材は白ではなく茶色または黄褐色であるため、最終的な色は木材と相互作用します。
明るい部分は、画面上よりも暗く見えたり、透明になったりする場合があります。
オプション 2: ホワイト + CMYK
白いアンダーベースは、カラーアートワークの下に、より不透明な基盤を作成します。
これは次のような場合に役立ちます。
- より強い色
- 明るい写真
- より鮮明なロゴ
- より一貫したブランドカラー
- ダークウッドでの視認性が向上
典型的なアプリケーションには次のようなものがあります。
- 写真
- ビジネスロゴ
- カラフルなイラスト
- 製品のブランディング
- 詳細なアートワーク
ホワイト+CMYKにより天然木の色の影響を軽減します。
オプション 3: 選択的ホワイト + CMYK
選択的な白は、多くの場合、高級木材製品にとって最も興味深い選択肢です。
画像全体の下に白を印刷するのではなく、不透明度が必要な場所にのみ白を使用します。
例えば:
- 色とりどりの風景の下にある白
- 背景の木の領域に白はありません
- 会社ロゴの下は白
- 装飾要素の周りの自然な木目
これにより、次の組み合わせが作成されます。
天然木 + 制御されたフルカラー
完成品に、より意図的にデザインされた外観を与えることができます。
どの白インク モードを使用する必要がありますか?
単純な決定ルール:
最大限の自然な質感をお求めですか?
CMYKのみを使用してください。
より予測可能な鮮やかな色が必要ですか?
ホワイト+CMYKを使用します。
プレミアムな混合効果が必要ですか?
選択的ホワイト + CMYK を使用します。
最適なオプションは、アートワークと製品の配置によって異なります。
木材に UV 印刷する方法を段階的に説明します。
素材とアートワークが準備できたら、再現可能な制作プロセスを構築します。
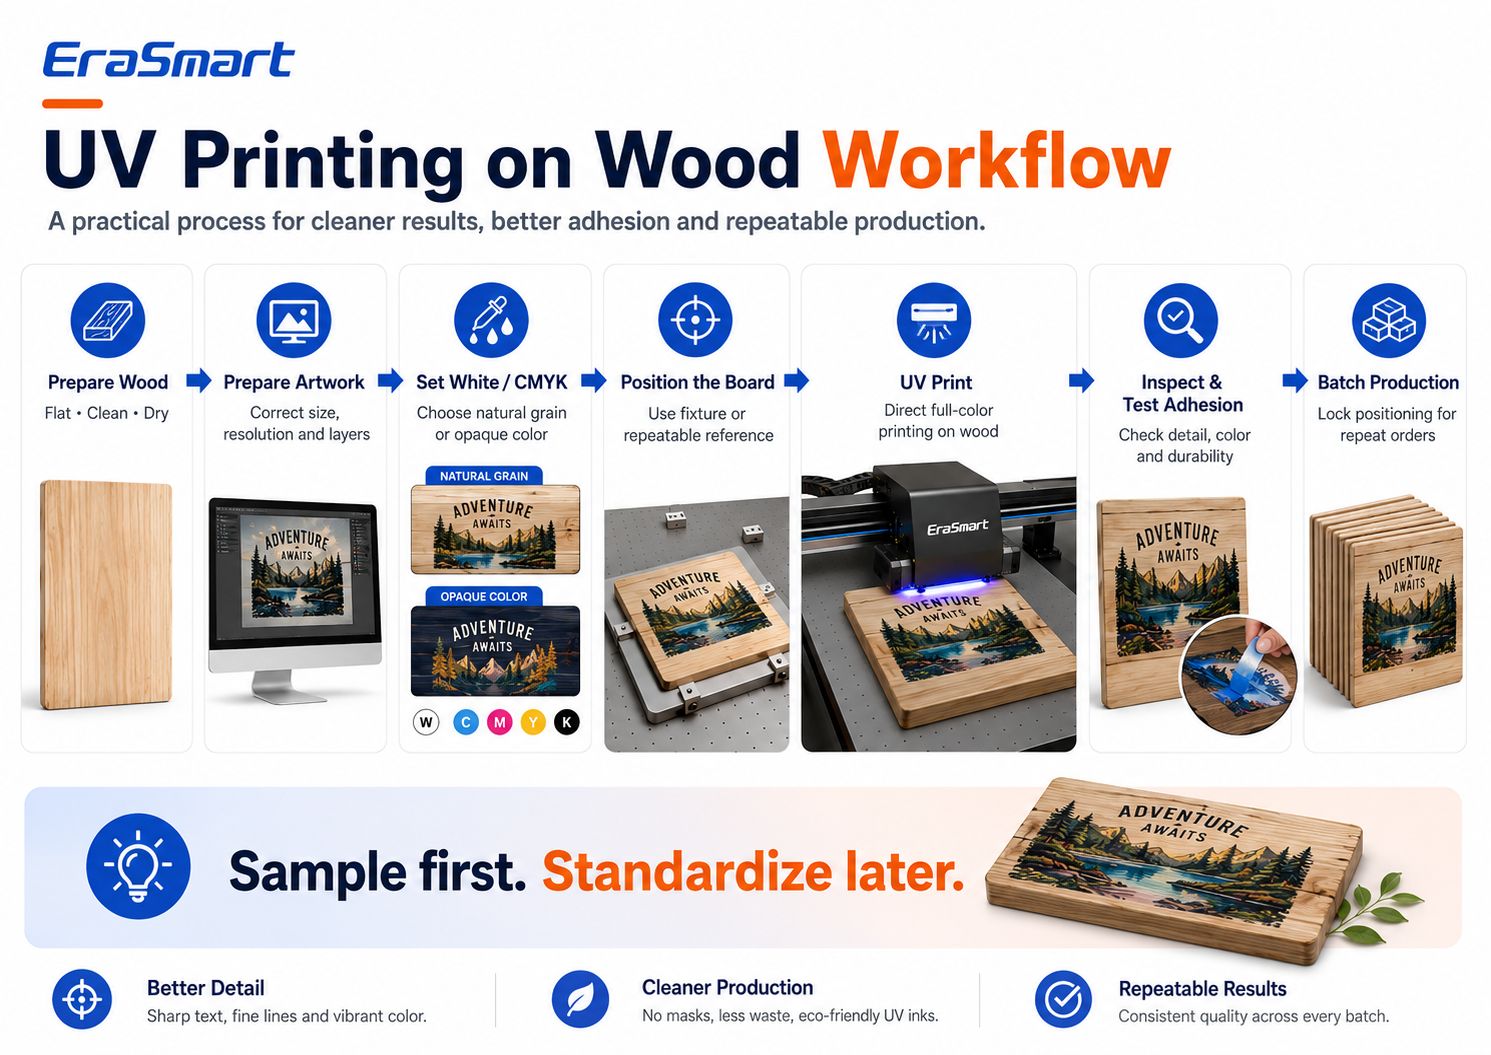
ステップ 1: 木材を準備する
ボードが次の状態であることを確認してください。
- クリーン
- ドライ
- フラット
- ほこりのない
- テストに適した
ステップ 2: アートワークを準備する
セット:
- 最終寸法
- 画像解像度
- 印刷位置
- CMYKレイヤー
- 白インク層
- 必要に応じてワニス層を塗る
ステップ 3: ホワイト インク戦略を選択する
次のいずれかを決定します。
- CMYKのみ
- 白+CMYK
- 選択白 + CMYK
ジョブをプリンターに送信する前に。
ステップ 4: ボードの位置を決める
木材を印刷プラットフォーム上にしっかりと置きます。
リピート商品の場合は、次の使用を検討してください。
- 位置決めマーク
- エッジ参照
- 備品
- 治具
- テンプレート
これにより、位置合わせの誤差が軽減されます。
ステップ 5: 印刷高さを設定する
正しいプリントヘッドのクリアランスが重要です。
サーフェスがひどく歪んでいたり、位置が高すぎると、次のような問題が発生する可能性があります。
- 印刷品質の問題
- 噴射距離が間違っている
- プリントヘッドの潜在的なリスク
ひどく反った木材を補正するためにプリンターを使用しないでください。
安定した十分に平らな製品を使用してください。
ステップ 6: 1 つのサンプルを印刷する
100 個のバッチをすぐに開始しないでください。
最初に 1 つのサンプルを印刷します。
チェック:
- 色
- 詳細
- 白インクの位置合わせ
- 印刷位置
- 接着力
- 耐傷性
- 全体的な外観
ステップ 7: 接着力のテスト
硬化後、インク層が意図した用途に適しているかどうかをテストします。
正確なテストは製品によって異なります。
屋内装飾用の銘板には、頻繁に扱われるアイテムとは異なる要件があります。
ステップ 8: 位置をロックする
サンプルが承認されたら:
- RIP設定を保存する
- X/Y位置を記録する
- 治具を標準化する
- ボードのサイズを文書化する
ステップ 9: バッチ生産を開始する
より再現性の高いワークフローで複数の作品を生産できるようになりました。
ステップ 10: 最終 QC
各バッチについて次のことを確認します。
- アライメント
- ノズルの欠陥
- 傷
- 基板の欠陥
- 間違ったアートワーク
- カラーバリエーション
- 接着の問題
これは、パーソナライズされたジョブの場合に特に重要です。
まずはサンプル。後で標準化します。
趣味での印刷とプロの制作との大きな違いの 1 つは標準化です。
単一の木製看板の場合は、手動での位置決めが許容される場合があります。
同一のカフェ QR サインを 50 枚作成する場合、目標は次のようになります。
同じ素材 + 同じ治具 + 同じ RIP プリセット + 同じ位置 + 同じ QC
これにより、以下が削減されます。
- セットアップ時間
- 誤植
- 無駄なブランク
- 顧客からの苦情
リピート注文用に木材を配置する方法
同じ木材ブランクを定期的に印刷する場合は、反復可能な位置決めシステムを作成します。
考えられるアプローチは次のとおりです。
- コーナーストップ
- 物理的な治具
- 印刷されたテンプレート
- 定規の位置決め
- 専用治具
目標は、すべての製品の場所を手動で推測することを避けることです。
たとえば、顧客が 30 個の木製メニュー看板を注文した場合:
- 同じ基板寸法を使用する
- 基板を同じ基準位置に固定します
- RIP座標をロックする
- 必要に応じてアートワークデータのみを変更します
- 定義された間隔で検査する
これにより、カスタム木材印刷が工芸実験ではなく生産ワークフローに変わります。
木材への直接 UV 印刷と UV DTF の比較
EraSmart は UV フラットベッド ワークフローと UV DTF ワークフローの両方を提供しますが、これらは同じプロセスではありません。
ダイレクトUV印刷
次の場合にはダイレクト UV プリンターを選択してください。
- 木の表面は平らです
- オブジェクトはプリントベッドに適合します
- 製品に直接印刷したい
- 正確な位置決めが必要です
- 楯、パネル、看板、または贈り物を制作している場合
- 製品に直接白とニスの効果を加えたい
UV DTF
UV DTF は次の場合に役立ちます。
- 完成品を平台に置くのは難しい
- 印刷範囲がおかしい
- 最初にグラフィックを作成し、後で適用したい場合
- あなたは完成した特定のオブジェクトを装飾しています
しかし、木材への UV DTF の接着は依然として表面に大きく依存します。
密封された滑らかな木材によく貼り付くデカールは、次の場合には同じように動作しない可能性があります。
- ほこりっぽい生の松
- 質感の高い木材
- オイル仕上げの木材
- ワックスがけされた表面
そのため、商業生産の前にテストを行います。
木材に印刷する場合の一般的な問題
問題 1: 色がくすんで見える
考えられる理由:
- 白いアンダーベースはありません
- ダークウッド
- 力強い天然木目
- 白い背景用にデザインされたアートワーク
解決
ホワイト + CMYK または選択的なホワイトをテストします。
また、実際の木の背景を考慮してアートワークを調整します。
問題点2:インクの定着が弱い
考えられる原因:
- ほこり
- 油
- ワックス
- 互換性のないコーティング
- 水分
- 不十分な表面処理
解決
正確な基材を洗浄し、接着テストを実行します。
必要に応じて、その材料に適合する適切な前処理を評価します。
問題 3: 小さな文字が粗く見える
考えられる原因:
- 粗い粒子
- 緩い繊維
- 低解像度のアートワーク
- プリントヘッドの距離が正しくない
解決
より滑らかな木材を使用し、表面処理を改善し、ベクター テキストを使用し、印刷の高さを確認します。
問題点4:製品ごとに印刷位置が異なる
考えられる原因:
反復可能な基準を使用しない手動位置決め。
解決
フィクスチャまたは位置決めテンプレートを使用します。
問題 5: 基板が歪んでいる
反りがあると、プリントヘッドと表面の間に一貫性のない距離が生じる可能性があります。
解決
安定した十分に平らなボードを使用してください。
真空プラットフォームは適切な平らな材料を固定するのに役立ちますが、ひどい反りを修正することは期待できません。
問題 6: 木目がアートワークを圧倒する
これは多くの場合、プリンターの問題ではなく、設計の問題です。
解決
より強い不透明度が必要な場合は、白いアンダーベースを使用します。
または、自然な木目を中心にアートワークを意図的に再デザインします。
UV印刷後に保護コーティングは必要ですか?
すべての木製品に追加のクリア仕上げが必要なわけではありません。
決定は以下によって決まります。
- 屋内使用と屋外使用
- 取り扱い頻度
- 摩耗
- 湿気への曝露
- 顧客の期待
- 木の種類
- プリント仕上げ
装飾的な屋内製品の場合、UV 硬化プリントですでに希望の外観が得られる場合があります。
より激しい摩耗や特定の環境への曝露を受ける製品の場合、追加の仕上げが評価される場合があります。
印刷後のコーティングは変化する可能性があるため、必ずテストしてください。
- 光沢
- 色の見え方
- テクスチャ
- 接着力
- ワニス効果
実用的な木材印刷用 EraSmart UV プリンター
中小規模の木材製品の場合、A3 クラスの UV フラットベッドが実用的な生産形式です。
1 つのオプションは、EraSmart デジタル インクジェット A3 UV プリンター — デュアル XP600。
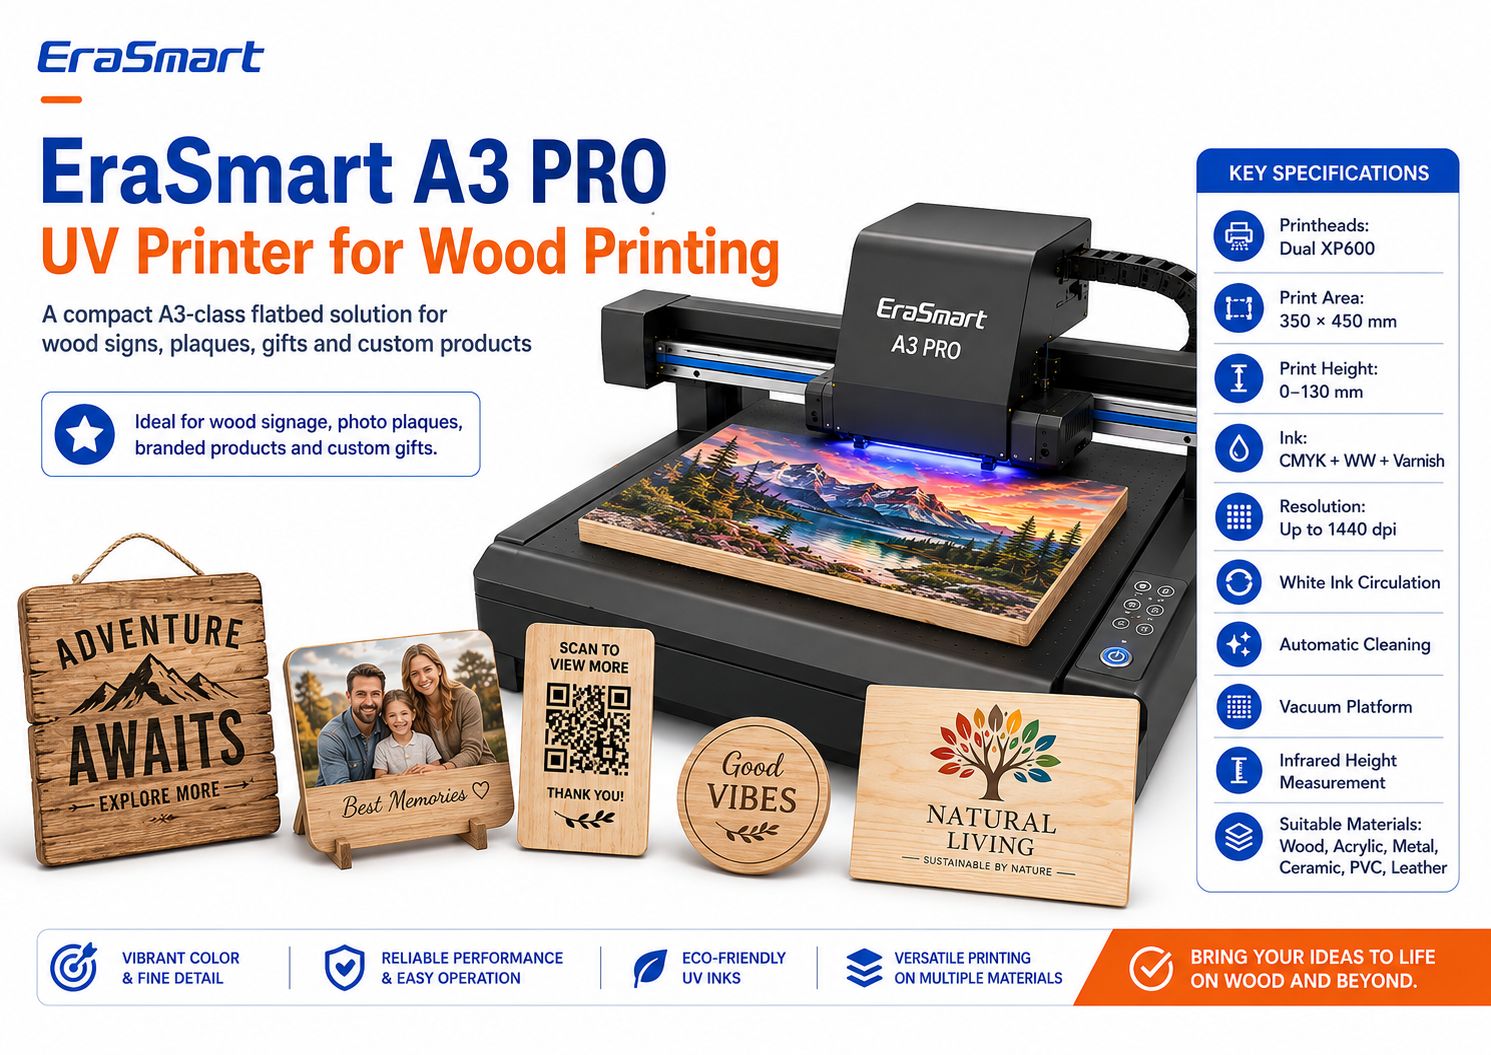
EraSmart A3 PRO 主な仕様
| 仕様 | EraSmart A3 PRO |
|---|---|
| プリントヘッド | デュアルXP600 |
| 印刷領域 | 350×450mm |
| 印刷の高さ | 0–130mm |
| インク構成 | CMYK + WW + ワニス |
| 解決 | 最大1440dpi |
| 白インク循環 | はい |
| 自動クリーニング | はい |
| 真空プラットフォーム | はい |
| 身長測定 | 赤外線 |
| RIPソフトウェア | Riin / PrivateRip |
プリンターは次のような素材をサポートしています。
- 木材
- アクリル
- 金属
- セラミック
- PVC
- TPU
- レザー
- KTボード
木材用途の場合、以下の組み合わせ白インク、ワニス機能、真空プラットフォーム、赤外線高さ測定小規模バッチのフラットな製品のカスタマイズに特に役立ちます。
A3 クラスのワークフローに適合する木材製品は何ですか?
350 × 450 mm の印刷領域は、最終的な寸法に応じて、多くの小さなカスタム製品に対応できます。
例としては次のものが挙げられます。
- 写真プレート
- QRサイン
- 小さなメニューの看板
- パーソナライズされたギフト
- コースター
- ブランドのギフトボックス
- 木製賞
- 装飾パネル
- 中小企業の看板
- ウェディングアイテム
より大きな木製パネル、看板、またはバッチごとに複数のピースの場合は、より大きなプラットフォームの方が合理的である可能性があります。
EraSmart も提供しています。A2 UVプリンター製品の寸法に多くのスペースが必要な企業向けに、より広い作業エリアを提供します。
単にマシンが大きいほどプロフェッショナルに見えるからという理由ではなく、製品に応じてプリンターのサイズを選択してください。
UVプリンターで印刷できる木製品
木材は一度に複数のビジネス市場にサービスを提供できるため、価値があります。
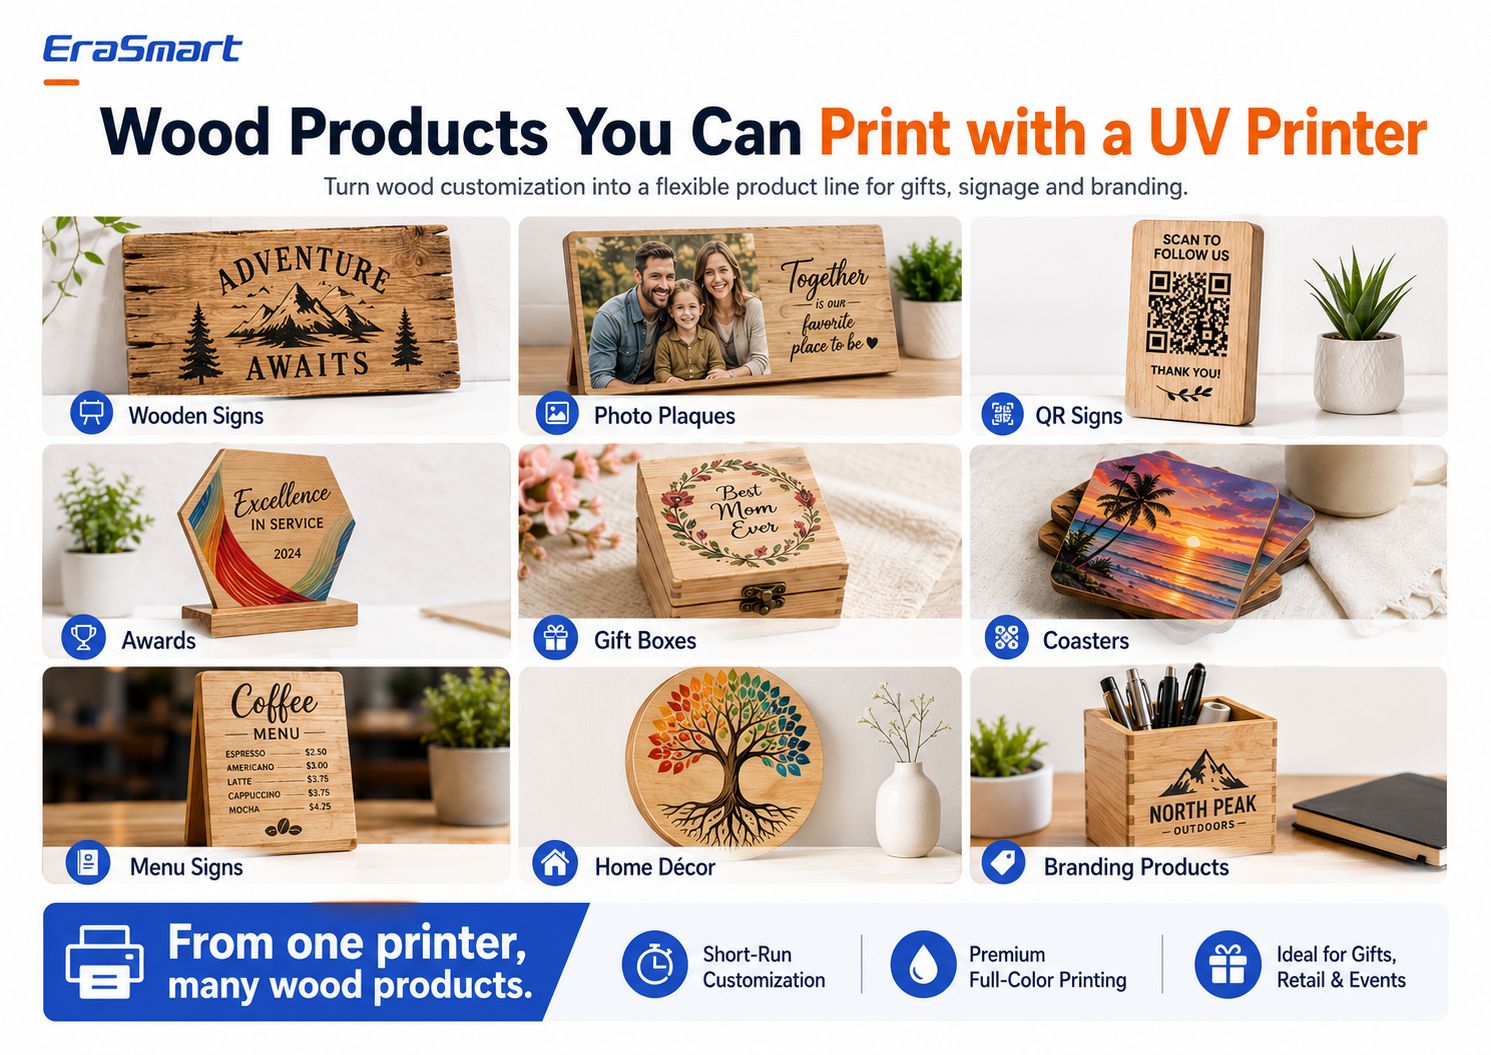
1. 木製看板
例:
- キャビンサイン
- 家族の名前のサイン
- 結婚式のサイン
- カフェの看板
- 店の看板
- 方向標識
- 装飾的な引用符
2. 写真プレート
フルカラー UV 印刷により、写真を次のように変えることができます。
- 家族への贈り物
- アニバーサリーピース
- 記念の楯
- 結婚祝い
- ペットの肖像画
- 旅行の思い出
白インクは、多くの場合、写真アートワークの背後に役立ちます。
3. QRコードサイン
中小企業では、次の目的で QR ディスプレイを使用することが増えています。
- メニュー
- 支払い
- レビュー
- Wi-Fiアクセス
- ソーシャルメディア
- 予約ページ
配達前に QR コードを印刷して物理的にスキャンします。
デジタル プレビューだけに頼らないでください。
4. 木製賞
作成する:
- 企業賞
- 従業員表彰作品
- スポーツ賞
- クラブの盾
- ブランド証明書
5. ギフトボックス
木箱は次のようにカスタマイズできます。
- 名前
- ロゴ
- 花のグラフィック
- 結婚式の日程
- 企業ブランディング
正確なボックスの形状は、プリンターがサポートする寸法とクリアランス内に安全に収まる必要があります。
6. コースター
コースターは以下の用途に適しています。
- 観光デザイン
- アートコレクション
- カフェ
- 結婚祝い
- ブランド品
製品が湿気にさらされたり、繰り返し磨耗したりする場合は、実際の使用状況に応じて完成品をテストしてください。
7. メニューの看板
木製メニューは次の用途に使用できます。
- カフェ
- レストラン
- バー
- フードトラック
- 結婚式
- イベント
8. 家の装飾
例:
- ボタニカルアート
- 姓
- 保育園の装飾
- 景観パネル
- 引用符
- 休日の装飾
9. 製品のブランディング
企業は以下を注文できます。
- カウンターサイン
- ロゴプレート
- プロモーションギフト
- 展示品
- 小売装飾
- ブランドのデスク製品
B2B の注文は、顧客が同じテンプレートを更新されたテキストや異なるスタッフ名で再注文する可能性があるため、特に価値があります。
1 つの木材デザインがどのようにして複数の製品になるのか
スマートなカスタマイズ ビジネスでは、アートワークを再利用できます。
たとえば、1 つの山のイラストは次のようになります。
- キャビンサイン
- コースターセット
- フォトフレームの背景
- ギフトボックス
- 記念の楯
- QRサイン
- ブランドのデスクアイテム
すべての製品で同じデザインを再作成する必要はありません。
代わりに、以下を適応させます。
- 寸法
- 作物
- 文章
- 白インクマスク
- 製品テンプレート
これにより、各アートワーク ファイルの価値が高まります。
UV木材印刷のビジネスアイデア
パーソナライズされたギフトショップ
売る:
- 写真プレート
- 家族のサイン
- 結婚祝い
- ペット用品
- パーソナライズされたボックス
地元の看板ショップ
オファー:
- カフェの看板
- メニュー
- QR表示
- 卓上の銘板
- ビジネスロゴ
Etsy またはオンライン販売者
作成する:
- 素朴な看板
- 季節の装飾
- パーソナライズされたギフト
- コースターセット
- ウェディング製品
観光・土産品事業
印刷:
- 目的地のアートワーク
- ローカルマップ
- ランドマークのグラフィックス
- 記念の楯
- コースターコレクション
ウェディング・イベント事業
生産する:
- 歓迎のサイン
- テーブルピース
- 好意
- 小さなプラーク
- 記念品
コーポレートギフトサプライヤー
オファー:
- 賞を受賞
- ブランドボックス
- 卓上の銘板
- 表彰状の贈り物
- ロゴグッズ
カスタムウッドプリントの価格設定方法
インクと木材だけを使って価格を計算しないでください。
含む:
- 木製ブランク
- 表面処理
- インク
- 白インク
- ワニス
- 試験片
- 失敗したプリント
- アートワークのセットアップ
- パーソナライゼーション
- マシンタイム
- 労働
- 仕上げ
- 梱包
- プラットフォーム料金
- 配送資材
- メンテナンス
- 利益
顧客は汎用の木製ボードを購入しないため、パーソナライゼーションは通常、より多くの価値を生み出します。
彼らは完成したカスタム製品を購入しています。
避けるべきよくある間違い
間違い 1: すべての木版画が同じであると思い込む
そうではありません。
正確な材料をテストします。
間違い 2: 埃っぽい木に印刷する
サンディングダストは品質と接着力を低下させる可能性があります。
間違い 3: 白インクを無視する
白インクは、天然木の色を制御するための最も重要な創造的なツールの 1 つです。
間違い 4: サンプルなしで完全な注文を印刷する
必ず最初に物理サンプルを承認してください。
間違い 5: ひどく反った木材を使用する
一貫したプリントヘッドのクリアランスには平坦性が重要です。
間違い 6: 既存の表面コーティングを無視する
ワックス、オイル、ラッカー、ペイント、その他のコーティングは接着に影響を与える可能性があります。
間違い 7: 白い紙と木に同じアートワークを使用する
実際の基板に合わせて設計します。
間違い 8: すべての製品を手動で再配置する
バッチ生産用に再現可能な治具を構築します。
プロフェッショナルな木材印刷チェックリスト
印刷する前に:
材料
- 木の種類が確認されました
- 表面がきれい
- ボードドライ
- 十分に平らな
- コーティングが確認されました
- 接着試験予定
アートワーク
- 最終寸法は正しい
- 高解像度の画像
- 可能な場合はベクター テキスト/ロゴ
- 白インクマスクを用意しました
- 必要に応じてワニス層を準備します
プリンター
- ノズルチェック完了
- 正しい印刷高さ
- 真空または位置決めセットアップの準備完了
- RIPプリセットが選択されました
サンプル
- カラーチェック済み
- 詳細を確認しました
- 白インクチェック済み
- 接着チェック済み
- 承認されたポジション
生産
- 固定具はロックされています
- アートワークのバージョンが確認されました
- バッチ数量をチェックしました
- 定期的なQCの実施
仕上げ
- 傷チェック済み
- エッジチェック済み
- 梱包準備済み
- 最終数量が確認されました
最終的な答え: 木材にどうやって印刷するのですか?
適切な木製製品にプロフェッショナルな直接印刷を行う場合、UV 印刷は、フルカラーのアートワーク、白インク、ワニス効果、パーソナライズ、および小バッチ生産のための柔軟なワークフローを提供します。
プロセスは次のとおりです。
木材を準備する → アートワークを準備する → 白インク戦略を選択する → 製品を配置する → 印刷高さを設定する → サンプルを印刷する → 接着力をテストする → 位置を標準化する → バッチ生産を開始する
最大の要因はプリンターの最大解像度ではありません。
それは表面制御。
テスト済みの印刷設定を備えた清潔で滑らかで安定した木製製品は、通常、不適切な、埃っぽい、油っぽい、またはひどく歪んだ表面に高価な機械で印刷するよりも、より予測可能な結果を生成します。
2 番目に重要な要素は白インクです。
使用:
- CMYKのみナチュラルな木目が欲しいときに
- 白+CMYKより強い不透明度が欲しいとき
- 選択白 + CMYK天然素材の個性と鮮やかなカラーを組み合わせたいとき
木製の盾、看板、ギフト、QR ディスプレイ、コースター、賞状、ボックス、その他のフラットなカスタム製品を製造する企業の場合、EraSmart A3 PRO UV プリンターは、デュアル XP600 プリントヘッド、白インク、ワニス機能、白インク循環、自動クリーニング、真空プラットフォーム、および赤外線高さ測定を備えた 350 × 450 mm A3 クラスのプラットフォームを提供します。
目標は単に木材に印刷することではありません。
目標は、同じ品質を何度でも。
よくある質問
UV プリンターは木材に直接印刷できますか?
はい。 UV フラットベッド プリンタは、多くの適切な木製の表面に直接印刷できます。木材は清潔で安定しており、十分に平らで、商業生産の前に接着性をテストする必要があります。
UV 印刷の前に木材を研磨する必要がありますか?
いつもではありません。滑らかに準備された木材がすでに適している可能性があります。粗い表面、繊維の緩み、または不規則な仕上げには、サンディングの効果が得られる場合があります。印刷前に必ず研磨粉を取り除いてください。
UV印刷に最適な木材は何ですか?
一般に、滑らかで清潔で安定した木材は、最も予測しやすい結果をもたらします。表面の状態や必要な仕上げに応じて、バーチ合板、カエデ、プレパイン、竹、MDF、塗装木材をすべて使用できます。
原木にもUV印刷できますか?
はい、しかし生の木材はより多孔質で質感が高い場合があります。結果は、木目、表面の滑らかさ、湿気、ほこり、アートワークによって異なります。
木材に印刷する場合、白インクは必要ですか?
いつもではありません。
CMYK は、自然な粒子を見せたい場合にのみ使用してください。
より不透明な色、鮮やかな色、または予測可能な色が必要な場合は、CMYK の下に白を使用します。
UV印刷で木材に写真を再現できますか?
はい。写真製品の場合は、高品質のアートワークを使用し、画像の色をより強く保ち、木の色調の影響を少なくしたい場合は、白い下地を検討してください。
QRコードを木材に印刷できますか?
はい。ただし、QR コードは十分に大きく、鮮明で、高いコントラストを維持する必要があります。完成した印刷コードは、納品前に必ず複数の電話機でテストしてください。
すべての木製品にはプライマーが必要ですか?
いいえ。プライマーの要件は、正確な木材の表面、コーティング、インク、接着要件によって異なります。プライマーを自動的に塗布するのではなく、最初にテストしてください。
UVプリンターで木箱も印刷できますか?
製品がプリンターのサポートされている寸法、高さ、重量、および安全なプリントヘッドのクリアランス内に収まる場合。印刷可能領域も十分に平坦である必要があります。
どの EraSmart プリンターが木材印刷に適していますか?
中小規模の平らな木材製品の場合、EraSmart デジタル インクジェット A3 UV プリンター — デュアル XP600は適切なオプションの 1 つです。大きな木材については、EraSmart UV プリンター実際の製品の寸法に基づいて範囲を選択し、印刷範囲を選択します。
カスタムの木材印刷ビジネスを構築したいですか?
EraSmart に伝えてください:
- どのような木製品をプリントしたいですか
- 製品の寸法
- 木の種類
- 表面が未加工、塗装、またはコーティングされているかどうか
- 予想月間生産量
- 白インクが必要かどうか
- ニス効果が必要かどうか
- あなたのワークスペース
- 将来の製品計画
私たちのチームが適切な比較をお手伝いしますEraSmart UV プリンター木製看板、写真プレート、パーソナライズされたギフト、ブランド製品、QR 看板、コースター、ボックス、その他のカスタム木製アプリケーションの制作ワークフロー。
表面を準備します。白インクを制御します。サンプルをテストします。次に、ワークフローをスケールします。
あなたも好きかもしれません

著作権2020©Erasmart。 | サイトマップ