ผู้ผลิตเครื่องพิมพ์อิงค์เจ็ทขนาดเล็ก

86-18566233796 [email protected]

บล็อก How to Use UV DTF Type B Film Without a Printer: What Beginners Should Know

How to Use UV DTF Type B Film Without a Printer: What Beginners Should Know

June 28, 2026 บล็อก

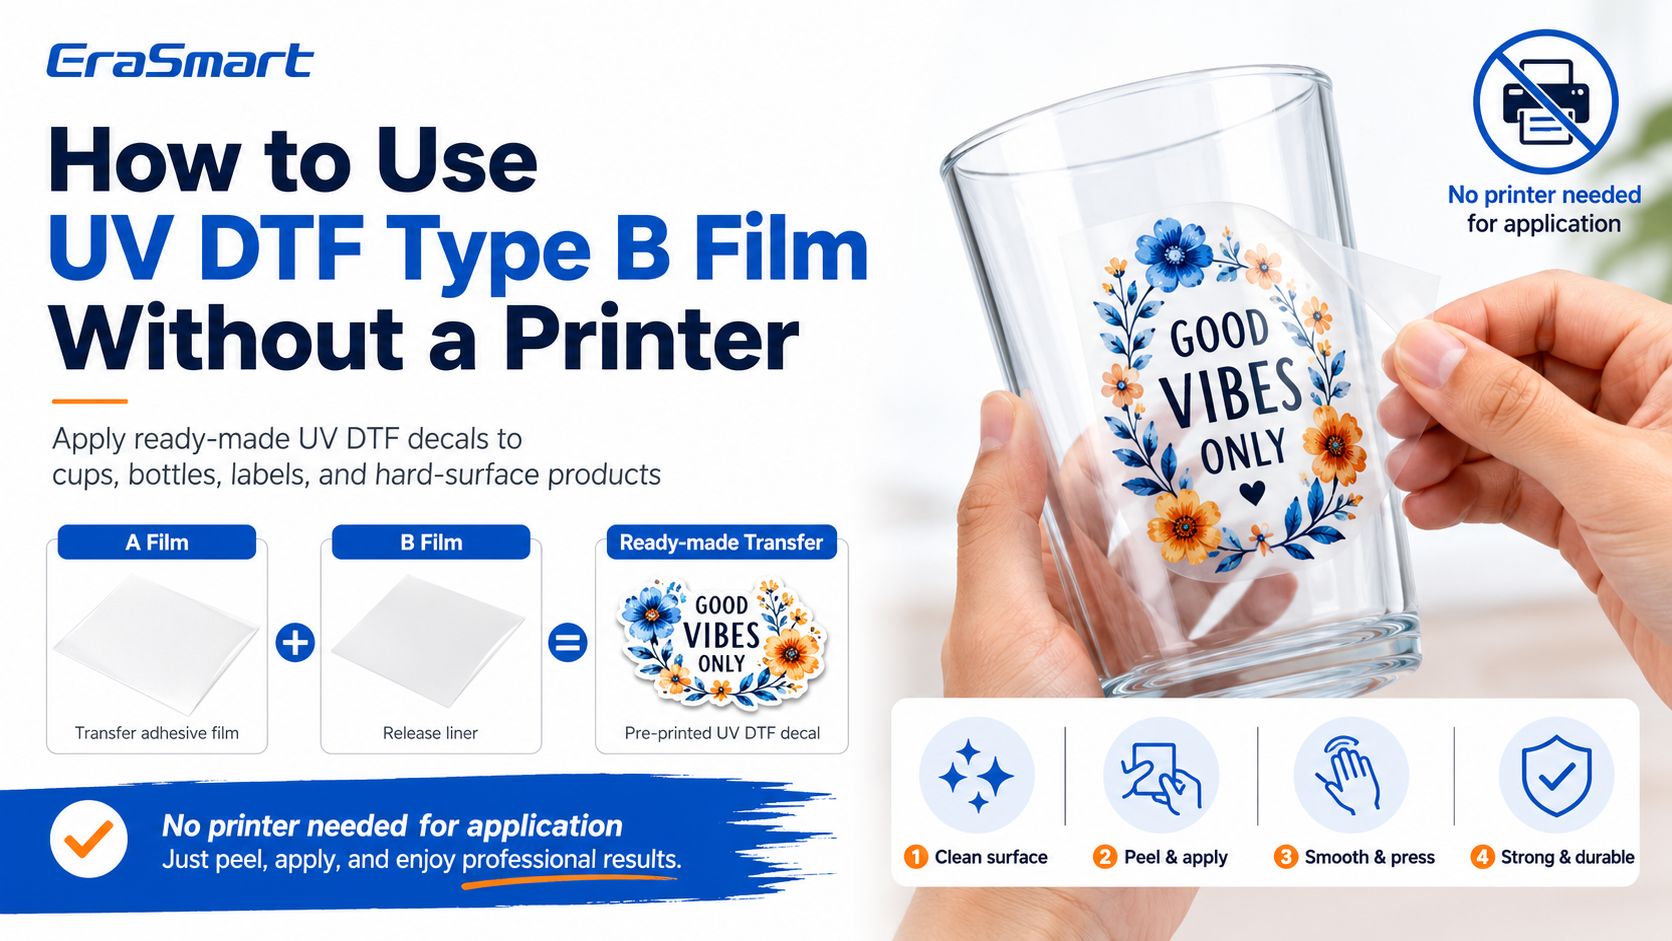
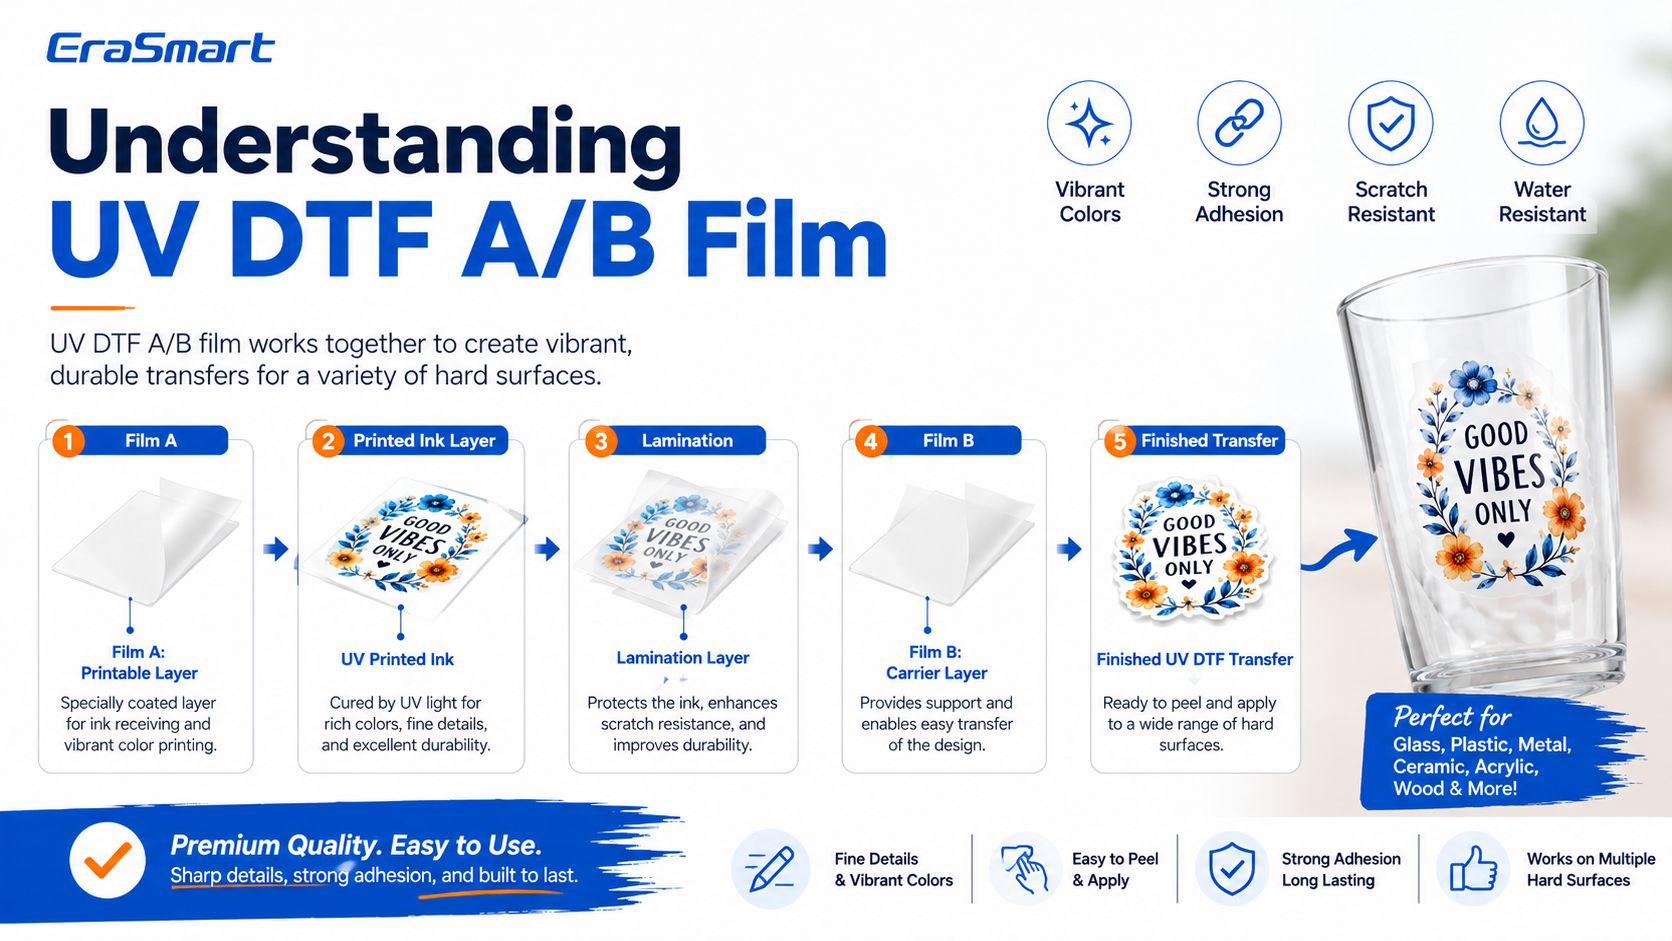
Blank UV DTF Type B film cannot create a printed design by itself. In a standard UV DTF workflow, the design is printed onto A film first. Then B film is laminated over the printed design and works as the carrier layer that helps transfer the decal onto a hard surface.

So, if you do not own a UV DTF printer, the practical solution is not to use blank Type B film alone. The practical solution is to buy pre-printed UV DTF transfers from a supplier, then apply those finished decals to your products.

If you want to understand the full film structure, EraSmart’s A/B Film for UV DTF Printing explains how A film and B film work together, why lamination matters, and why surface preparation is important for successful transfer.

Quick Answer: Can You Use UV DTF Type B Without a Printer?

Yes, but only in the right context.

You can use UV DTF transfers without owning a printer if the design is already printed and laminated. In that case, you are applying a finished UV DTF decal to a hard surface.

You cannot create a custom full-color UV DTF decal from blank Type B film alone. Type B film is not a printer, not an ink layer, and not a design generator. It is part of the transfer system.

SituationCan You Do It Without a Printer?Explanation
Apply a ready-made UV DTF decalใช่The design has already been printed and laminated
Use blank B film to create a designเลขที่B film alone does not contain ink or artwork
Order custom transfers from a supplierใช่The supplier prints and laminates the design for you
Make your own UV DTF decals in-houseNo, not without equipmentYou need a UV DTF printer, UV ink, A/B film, RIP, and lamination
Start testing a sticker or cup wrap businessใช่Buy finished transfers first, then upgrade when demand grows

For beginners, this means you can test the UV DTF business model without a printer, but you cannot fully control production until you own a UV DTF printer.

What Is UV DTF Type B Film?

UV DTF printing uses an A/B film system.

ภาพยนตร์ is the printable film. The UV DTF printer prints CMYK, white ink, and varnish onto this film. The UV LED curing system cures the printed layers during production.

บี หนัง is the carrier or transfer film. It is laminated onto the printed A film and helps lift, carry, and apply the printed design onto the final product surface.

In simple terms:

  • A film receives the printed image.

  • B film helps transfer the image.

  • The finished decal is applied to a hard surface.

  • After peeling, only the printed design remains on the product.

อีราสมาร์ท เครื่องพิมพ์ UV DTF workflow follows this logic: print on A film with CMYK + White + Varnish, cold-laminate with B film, cut, peel, and apply without hot-melt powder or garment heat pressing.

Why Beginners Think They Can Use Type B Film Without a Printer

The confusion usually comes from how finished UV DTF transfers are sold. Some sellers call the ready-to-apply decal “Type B film” because the customer interacts with the carrier layer during application. But in production terms, the decal is not just blank B film. It is already printed, cured, laminated, and ready to transfer.

For customers, the product may look like a clear film sheet with a printed design. They peel, position, press, and remove the carrier. This feels simple, so many beginners assume the B film itself is the product.

The correct explanation is:

  • If it has a printed design, it is a finished UV DTF transfer.

  • If it is blank B film, it is only a consumable.

  • If you want your own design, someone must print it first.

  • If you want full control, you need a UV DTF printer.

This distinction helps avoid wasted materials and wrong expectations.

When It Makes Sense to Use UV DTF Transfers Without a Printer

Using ready-made UV DTF transfers without owning a printer can be a smart first step.

It is useful if you want to:

  • test cup wrap demand

  • decorate bottles, jars, or tumblers

  • try premium sticker products

  • make small batches of gift items

  • test cosmetic label ideas

  • sell handmade product decals

  • create sample products

  • test local customer interest

  • learn the application process

  • compare surfaces before buying a machine

This is especially helpful for small businesses that are not ready to buy equipment immediately. You can start with finished transfers, sell sample products, and use real customer feedback to decide whether a UV DTF printer is worth the investment.

When you are ready to produce your own transfers, you can upgrade to an เครื่องพิมพ์ EraSmart UV DTF for in-house printing, lamination, and product control.

What Products Can You Decorate Without a UV DTF Printer?

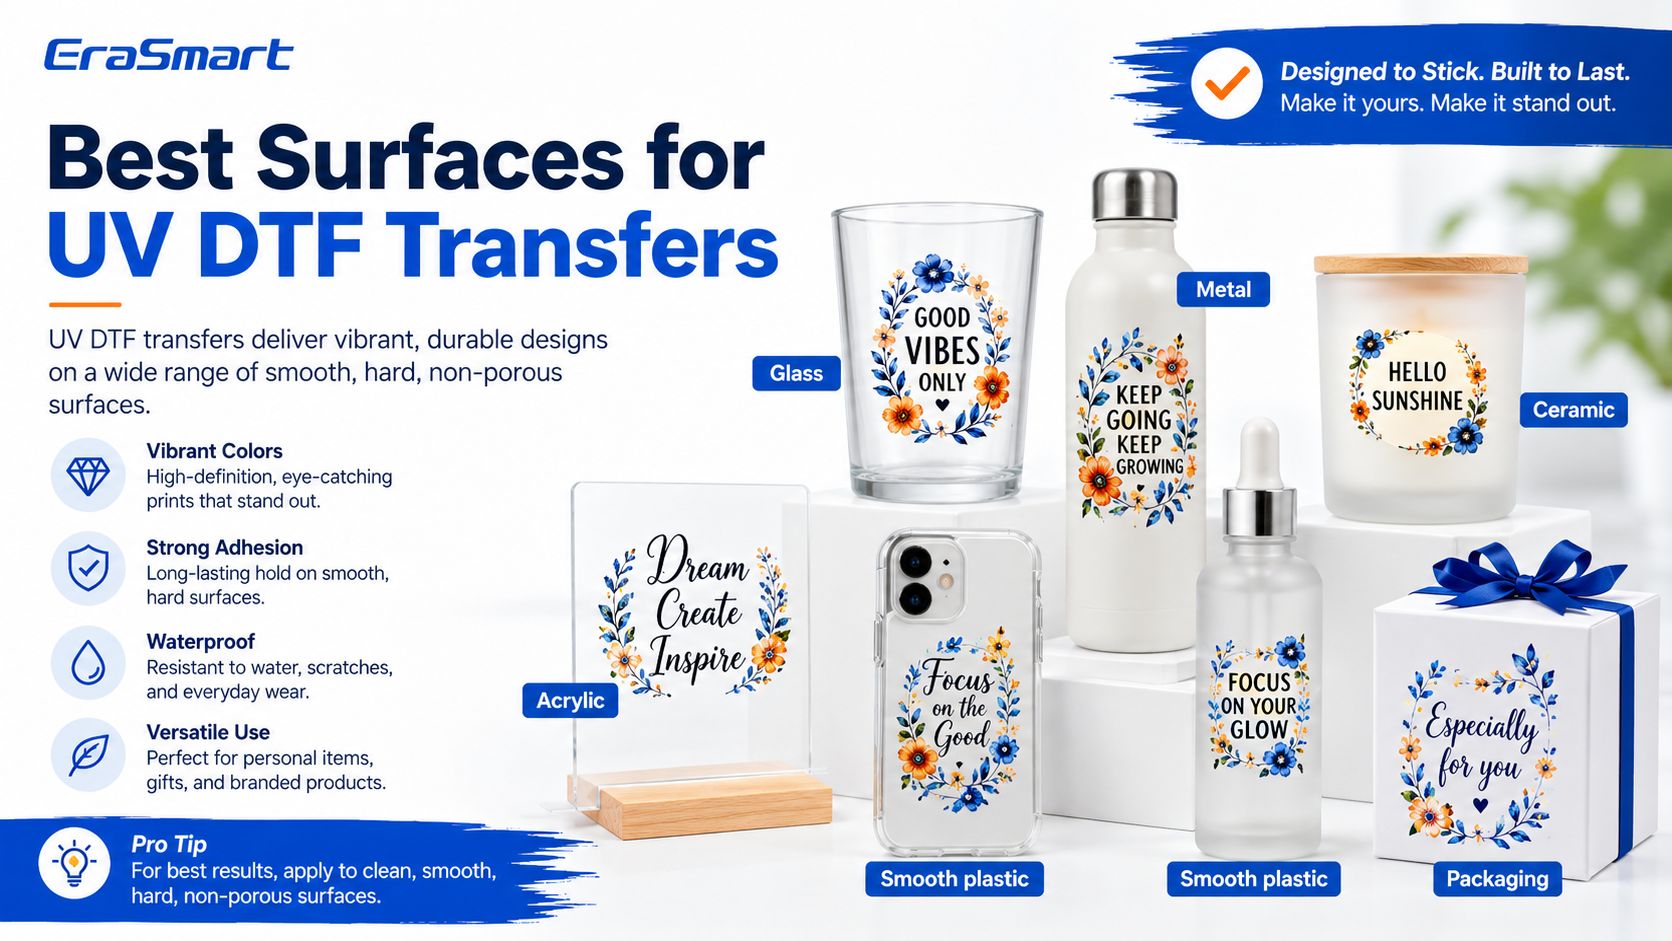
If you buy finished UV DTF transfers, you can apply them to many clean, smooth hard surfaces.

Good product options include:

  • ถ้วยแก้ว

  • แก้วน้ำ

  • ขวดน้ำ

  • แผงอะคริลิก

  • เคสโทรศัพท์

  • laptop covers

  • โถเทียน

  • cosmetic bottles

  • ขวดน้ำหอม

  • soap packaging

  • กล่องของขวัญ

  • กระป๋องโลหะ

  • ceramic mugs

  • plastic containers

  • product packaging

  • รายการส่งเสริมการขาย

UV DTF works best on smooth hard surfaces. It is not the right primary method for T-shirts, hoodies, or fabric apparel. For garments, use textile DTF instead. EraSmart’s UV DTF กับสิ่งทอ DTF กับ UV Flatbed guide explains this difference clearly.

Tools You Need to Apply Ready-Made UV DTF Transfers

You do not need a printer to apply finished UV DTF decals, but you do need proper application tools.

Useful tools include:

  • ready-made UV DTF transfer

  • clean hard-surface product

  • lint-free cloth

  • isopropyl alcohol wipe

  • scissors or cutter

  • scraper or squeegee

  • soft cloth

  • masking tape for alignment

  • ruler or positioning guide

  • gloves if needed

  • clean worktable

You usually do not need a heat press for standard UV DTF decal application. EraSmart’s A3 UV DTF printer workflow is described as powderless, with A/B film and no oven or heat press for standard decal transfer.

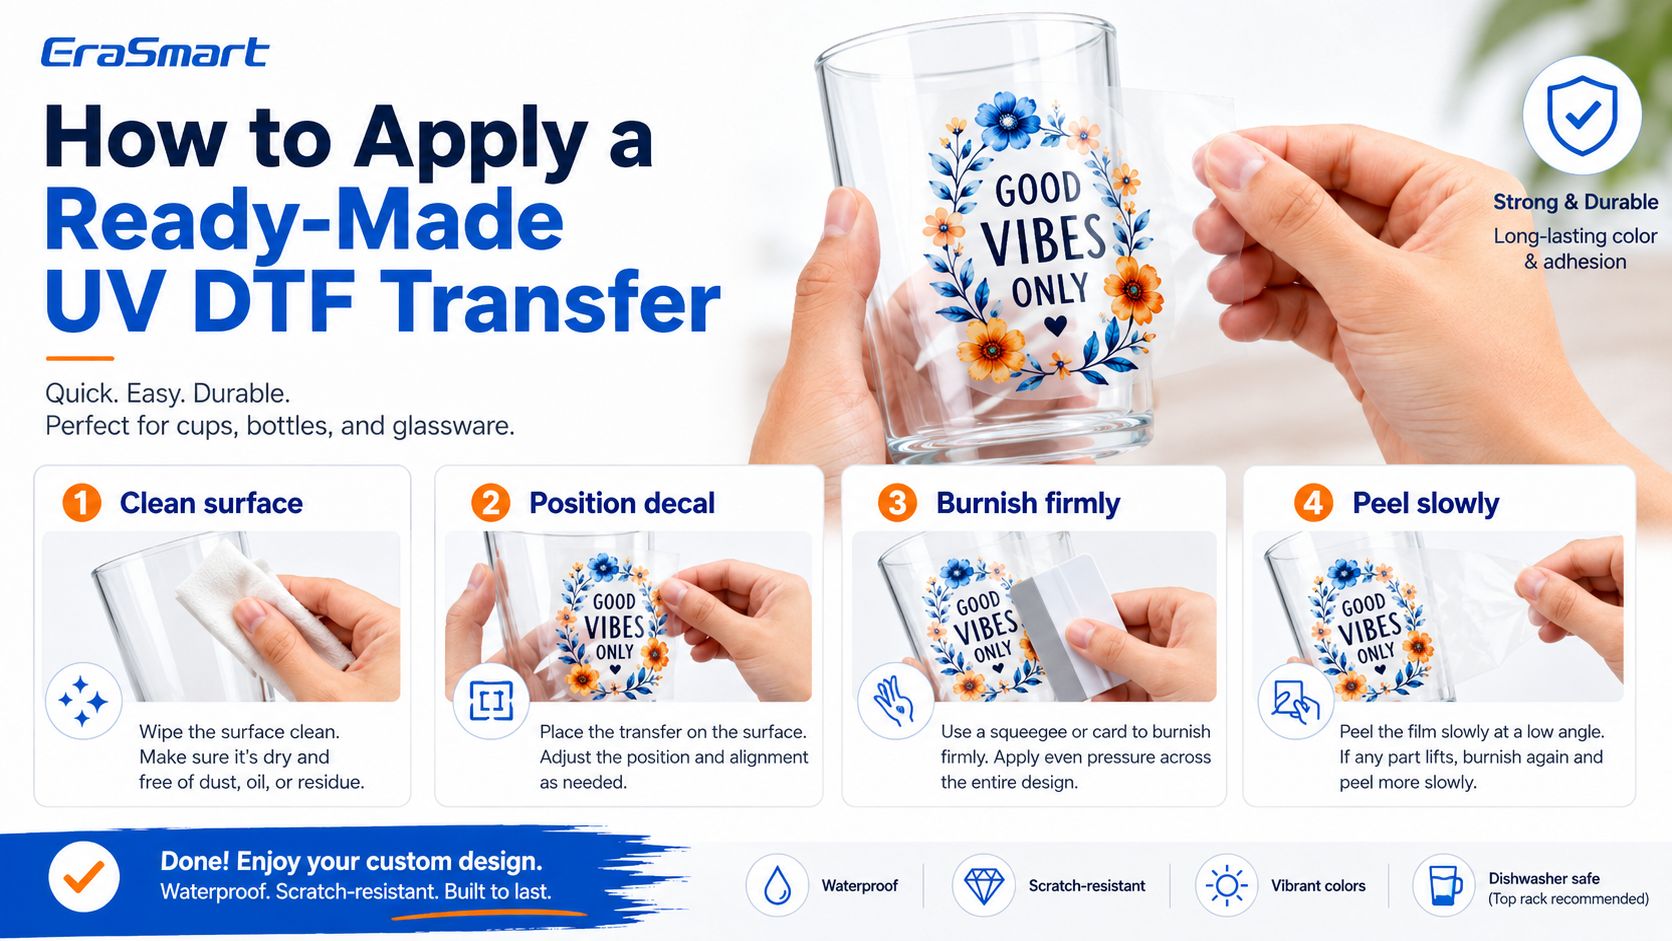
Step-by-Step: How to Apply UV DTF Transfers Without a Printer

Step 1: Choose the Right Surface

UV DTF decals work best on clean, smooth, hard surfaces.

Good surfaces include:

  • กระจก

  • อะคริลิก

  • โลหะ

  • ceramic

  • coated wood

  • smooth plastic

  • coated packaging

  • เคสโทรศัพท์

  • ขวด

  • cups

  • jars

Avoid applying UV DTF transfers directly to dusty, oily, wet, soft, fuzzy, highly textured, or flexible fabric surfaces. If the surface is rough or porous, adhesion may be weaker.

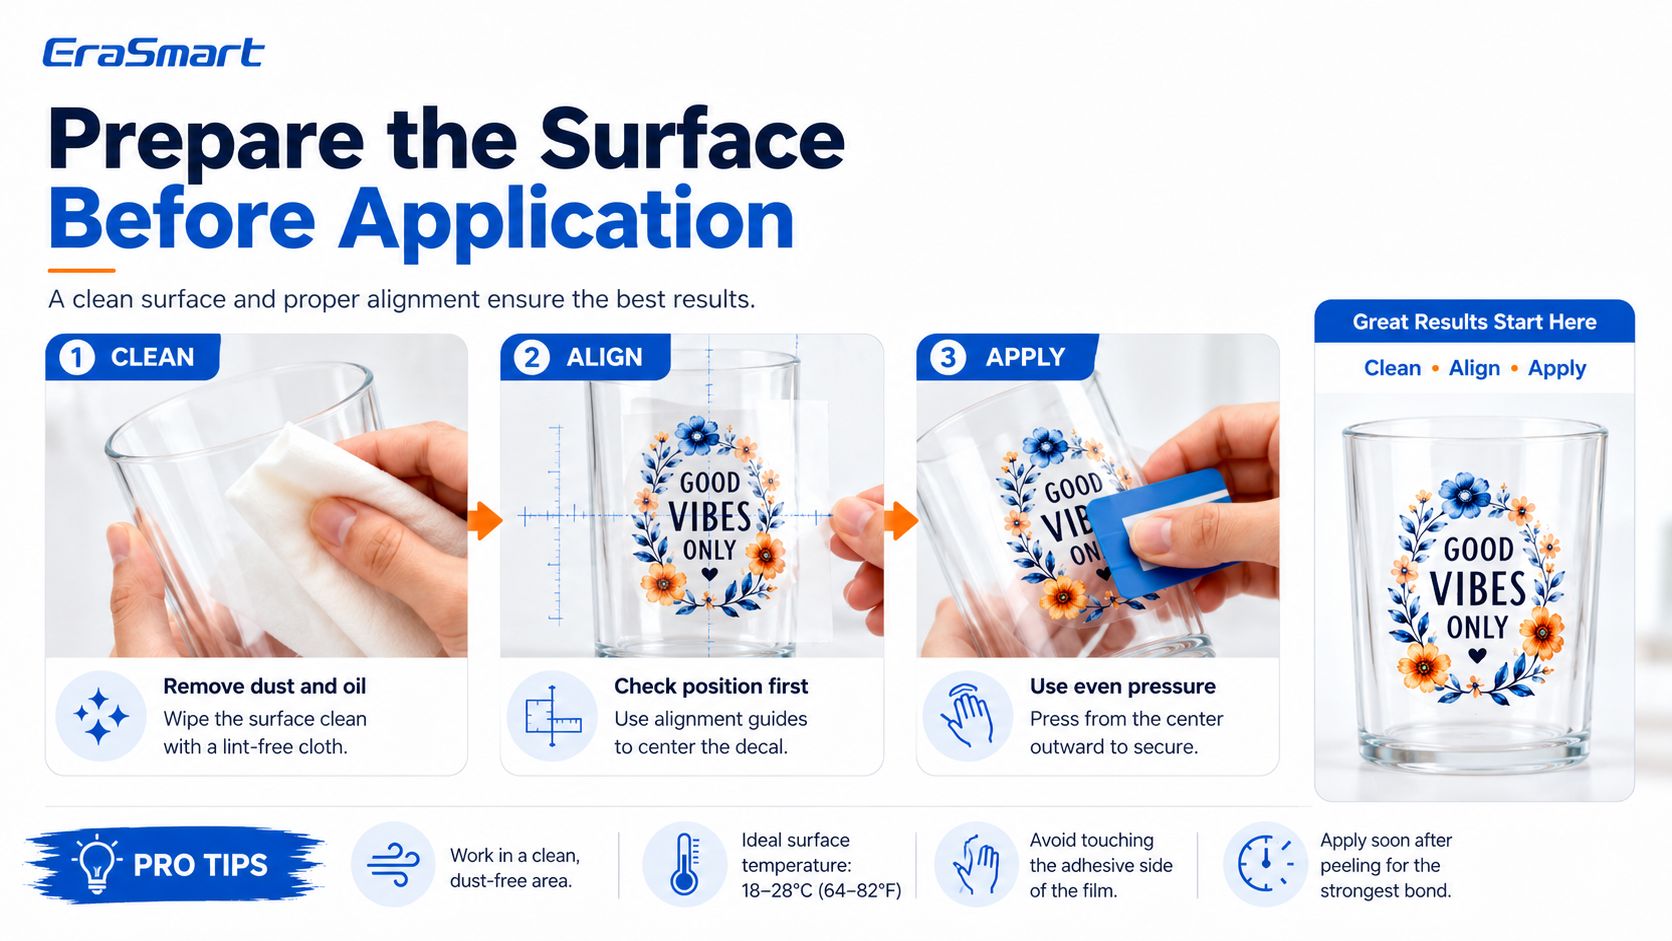
Step 2: Clean the Surface

Surface preparation is one of the most important steps.

Use a lint-free cloth and isopropyl alcohol to clean the application area. Remove dust, oil, fingerprints, moisture, and packaging residue. Let the surface dry completely before applying the transfer.

Do not rush this step. Many UV DTF failures come from poor surface cleaning rather than the decal itself.

อีราสมาร์ท A/B Film for UV DTF Printing guide also notes that oily, dusty, humid, or highly textured surfaces are common causes of transfer problems.

Step 3: Trim the Transfer

Cut around the finished UV DTF decal, leaving a small margin for easier handling. You do not need to cut perfectly along the design edge because only the printed area should remain after transfer.

For cup wraps, bottles, and curved surfaces, make sure the transfer size matches the product shape and does not overlap awkwardly.

Step 4: Check Alignment Before Sticking

Before removing the backing, place the decal over the product to check position.

For larger designs, use a ruler, tape, or alignment guide. For cup wraps, align the center first and check whether the design sits straight.

Once the adhesive touches the surface, repositioning can be difficult. Always check alignment before pressing.

Step 5: Peel the Backing Carefully

Peel the backing layer slowly to expose the adhesive side of the UV DTF transfer.

If any part of the design lifts unexpectedly, lay the film back down and press again before continuing. Do not pull quickly.

Step 6: Apply the Transfer to the Product

Place the transfer onto the product surface carefully. Start from one side or from the center, depending on product shape.

For flat products such as acrylic panels or packaging boxes, start from one edge and press gradually.

For curved products such as cups and bottles, align the middle first, then work outward to reduce wrinkles and bubbles.

Step 7: Squeegee or Burnish Firmly

Use a scraper, squeegee, or soft cloth to press the transfer firmly.

Work from the center outward to remove air bubbles. Apply even pressure across the entire design, especially around small letters, thin lines, edges, and corners.

This step helps the printed decal bond to the surface.

Step 8: Peel the Carrier Film Slowly

Peel the top carrier film slowly at a low angle. Do not pull straight upward.

If part of the design comes up with the film, lay it back down and burnish again. Then try peeling from another corner or angle.

Slow peeling gives the decal more time to stay attached to the product surface.

Step 9: Let the Product Rest

After application, let the product rest before heavy handling, washing, rubbing, or packaging. This gives the adhesive layer more time to stabilize.

For products that will be handled frequently, test scratch resistance and adhesion before selling in volume.

Step 10: Test Before Selling

Before selling a new product, test:

  • การยึดเกาะ

  • scratch resistance

  • water exposure

  • surface compatibility

  • peel quality

  • customer handling conditions

  • packaging friction

  • curved-surface performance

Testing protects your brand and reduces customer complaints.

Best Surfaces for UV DTF Transfers

UV DTF transfers usually perform best on smooth hard surfaces.

พื้นผิวความเหมาะสมหมายเหตุ
กระจกVery goodClean carefully before application
อะคริลิกVery goodGood for signs, labels, and gifts
โลหะดีCoated or smooth surfaces work better
เซรามิคดีTest curved and glossy surfaces
พลาสติกDependsLow-surface-energy plastics need testing
Coated woodดีRaw porous wood may reduce adhesion
Paper packagingDependsCoated boxes work better than rough paper
Leather-like surfacesDependsTest texture and flexibility
Fabricไม่แนะนำUse textile DTF for garments

If your business focuses on stickers, labels, and cup wraps, EraSmart’s UV DTF Printer for Stickers และ UV DTF Printer for Cup Wraps pages can help you match the right product direction.

Common Mistakes When Applying UV DTF Transfers Without a Printer

Mistake 1: Buying Blank B Film and Expecting a Design

Blank B film cannot create artwork. You need a printed and laminated UV DTF transfer.

If you want custom designs without a printer, order finished transfers from a print supplier. If you want full control, use a UV DTF printer.

Mistake 2: Applying to Dirty Surfaces

Dust, oil, moisture, and fingerprints can weaken adhesion. Always clean the product surface before applying.

Mistake 3: Peeling Too Fast

Fast peeling can pull small details away from the product. Peel slowly at a low angle.

Mistake 4: Applying to Highly Textured Surfaces

UV DTF works best on smooth surfaces. Rough surfaces may prevent full contact between the adhesive and the product.

Mistake 5: Treating UV DTF Like Vinyl

UV DTF decals are not the same as vinyl cut stickers. They use printed UV ink layers and a transfer film system. Application pressure, peel angle, and surface preparation matter.

Mistake 6: Using UV DTF for T-Shirts

UV DTF is for hard-surface decals, not garment printing. If your business is apparel-focused, choose an EraSmart DTF Printer instead.

Mistake 7: Selling Without Testing

Never assume one transfer will work perfectly on every material. Test the exact surface before taking customer orders.

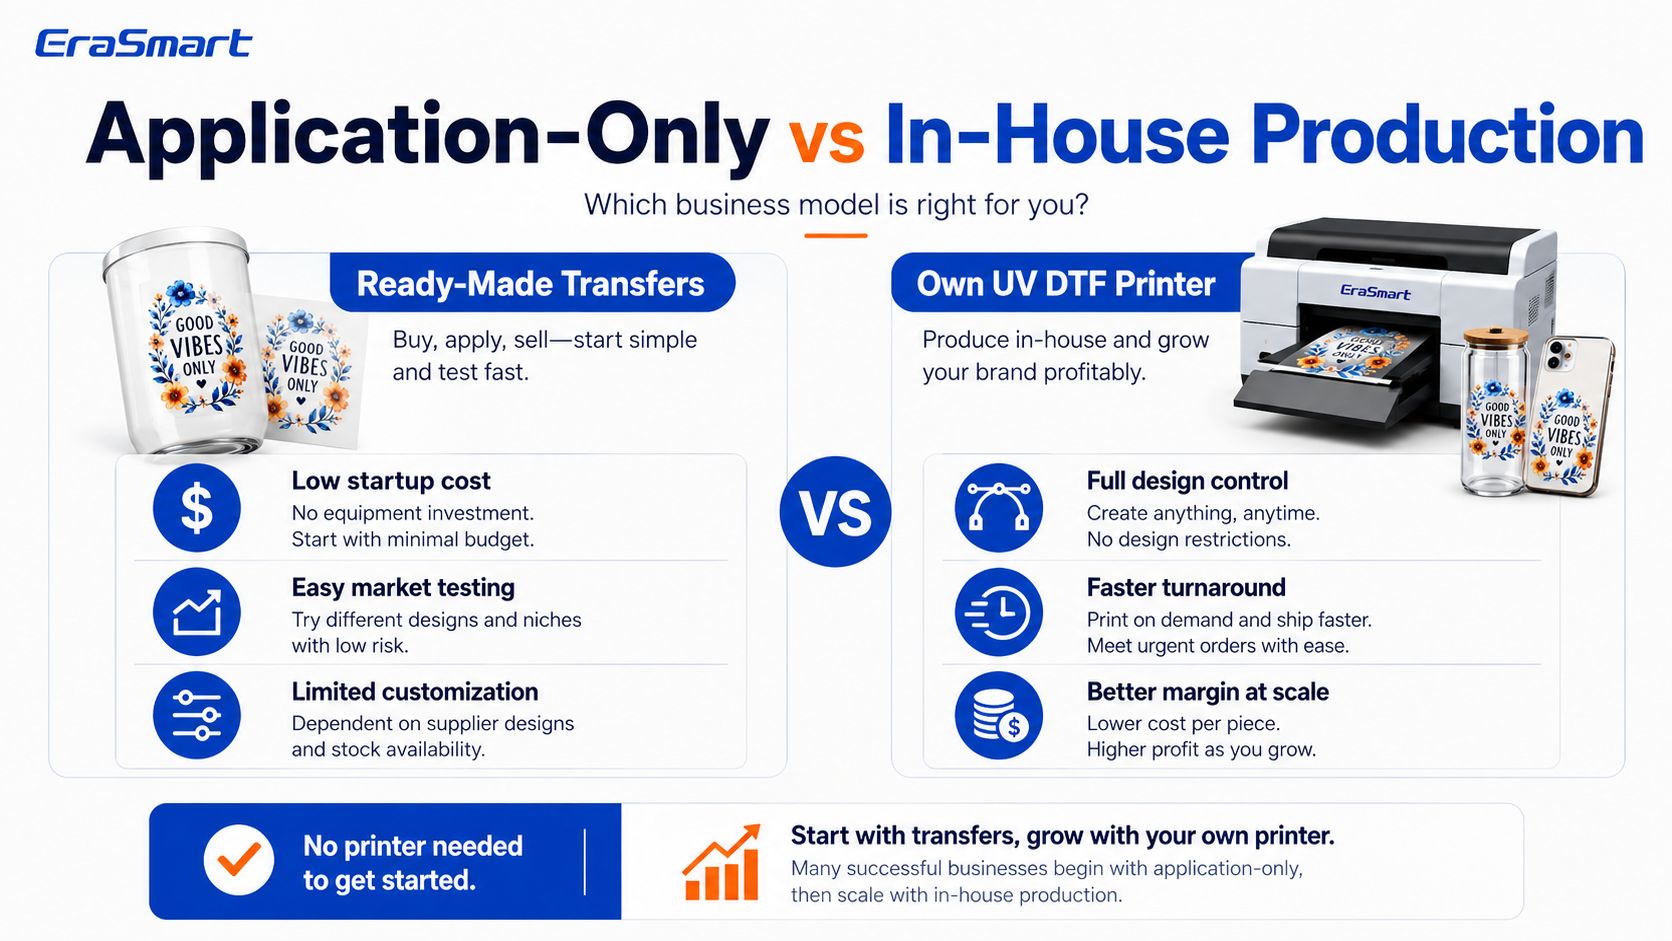
Pros and Cons of Using UV DTF Transfers Without a Printer

ข้อดี

Using ready-made UV DTF transfers without owning a printer has several advantages:

  • lower startup cost

  • no machine maintenance

  • no ink management

  • no RIP setup

  • no lamination workflow

  • easy product testing

  • good for beginners

  • suitable for small batches

  • useful for market validation

  • lower equipment risk

This is a smart way to learn the market before buying a machine.

Disadvantages

However, there are also limitations:

  • higher cost per transfer

  • limited control over print quality

  • limited design changes

  • longer waiting time from suppliers

  • less flexibility for urgent orders

  • difficult to offer same-day customization

  • less control over white ink and varnish effects

  • less control over sizing and gang sheets

  • supplier quality affects your final product

  • profit margin may be lower at scale

This is why many businesses start with ready-made transfers, then upgrade to their own UV DTF printer once they understand demand.

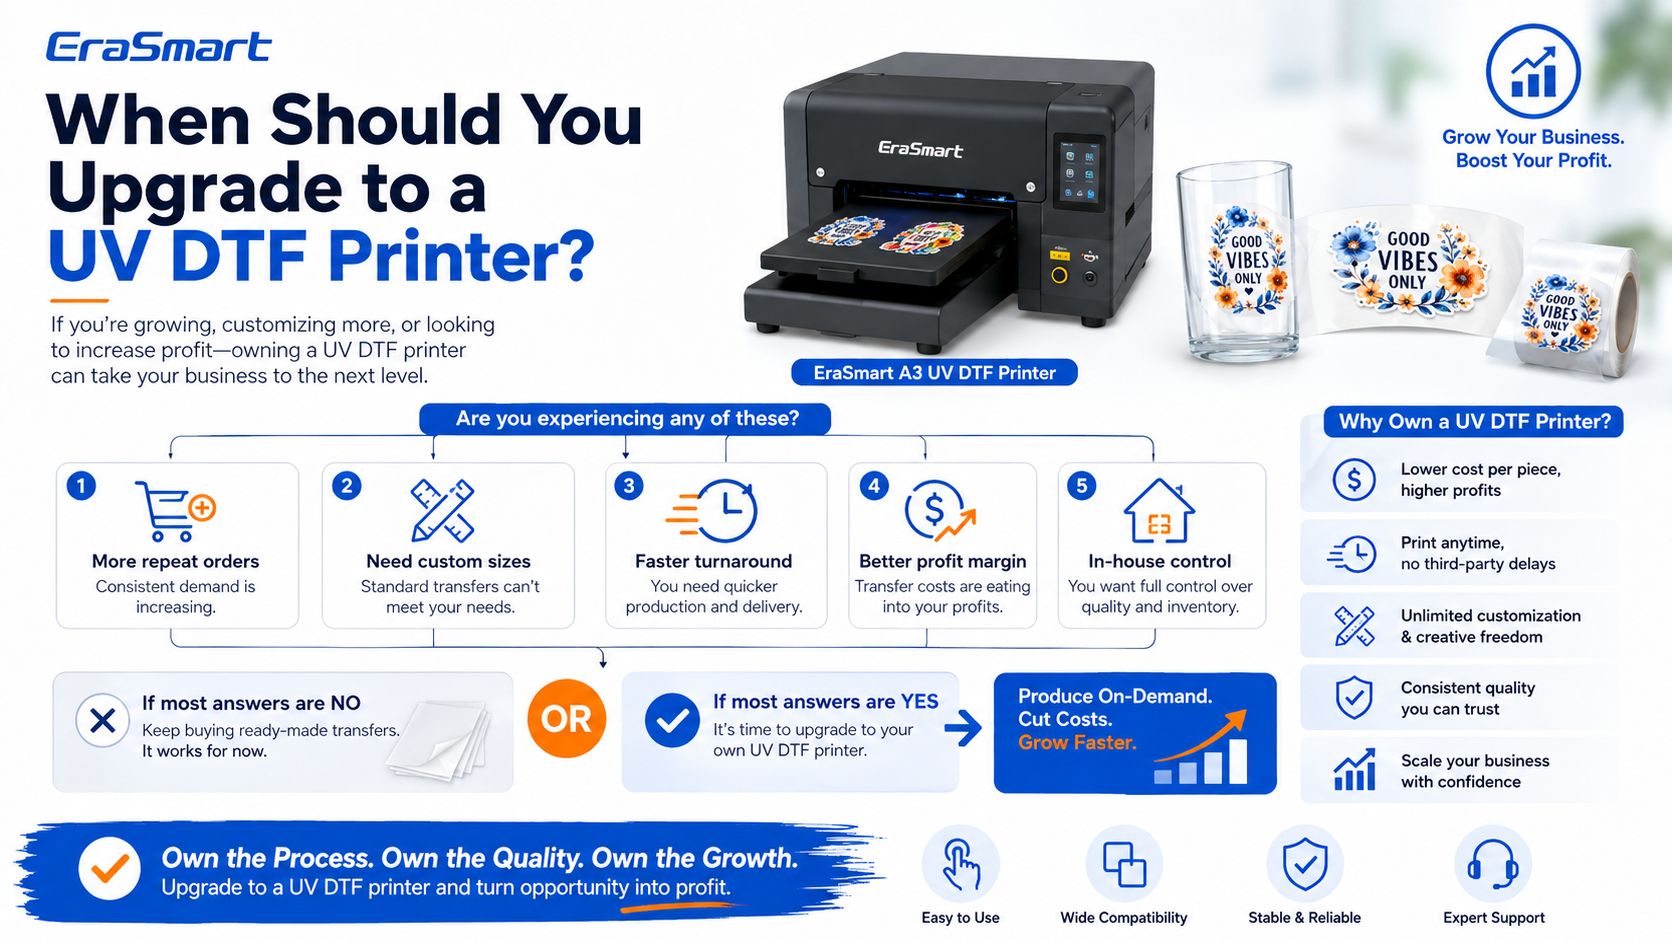
When Should You Upgrade to a UV DTF Printer?

You should consider upgrading when:

  • you receive regular decal orders

  • customers ask for custom sizes

  • customers need fast turnaround

  • you want better profit margin

  • you want to control color and varnish effects

  • you want to print gang sheets efficiently

  • you want to sell your own transfer sheets

  • you want to produce cup wraps in-house

  • supplier lead time slows your business

  • your transfer cost becomes too high

At that point, an เครื่องพิมพ์ EraSmart UV DTF can help you move from application-only business to full in-house production.

EraSmart’s A3 UV DTF system is designed for decals, labels, and cup wraps with A3 / 350 mm media width, CMYK + White + Varnish, up to 1440 dpi, and A/B film cold lamination.

Application-Only Business vs In-House UV DTF Printing

Business Modelดีที่สุดสำหรับข้อได้เปรียบหลักข้อจำกัดหลัก
Apply ready-made transfersBeginners, testing, small batchesLow equipment costLess control and lower margin
Outsource custom transfersSmall brands without printerCustom designs without machineSupplier lead time
Own UV DTF printerGrowing decal businessesFull control and better scalabilityRequires equipment and workflow management
UV DTF + UV printerLarger custom product studiosMore product categoriesHigher investment
UV DTF + textile DTFApparel and hard-goods brandsBroader product businessMore training and workflow control

If you are still comparing printing methods, read EraSmart’s UV DTF Printer vs UV Printer และ UV DTF กับสิ่งทอ DTF กับ UV Flatbed guides before buying equipment.

Best Business Ideas for Ready-Made UV DTF Transfers

If you do not have a printer yet, you can still test these product ideas:

1. Cup Wraps

Buy ready-made cup wrap transfers and apply them to glass cups, tumblers, mugs, or water bottles. This is a strong product category because customers like seasonal and personalized drinkware.

2. Candle Jar Labels

Small candle brands often need premium labels in low quantities. You can test finished UV DTF labels on glass candle jars.

3. Cosmetic Packaging Labels

Skincare bottles, perfume bottles, and cosmetic jars can look more professional with UV DTF decals.

4. Handmade Product Stickers

Etsy sellers, craft brands, soap makers, and small gift brands often need low-MOQ custom branding.

5. Phone Case Decals

You can apply finished UV DTF decals to blank phone cases and test small product collections.

6. Gift Box Decoration

UV DTF decals can add premium branding to gift boxes, event packaging, and boutique product packaging.

7. Local Business Branding

Offer small decal services to cafés, salons, gyms, gift shops, and event businesses.

How to Build a Business Without a UV DTF Printer

Step 1: Choose a Narrow Product Niche

Do not start with every possible decal product. Choose one niche first:

  • ห่อถ้วย

  • candle labels

  • ฉลากเครื่องสำอาง

  • phone case decals

  • gift box labels

  • small business stickers

A narrow niche makes marketing easier.

Step 2: Order Finished Transfers

Prepare your designs and order finished UV DTF transfers from a supplier. Check size, color, finish, adhesive quality, and delivery time.

Step 3: Apply Transfers to Sample Products

Create real samples on your target products. Take photos and videos of the application process and final result.

Step 4: Test Durability

Before selling, test scratch resistance, water exposure, surface adhesion, packaging friction, and customer handling.

Step 5: Sell Small Batches

Start with low inventory. Sell finished products first, then reinvest into more transfers or equipment.

Step 6: Track Your Costs

Track transfer cost, blank product cost, labor, packaging, shipping, advertising, and profit.

Step 7: Upgrade When Orders Become Stable

Once you have repeat customers and predictable demand, consider buying your own UV DTF printer.

Cost Logic: Ready-Made Transfers vs Owning a Printer

Using ready-made transfers has lower startup cost but higher per-piece cost. Owning a printer has higher startup cost but gives better long-term control and scalability.

ปัจจัยด้านต้นทุนReady-Made TransfersOwn UV DTF Printer
Startup costต่ำสูงกว่า
Cost per transferสูงกว่าLower at scale
Design flexibilityLimited by supplierFull control
Turnaround timeDepends on supplierFaster in-house
Quality controlSupplier-dependentOperator-controlled
Custom sizesMay be limitedFlexible
Profit marginLower at volumeBetter at volume
Best stageTestingGrowth and production

For many businesses, the best path is simple:

Start with ready-made UV DTF transfers to test demand. Upgrade to an EraSmart UV DTF printer when orders become regular.

รุ่นเด่น — เครื่องพิมพ์ UV DTF ขนาด A3

การผลิต UV DTF ระดับมืออาชีพสำหรับสติ๊กเกอร์ ฉลาก และห่อหุ้มถ้วย ขนาดที่กะทัดรัด ผลผลิตที่เสถียร และขั้นตอนการทำงานถ่ายโอนความเย็นที่ง่ายดาย

ข้อมูลจำเพาะที่สำคัญ

พารามิเตอร์ ค่า
ความกว้างสื่อสูงสุดA3 / 350 มม
ช่องCMYK + ขาว + วานิช
ปณิธานความละเอียดสูงสุด 1440 dpi
ขั้นตอนการทำงานฟิล์ม A/B UV DTF · เคลือบเย็น
ใช้ดีที่สุดสติ๊กเกอร์ ฉลาก กระดาษห่อแก้ว สกินแกดเจ็ต
ฉีกRiin / EraRip / Photoprint (รองรับ ICC)

คำแนะนำการซื้อ EraSmart

If you are only testing the market, you can begin with ready-made UV DTF transfers. This helps you learn the application process and understand which products customers want.

If your business starts receiving repeat orders, custom size requests, or urgent production needs, it is time to consider in-house UV DTF printing.

เลือกอัน เครื่องพิมพ์ EraSmart UV DTF if your business wants to produce:

  • สติ๊กเกอร์

  • labels

  • ห่อถ้วย

  • สติ๊กเกอร์ติดขวด

  • ฉลากเครื่องสำอาง

  • candle jar labels

  • phone case decals

  • packaging decals

  • gadget skins

  • ป้ายอะคริลิก

  • premium hard-surface transfers

เลือกอัน EraSmart DTF Printer if your business focuses on T-shirts, hoodies, uniforms, sportswear, and fabric products.

เลือกอัน เครื่องพิมพ์ UV EraSmart if your business wants to print directly onto acrylic, glass, metal, wood, phone cases, and rigid products.


อาจเป็นเช่นเดียวกับคุณด้วย

  • เครื่องพิมพ์ Erasmart

    เครื่องพิมพ์ UV
    เครื่องพิมพ์ DTF
    เครื่องพิมพ์ DTG
    เครื่องกดความร้อน
    เครื่องพิมพ์โฆษณา

  • เครื่องมือเครื่องพิมพ์

    เตาอบ DTF
    กดร้อน
    เครื่องแกะสลัก
    การถ่ายเทความร้อนของแก้ว
    เครื่องเคลือบ

  • สิ้นเปลือง

    หมึกพิมพ์
    เคสโทรศัพท์มือถือ
    ผลิตภัณฑ์แก้ว
    ทำความสะอาดของเหลว
    ผ้าฝ้าย

  • ติดต่อเรา

    whatsapp: +8618566233796
    WeChat: +8618566233796
    มือถือ: +8618566233796
    เว็บ:www.erasmart.com
    ร้านค้า:www.erasmartmall.com

  • ขอใบเสนอราคา

    เพียงแค่ให้รายละเอียดเล็กน้อยและเราจะช่วยให้คุณได้รับใบเสนอราคาด่วน!

    ต้องการราคาเครื่องพิมพ์ใช่ไหม?

    บอกความต้องการการพิมพ์ของคุณให้เราทราบ ทีมงานของเราจะตอบกลับภายใน 24 ชั่วโมง