Kích thước nhỏ nhà sản xuất máy in phun phẳng

Cách in trên gỗ: Hướng dẫn thực hành về in UV, chuẩn bị và sản phẩm tùy chỉnh
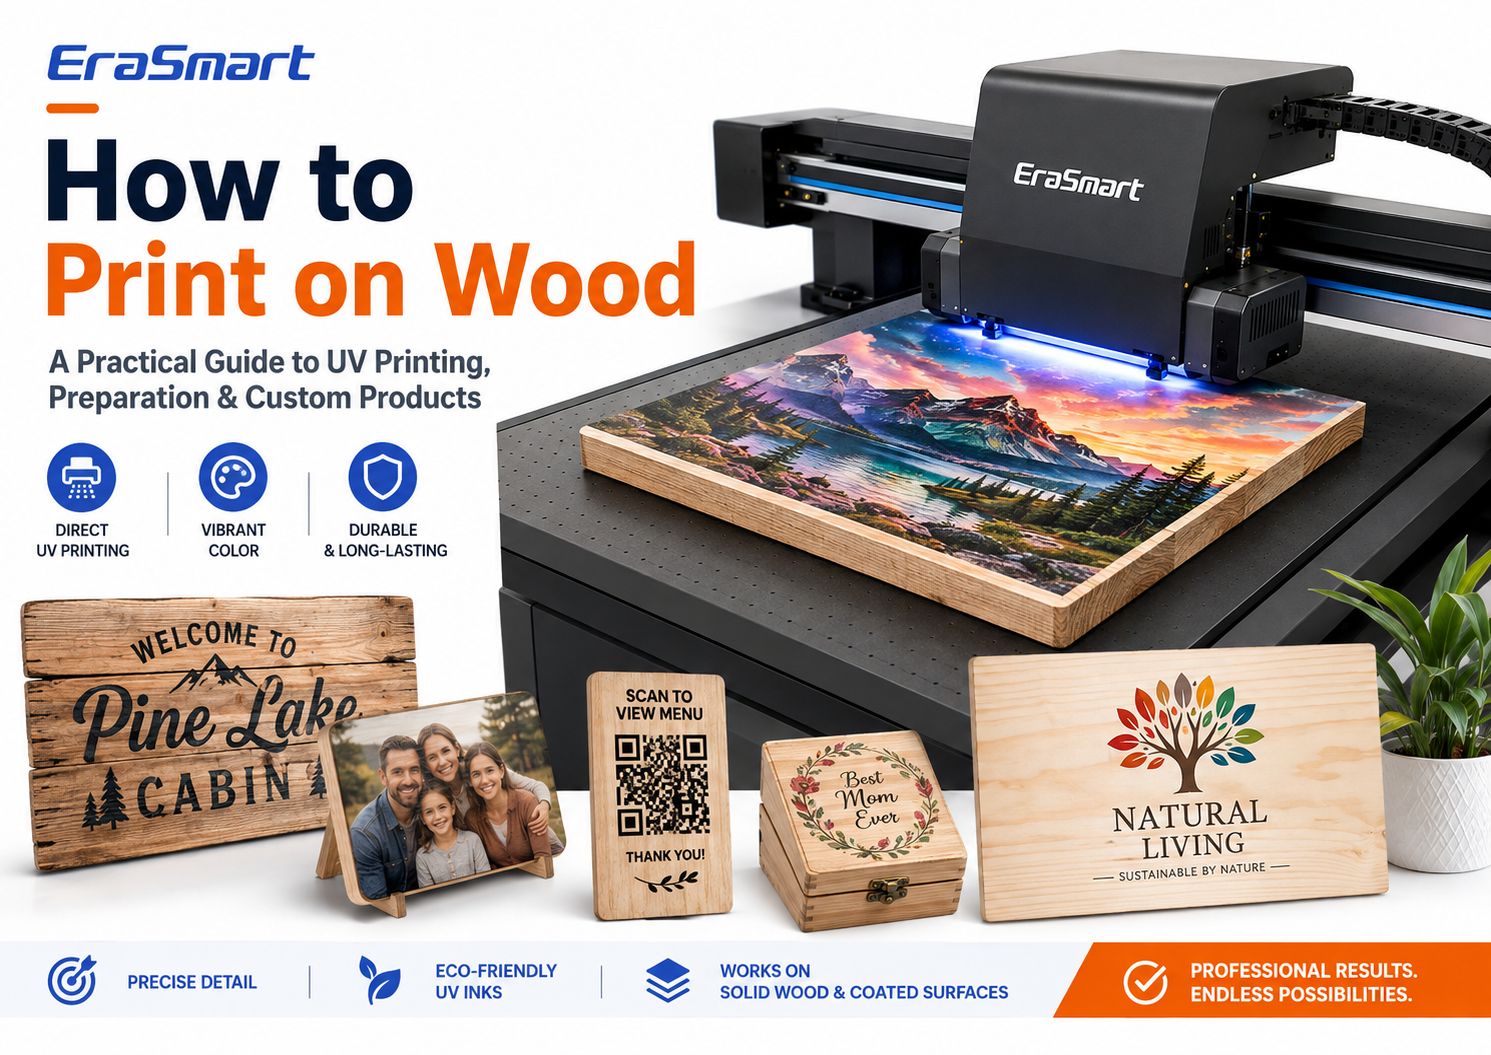
Có, bạn có thể in trực tiếp trên gỗ.
Để tùy chỉnh đầy đủ màu sắc chuyên nghiệp, in phẳng UV là một trong những phương pháp thiết thực nhất vì máy in có thể đặt CMYK, mực trắng và vecni tùy chọn trực tiếp lên bề mặt gỗ phù hợp mà không cần giấy chuyển.
Điều này cho phép sản xuất bảng hiệu bằng gỗ, mảng ảnh, màn hình mã QR, giải thưởng, hộp quà tặng, đế lót ly, bảng menu, trang trí nhà cửa, sản phẩm có thương hiệu và quà tặng cá nhân hóa theo lô nhỏ hoặc vừa.
Nhưng việc in gỗ thành công không chỉ đơn giản là đặt một tấm gỗ lên máy in UV và nhấn In.
Gỗ là một vật liệu tự nhiên. Hạt, độ xốp, bụi, độ ẩm, lớp phủ bề mặt, độ phẳng, dầu, sáp và kết cấu đều có thể ảnh hưởng đến chất lượng in và độ bám dính của mực.
Một tấm gỗ dán bạch dương mịn có thể hoạt động rất khác so với gỗ thông thô. Một tấm tre thô có thể hoạt động khác với một sản phẩm tre sơn mài. Ngay cả hai phôi gỗ trông giống nhau cũng có thể tạo ra kết quả khác nhau nếu lớp phủ của chúng khác nhau.
Do đó, cách tiếp cận chuyên nghiệp là:
chuẩn bị bề mặt → kiểm tra vật liệu → chọn chiến lược mực trắng phù hợp → in mẫu → kiểm tra độ bám dính → chuẩn hóa quy trình làm việc
Hướng dẫn này giải thích các cách chính để in trên gỗ, cách in UV trực tiếp, bề mặt gỗ nào dễ in hơn, cách chuẩn bị vật liệu, khi nào nên sử dụng mực trắng, cách tạo quy trình sản xuất lặp lại và những sản phẩm bạn có thể tạo ra bằngMáy in UV EraSmart.
Trả lời nhanh: Cách tốt nhất để in trên gỗ là gì?
Không có phương pháp tốt nhất cho mọi sản phẩm gỗ.
Phương pháp phù hợp phụ thuộc vào:
- gỗ thô hay gỗ tráng
- liệu bạn có cần đầy đủ màu sắc không
- bạn có cần mực trắng không
- số lượng đặt hàng
- hình dạng bề mặt
- độ phức tạp của thiết kế
- yêu cầu hoàn thiện
- tốc độ sản xuất
- cho dù sản phẩm là sản phẩm thủ công DIY hay sản phẩm thương mại
Để tùy chỉnh đầy đủ màu sắc thương mại trên các sản phẩm bằng gỗ phẳng,In UV trực tiếp là một trong những lựa chọn linh hoạt nhất.
Nó cho phép tác phẩm nghệ thuật được in trực tiếp lên bề mặt và đặc biệt hữu ích khi bạn cần:
- đồ họa đầy màu sắc
- bức ảnh
- logo
- mực trắng
- sản xuất hàng loạt nhỏ
- tên cá nhân
- thiết kế biến
- mẫu sản phẩm lặp đi lặp lại
Tuy nhiên, các phương pháp khác vẫn có cách sử dụng riêng.
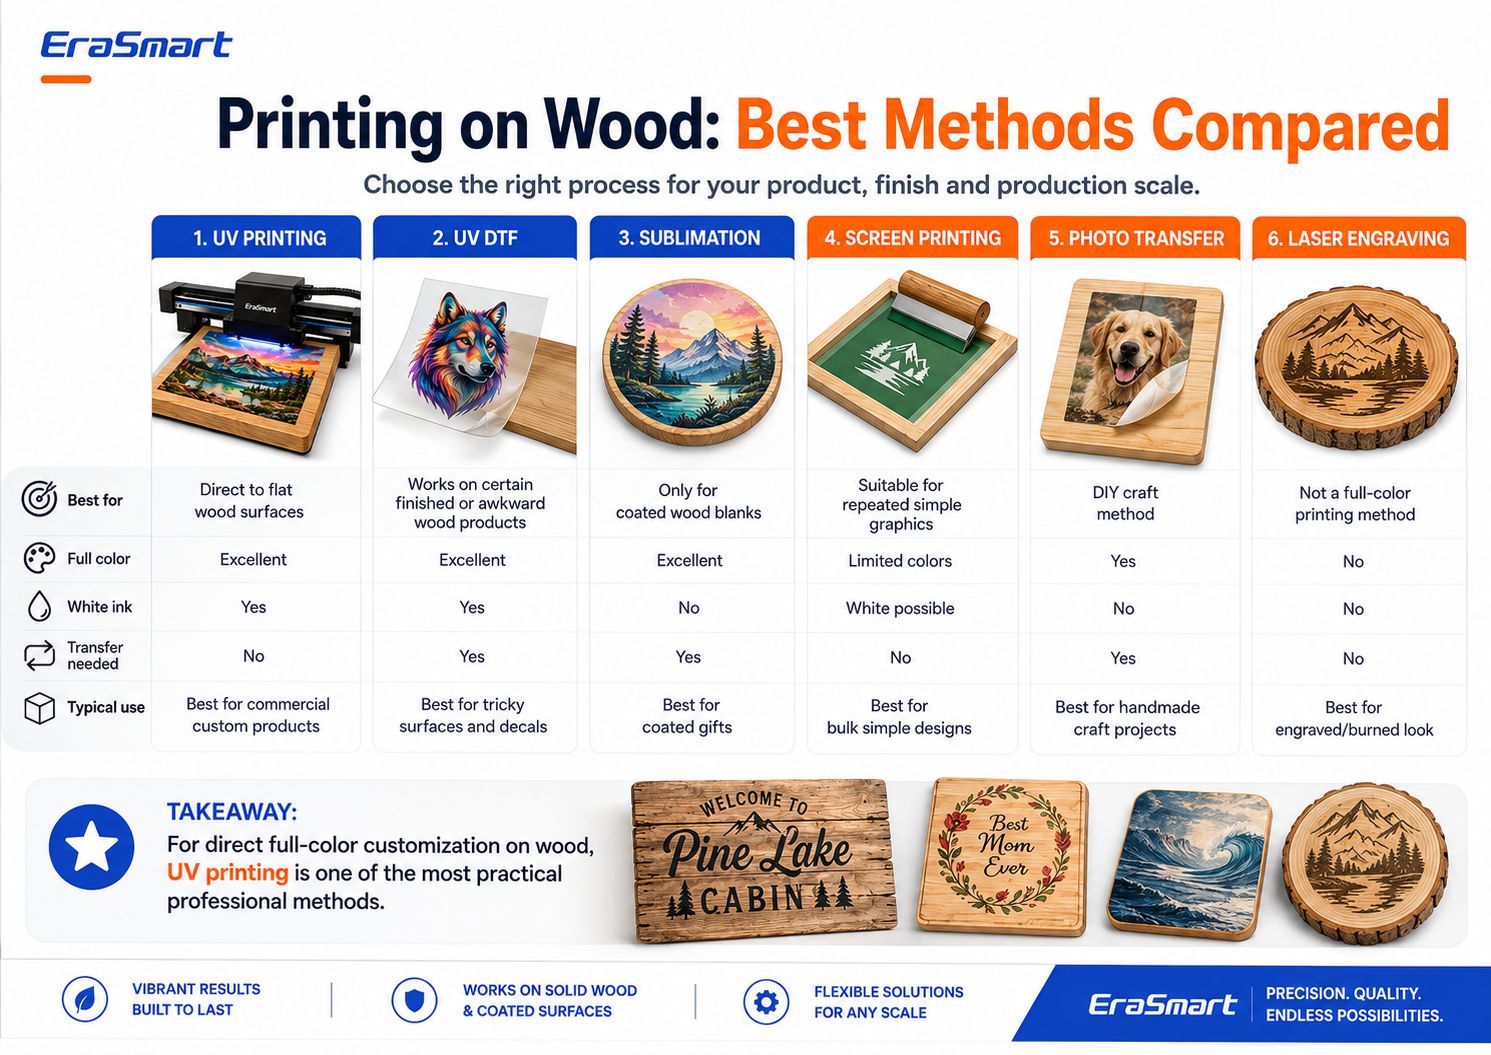
| Phương pháp | đầy đủ màu sắc | Mực trắng | Cần chuyển khoản | Sử dụng tốt nhất |
|---|---|---|---|---|
| In UV | Xuất sắc | Đúng | KHÔNG | Tùy chỉnh gỗ trực tiếp thương mại |
| UV DTF | Xuất sắc | Đúng | Đúng | Sản phẩm đã hoàn thiện hoặc khó định vị |
| Thăng hoa | Xuất sắc | KHÔNG | Đúng | Phôi gỗ phủ thăng hoa |
| In màn hình | Bị giới hạn bởi thiết lập | Khả thi | KHÔNG | Đồ họa đơn giản lặp đi lặp lại |
| Chuyển ảnh | Đúng | KHÔNG | Đúng | Dự án thủ công DIY |
| Khắc Laser | Không có đầy đủ màu sắc | KHÔNG | KHÔNG | Hiệu ứng gỗ cháy hoặc khắc |
Điểm mấu chốt làin trên gỗkhông phải là một quá trình duy nhất.
Chọn phương pháp tùy theo thành phẩm bạn muốn bán.
Tại sao in UV hoạt động tốt trên gỗ
Máy in UV sử dụng mực được xử lý bằng tia UV trong quá trình in.
Thay vì dựa vào giấy chuyển, máy in sẽ phun mực trực tiếp lên bề mặt gỗ.
Đối với các sản phẩm gỗ phù hợp, điều này tạo ra một số lợi thế.
In trực tiếp lên bề mặt
Tác phẩm nghệ thuật được in trực tiếp lên bảng.
Điều này có thể giảm bớt các bước sản xuất so với quy trình công việc yêu cầu:
- giấy chuyển nhượng
- chất kết dính riêng biệt
- truyền nhiệt
- chuyển ảnh thủ công
Tác phẩm nghệ thuật đầy màu sắc
In UV phù hợp cho các thiết kế như:
- bức ảnh
- minh họa đầy màu sắc
- logo
- phong cảnh
- đồ họa đám cưới
- hoa văn trang trí
- mã QR
- tên cá nhân
- xây dựng thương hiệu sản phẩm
Mực trắng
Mực trắng đặc biệt hữu ích trên gỗ vì chất nền tự nhiên không phải là màu trắng.
Bạn có thể sử dụng mực trắng để tạo độ mờ mạnh hơn và màu sắc dễ đoán hơn.
Hiệu ứng sơn bóng
Trên các cấu hình máy in UV tương thích, sơn bóng có thể được thêm vào một cách có chọn lọc cho:
- điểm bóng
- chi tiết nâng cao
- logo nổi bật
- điểm nhấn trang trí
- hiệu ứng bề mặt cao cấp
Tùy chỉnh hàng loạt nhỏ
In kỹ thuật số giúp sản xuất dễ dàng hơn:
- một tấm ảnh
- mười cái tên khác nhau
- nhiều dấu hiệu QR
- sản phẩm quà tặng ngắn hạn
- đồ cưới cá nhân
- biển hiệu doanh nghiệp địa phương
mà không tạo ra một màn hình hoặc tấm in truyền thống riêng cho mỗi thiết kế.
Bạn có thể in UV trên loại gỗ nào?
Máy in UV có thể hoạt động với nhiều chất nền bằng gỗ và gỗ, nhưng chỉ riêng loại gỗ không quyết định chất lượng in.
Tình trạng bề mặt cũng quan trọng không kém.
Các vật liệu phổ biến bao gồm:
- ván ép bạch dương
- cây phong
- cây thông
- cây tre
- MDF
- gỗ tráng
- gỗ sơn
- gỗ kín
- tấm gỗ cứng đã chuẩn bị sẵn
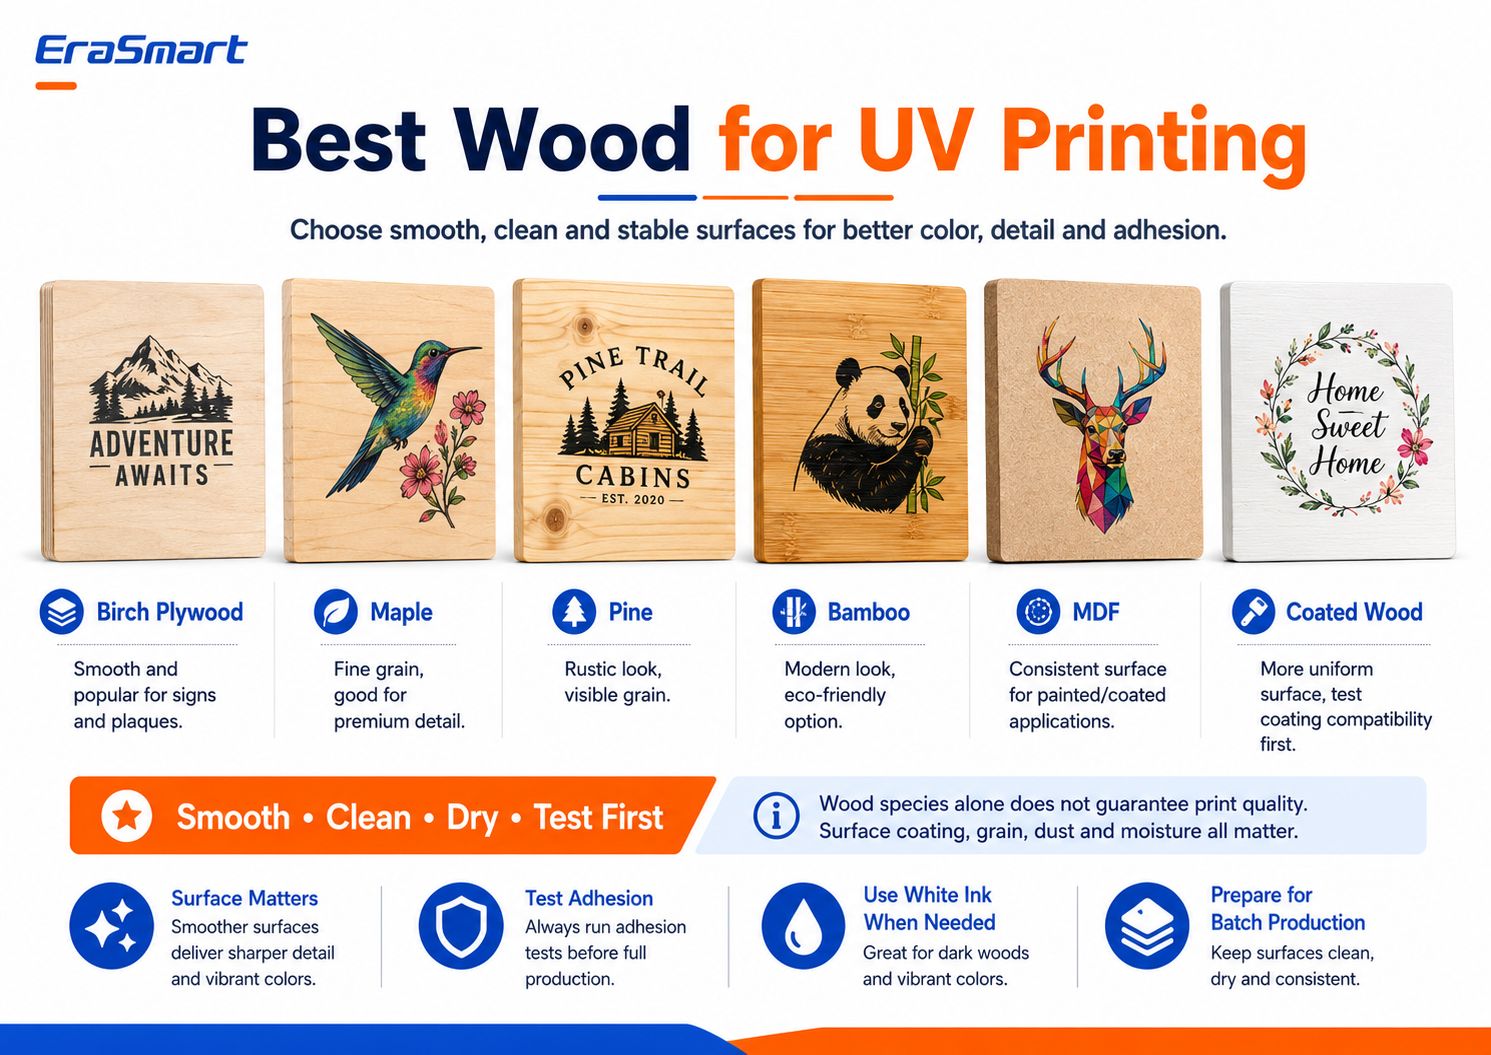
Ván ép bạch dương
Ván ép bạch dương phổ biến vì:
- dấu hiệu
- mảng bám
- miếng trang trí
- quà tặng cá nhân
Bề mặt ván ép mịn có thể cung cấp chi tiết tốt và định vị có thể dự đoán được.
Tuy nhiên, chất lượng ván ép khác nhau. Kiểm tra độ cong vênh, khuyết tật bề mặt và độ đồng nhất của veneer.
Cây phong
Maple có thớ gỗ tương đối mịn và có thể hoạt động tốt đối với các sản phẩm có chi tiết nhỏ.
Nó có thể phù hợp cho:
- mảng cao cấp
- sản phẩm ảnh
- dấu hiệu nhỏ
- quà tặng hàng hiệu
Cây thông
Thông mang lại vẻ ngoài mộc mạc hơn.
Các hạt và nút thắt có thể nhìn thấy được có thể trở thành một phần của thiết kế, đặc biệt là khi in mà không có phần đế dưới màu trắng toàn bộ.
Tuy nhiên, gỗ thông cứng hơn có thể cần chà nhám và chuẩn bị thêm.
Cây tre
Sản phẩm tre được ưa chuộng vì:
- quà tặng
- thiết kế nội thất
- phụ kiện nhà bếp
- mảng bám
- sản phẩm có thương hiệu
Vì sản phẩm tre thành phẩm có thể có lớp phủ bề mặt khác nhau nên hãy kiểm tra chính xác sản phẩm trước khi sản xuất.
MDF
MDF cung cấp bề mặt được sản xuất đồng đều hơn so với vân gỗ tự nhiên.
Nó có thể hữu ích cho:
- tấm sơn
- bảng chỉ dẫn
- thiết kế nội thất
- trưng bày sản phẩm
MDF thô có tính xốp, do đó tình trạng bề mặt của nó và bất kỳ quá trình phủ hoặc niêm phong nào phải được đánh giá trước khi sản xuất.
Gỗ tráng
Gỗ tráng hoặc sơn có thể mang lại vẻ ngoài đồng đều hơn.
Tuy nhiên, lớp phủ có một biến số khác:
Liệu mực UV có liên kết đúng cách với lớp phủ đó không?
Lớp phủ bóng, sáp, sơn mài, sơn, chất trám kín hoặc lớp hoàn thiện có năng lượng bề mặt thấp có thể ảnh hưởng đến độ bám dính.
Luôn kiểm tra vật liệu hoàn thiện thực tế.
Nguyên tắc quan trọng nhất: mịn, sạch, khô và ổn định
Khi chọn gỗ để in UV, hãy tìm bốn đặc điểm:
Trơn tru
Bề mặt mượt mà hơn thường hỗ trợ văn bản sắc nét hơn, đường nét rõ ràng hơn và chi tiết hình ảnh nhất quán hơn.
Lau dọn
Bụi từ quá trình chà nhám hoặc xử lý có thể cản trở việc in ấn và bám dính.
Khô
Độ ẩm có thể ảnh hưởng đến bề mặt và độ ổn định lâu dài của sản phẩm.
Ổn định
Bảng phải đủ phẳng để có khoảng trống đầu in an toàn và nhất quán.
Điều này quan trọng hơn việc chỉ đơn giản là chọn một loài từ danh sách.
Để có cái nhìn rộng hơn về chất nền tương thích với tia cực tím, hãy xem EraSmartHướng dẫn sử dụng vật liệu máy in UV.
Gỗ thô và gỗ tráng
Gỗ thô và gỗ tráng tạo ra những cơ hội khác nhau.
In trên gỗ thô
Gỗ thô bảo tồn đặc tính vật liệu tự nhiên.
Điều này rất hữu ích khi hạt là một phần có chủ ý của thiết kế.
Ưu điểm bao gồm:
- vẻ ngoài tự nhiên
- hiệu ứng mộc mạc
- kết cấu gỗ có thể nhìn thấy
- biến thể sản phẩm độc đáo
Những thách thức có thể bao gồm:
- độ xốp lớn hơn
- hạt không đều
- bụi
- sợi bề mặt
- sự hấp thụ thay đổi
- độ bám dính không nhất quán
Gỗ thô thường được hưởng lợi từ việc chà nhám và làm sạch cẩn thận.
In trên gỗ tráng hoặc kín
Gỗ tráng có thể cung cấp một bề mặt hình ảnh đồng đều hơn.
Những lợi thế có thể có:
- kết thúc mượt mà hơn
- vẻ ngoài nhất quán hơn
- hạt ít nhìn thấy hơn
- màu sắc dễ dự đoán hơn trong một số trường hợp
Nhưng bản thân lớp phủ phải tương thích với mực UV.
Các vấn đề tiềm ẩn bao gồm:
- độ bám dính yếu
- gãi
- bong tróc
- mực nằm trên bề mặt không tương thích
Đây là lý do tại sao cách tiếp cận an toàn nhất là:
không bao giờ phê duyệt một loại nguyên liệu gỗ để sản xuất chỉ dựa vào tên của nó. Kiểm tra chính xác sản phẩm trống hoặc thành phẩm.
Cách chuẩn bị gỗ trước khi in UV
Chuẩn bị bề mặt là một trong những phần quan trọng nhất của toàn bộ quá trình.
Bước 1: Kiểm tra bảng
Kiểm tra:
- độ phẳng
- vết xước
- vết lõm
- nút thắt
- sợi lỏng lẻo
- lớp phủ
- cong vênh
- độ ẩm
- dầu hoặc sáp
Đừng bắt đầu in cho đến khi bạn biết mình đang làm việc trên bề mặt nào.
Bước 2: Cát nếu cần thiết
Nếu bảng thô, chà nhám nhẹ có thể giúp tạo ra bề mặt in ổn định hơn.
Mục tiêu không phải lúc nào cũng là loại bỏ đặc tính gỗ tự nhiên.
Mục tiêu là loại bỏ:
- sợi lỏng lẻo
- điểm cao thô
- mảnh vụn
- khuyết tật bề mặt không mong muốn
Chà nhám mịn thường thích hợp hơn cho việc chuẩn bị in hơn là để lại bề mặt thô ráp chưa hoàn thiện.
Bước 3: Loại bỏ tất cả bụi chà nhám
Bước này rất dễ bị đánh giá thấp.
Bụi gỗ có thể cản trở:
- vị trí đặt mực
- độ sắc nét của cạnh
- độ bám dính
- sự xuất hiện cuối cùng
Sử dụng phương pháp làm sạch không có xơ vải thích hợp và đảm bảo bề mặt sạch sẽ trước khi in.
Bước 4: Loại bỏ dầu và ô nhiễm
Một số sản phẩm gỗ thành phẩm có thể chứa:
- dầu
- sáp
- hợp chất đánh bóng
- dấu vân tay
- cặn sản xuất
Những thứ này có thể làm giảm độ bám dính của mực.
Bước 5: Kiểm tra lớp phủ hiện có
Nếu sản phẩm được sơn, bịt kín, sơn bóng hoặc phủ, hãy tiến hành kiểm tra độ bám dính.
Đừng cho rằng mọi sản phẩm gỗ được sơn hoặc dán đều có thể in UV tự động.
Bước 6: Kiểm tra trước khi sản xuất
In một mẫu nhỏ bằng cách sử dụng tương tự:
- gỗ
- xử lý bề mặt
- loại tác phẩm nghệ thuật
- chiến lược mực trắng
- cài đặt bảo dưỡng
mà bạn định sử dụng cho đơn đặt hàng cuối cùng của khách hàng.
Nếu cần thiết đối với một chất nền cụ thể, lớp sơn lót hoặc tiền xử lý thích hợp có thể cải thiện độ bám dính.
Không sử dụng sơn lót tự động trên từng miếng gỗ.
Sử dụng nó khi thử nghiệm cho thấy vật liệu yêu cầu nó.
Chuẩn bị tác phẩm nghệ thuật để in gỗ
Một bản in gỗ tốt bắt đầu trước khi vật liệu đến máy in.
Kiểm tra:
- kích thước sản phẩm cuối cùng
- độ phân giải
- logo
- kích thước văn bản
- chất lượng hình ảnh
- lớp mực trắng
- lớp sơn bóng
- khu vực trong suốt
- chảy máu
- biên độ an toàn
Tác phẩm nghệ thuật raster
Để có hình ảnh và minh họa chi tiết, xung quanh300 dpi ở kích thước in cuối cùnglà điểm khởi đầu thực tế cho các sản phẩm có góc nhìn gần.
Tác phẩm nghệ thuật vector
Các tệp vectơ thích hợp hơn cho:
- logo
- mã QR
- chữ
- biểu tượng
- nghệ thuật vẽ đường
- đồ họa thương hiệu
vì chúng vẫn sắc nét khi thay đổi kích thước.
Thiết kế cho Gỗ, Không chỉ cho Màn hình
Một thiết kế được chuẩn bị trên canvas máy tính màu trắng có thể trông hoàn toàn khác khi được in trên gỗ tự nhiên.
Đây là lý do tại sao quyết định mực trắng lại quan trọng đến vậy.
Mực trắng và vân gỗ tự nhiên: Nên chọn loại nào?
Đây là một trong những quyết định sáng tạo quan trọng nhất trong việc in UV trên gỗ.
Có ba cách tiếp cận thực tế.
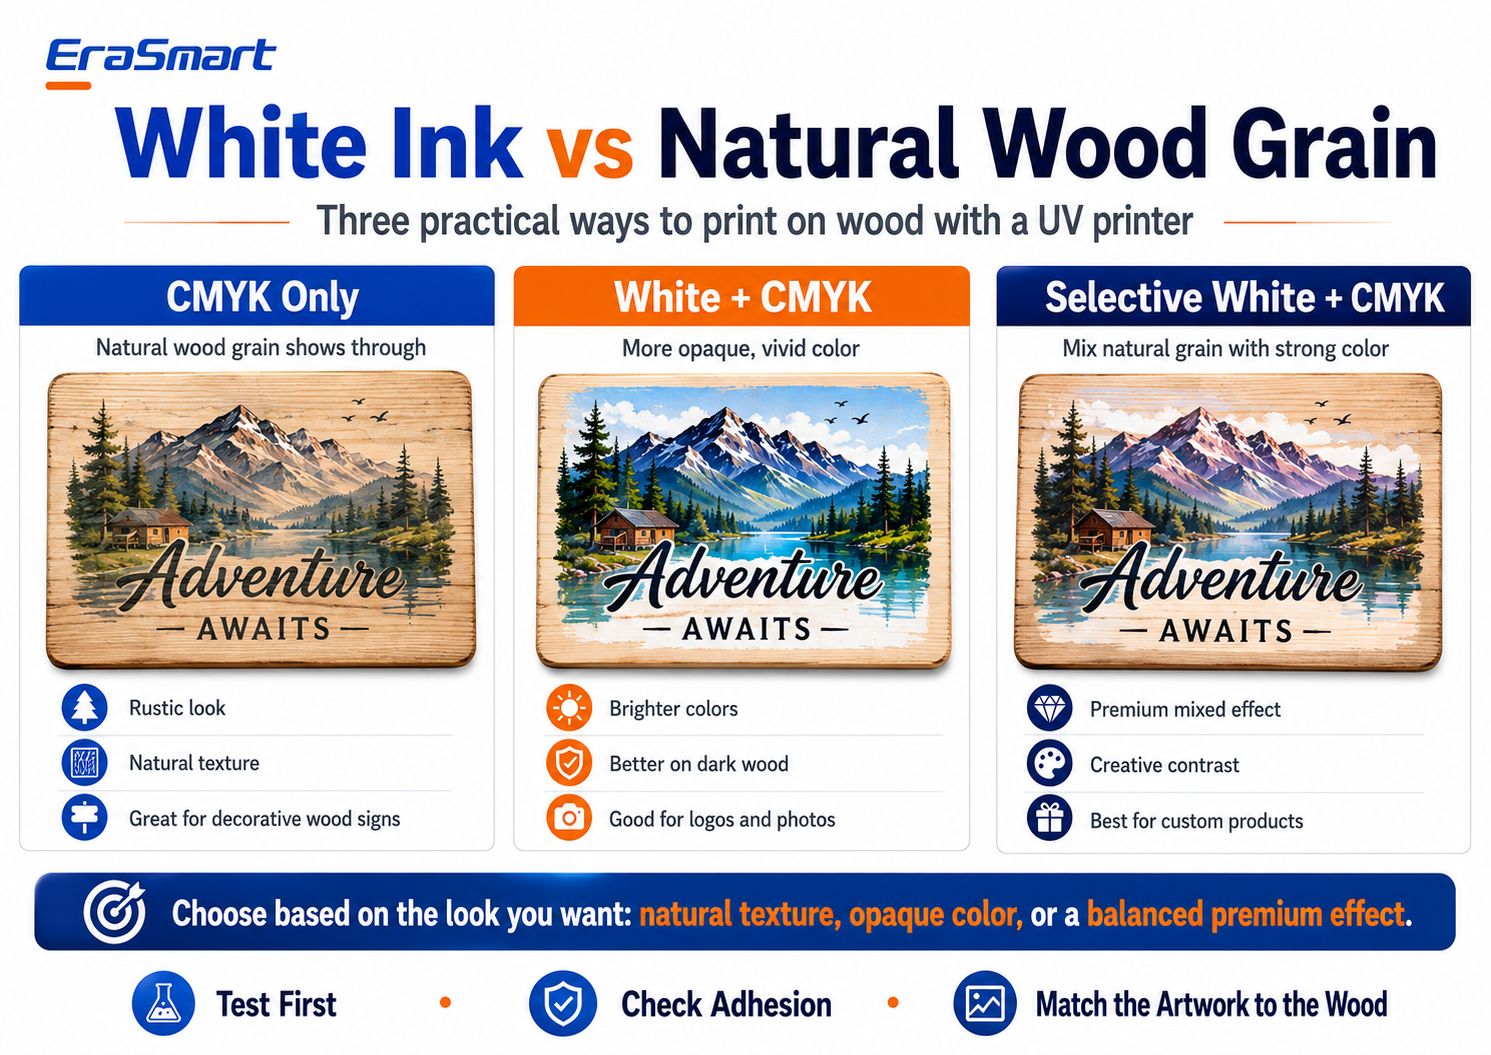
Tùy chọn 1: Chỉ CMYK
Với cách in chỉ CMYK, gỗ tự nhiên vẫn có thể nhìn thấy được qua các phần sáng hơn của tác phẩm nghệ thuật.
Điều này có thể tạo ra một:
- cái nhìn mộc mạc
- vẻ ngoài cổ điển
- kết cấu tự nhiên
- cảm giác thủ công
Nó đặc biệt hiệu quả đối với các thiết kế được tạo ra có chủ ý trên nền gỗ.
Các sản phẩm phù hợp bao gồm:
- bảng hiệu cabin
- mảng trang trí
- bảng hiệu quán cà phê
- quà tặng mộc mạc
- trang trí nhà tự nhiên
Hạn chế quan trọng là khả năng dự đoán màu sắc.
Vì chất nền có màu nâu hoặc rám nắng chứ không phải màu trắng nên màu cuối cùng sẽ tương tác với gỗ.
Các vùng sáng có thể tối hơn hoặc trong suốt hơn so với trên màn hình.
Cách 2: Trắng + CMYK
Lớp nền màu trắng tạo ra lớp nền mờ hơn bên dưới tác phẩm nghệ thuật màu.
Điều này rất hữu ích khi bạn cần:
- màu sắc mạnh mẽ hơn
- ảnh sáng hơn
- logo rõ ràng hơn
- màu sắc thương hiệu nhất quán hơn
- tầm nhìn tốt hơn trên gỗ tối màu
Các ứng dụng điển hình bao gồm:
- bức ảnh
- logo kinh doanh
- minh họa đầy màu sắc
- xây dựng thương hiệu sản phẩm
- tác phẩm nghệ thuật chi tiết
Trắng + CMYK làm giảm ảnh hưởng của màu gỗ tự nhiên.
Cách 3: Trắng chọn lọc + CMYK
Màu trắng chọn lọc thường là lựa chọn thú vị nhất cho các sản phẩm gỗ cao cấp.
Thay vì in màu trắng dưới toàn bộ hình ảnh, chỉ sử dụng màu trắng ở những nơi cần độ mờ.
Ví dụ:
- màu trắng dưới khung cảnh đầy màu sắc
- không có khu vực nền gỗ màu trắng phía sau
- màu trắng bên dưới logo công ty
- hạt tự nhiên xung quanh các yếu tố trang trí
Điều này tạo ra sự kết hợp của:
gỗ tự nhiên + kiểm soát đầy đủ màu sắc
và có thể tạo cho sản phẩm hoàn thiện một diện mạo được thiết kế có chủ đích hơn.
Bạn nên sử dụng chế độ mực trắng nào?
Một quy tắc quyết định đơn giản:
Muốn kết cấu tự nhiên tối đa?
Chỉ sử dụng CMYK.
Muốn có màu sắc sống động, dễ đoán hơn?
Sử dụng Trắng + CMYK.
Muốn có một hiệu ứng hỗn hợp cao cấp?
Sử dụng màu trắng chọn lọc + CMYK.
Lựa chọn tốt nhất phụ thuộc vào tác phẩm nghệ thuật và định vị sản phẩm.
Cách in UV trên gỗ từng bước
Sau khi chuẩn bị xong nguyên liệu và tác phẩm nghệ thuật, hãy xây dựng quy trình sản xuất có thể lặp lại.
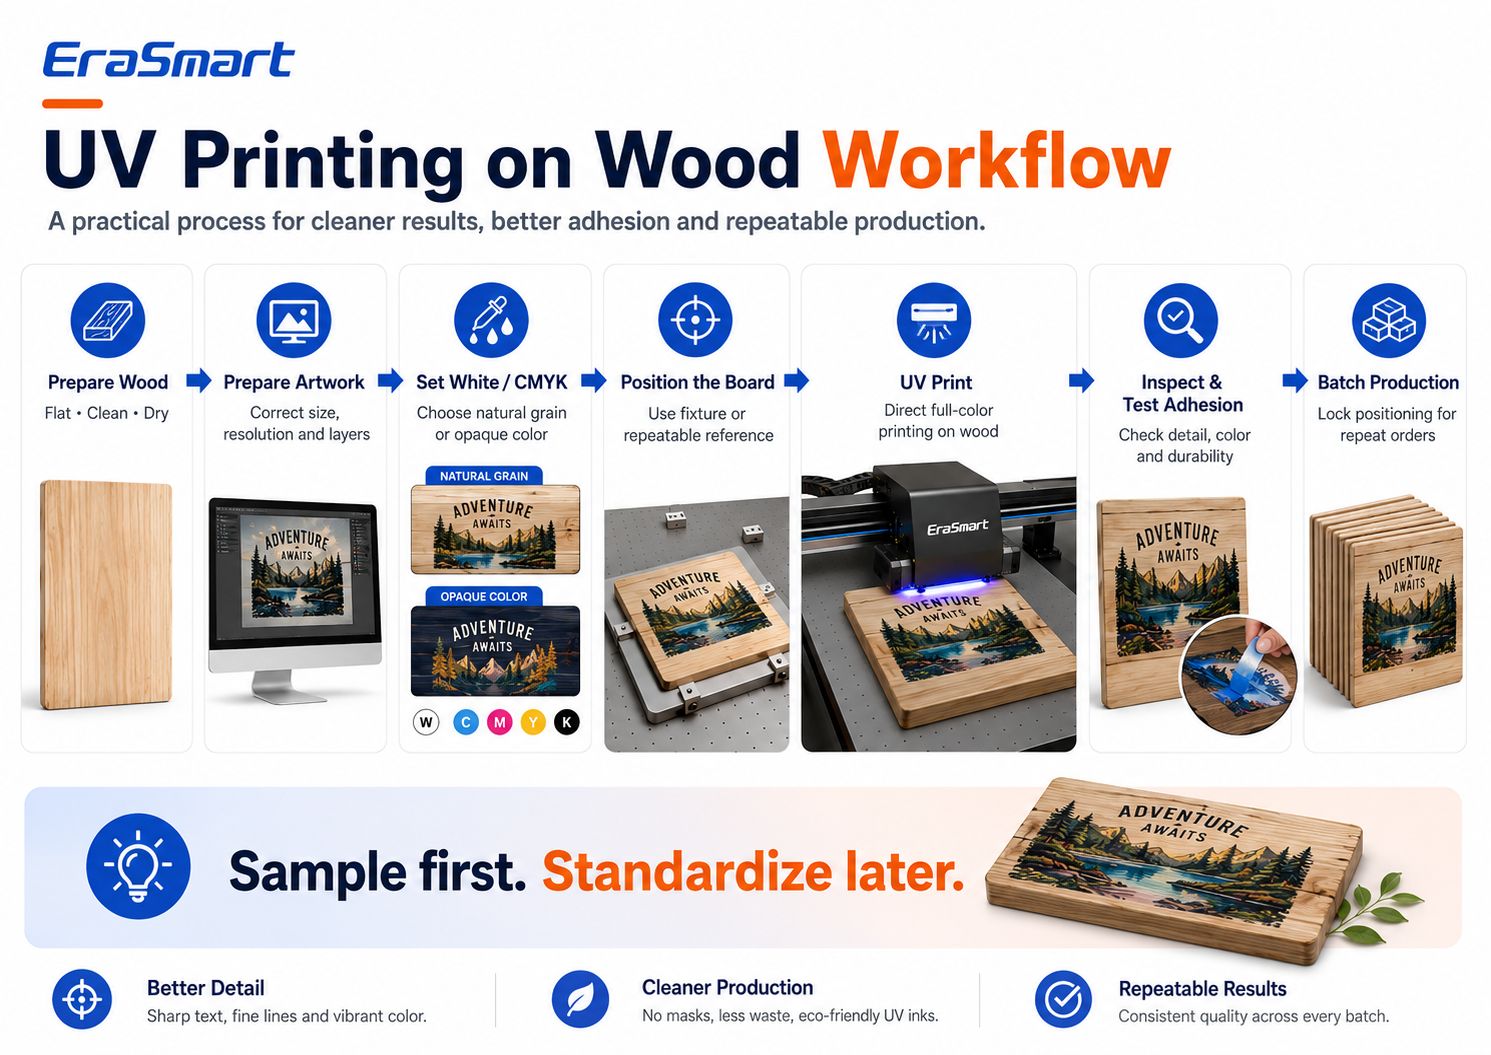
Bước 1: Chuẩn bị gỗ
Hãy chắc chắn rằng bảng là:
- lau dọn
- khô
- phẳng
- không có bụi
- thích hợp để thử nghiệm
Bước 2: Chuẩn bị tác phẩm nghệ thuật
Bộ:
- kích thước cuối cùng
- độ phân giải hình ảnh
- vị trí in
- Lớp CMYK
- lớp mực trắng
- lớp sơn bóng nếu cần thiết
Bước 3: Chọn chiến lược mực trắng của bạn
Quyết định giữa:
- chỉ CMYK
- Trắng + CMYK
- Trắng chọn lọc + CMYK
trước khi gửi lệnh in tới máy in.
Bước 4: Định vị bảng
Đặt gỗ chắc chắn trên bệ in.
Đối với các sản phẩm lặp lại, hãy cân nhắc sử dụng:
- dấu định vị
- tài liệu tham khảo cạnh
- đồ đạc
- đồ gá lắp
- mẫu
Điều này làm giảm lỗi căn chỉnh.
Bước 5: Đặt chiều cao in
Khoảng trống đầu in chính xác là rất quan trọng.
Bề mặt bị biến dạng nghiêm trọng hoặc được đặt ở vị trí quá cao có thể tạo ra:
- vấn đề về chất lượng in
- khoảng cách phun không chính xác
- rủi ro đầu in tiềm ẩn
Không sử dụng máy in để bù cho gỗ bị cong vênh nặng.
Sử dụng sản phẩm ổn định, đủ phẳng.
Bước 6: In một mẫu
Đừng ngay lập tức bắt đầu một lô 100 chiếc.
In một mẫu đầu tiên.
Kiểm tra:
- màu sắc
- chi tiết
- căn chỉnh mực trắng
- vị trí in
- độ bám dính
- chống trầy xước
- diện mạo tổng thể
Bước 7: Kiểm tra độ bám dính
Sau khi đóng rắn, kiểm tra xem lớp mực có phù hợp với mục đích sử dụng hay không.
Việc kiểm tra chính xác phụ thuộc vào sản phẩm.
Một tấm bảng trang trí trong nhà có những yêu cầu khác với một vật dụng được xử lý thường xuyên.
Bước 8: Khóa vị trí
Sau khi mẫu được phê duyệt:
- lưu cài đặt RIP
- ghi lại vị trí X/Y
- chuẩn hóa đồ đạc
- ghi lại kích thước bảng
Bước 9: Bắt đầu sản xuất hàng loạt
Giờ đây, nhiều sản phẩm có thể được sản xuất với quy trình làm việc lặp lại nhiều hơn.
Bước 10: Kiểm tra chất lượng cuối cùng
Kiểm tra từng lô để biết:
- căn chỉnh
- khuyết tật vòi phun
- vết xước
- lỗi bảng
- tác phẩm nghệ thuật không chính xác
- biến đổi màu sắc
- vấn đề bám dính
Điều này đặc biệt quan trọng đối với các công việc được cá nhân hóa.
Mẫu đầu tiên. Chuẩn hóa sau.
Một trong những khác biệt lớn nhất giữa in ấn theo sở thích và sản xuất chuyên nghiệp là tiêu chuẩn hóa.
Đối với một biển hiệu bằng gỗ đơn lẻ, việc định vị thủ công có thể được chấp nhận.
Đối với 50 biển hiệu QR quán cà phê giống hệt nhau, mục tiêu phải là:
cùng chất liệu + cùng vật cố định + cùng giá trị đặt trước RIP + cùng vị trí + cùng QC
Điều này làm giảm:
- thời gian thiết lập
- in sai
- khoảng trống lãng phí
- khiếu nại của khách hàng
Cách định vị gỗ cho các đơn hàng lặp lại
Nếu bạn thường xuyên in cùng một phôi gỗ, hãy tạo một hệ thống định vị có thể lặp lại.
Các cách tiếp cận có thể bao gồm:
- dừng góc
- đồ gá lắp vật lý
- mẫu in
- thước đo định vị
- đồ đạc chuyên dụng
Mục đích là để tránh việc đoán vị trí của mọi sản phẩm theo cách thủ công.
Ví dụ: nếu khách hàng đặt 30 biển hiệu menu bằng gỗ:
- sử dụng cùng kích thước bảng
- cố định bảng vào cùng vị trí tham chiếu
- khóa tọa độ RIP
- chỉ thay đổi dữ liệu tác phẩm nghệ thuật khi cần thiết
- kiểm tra theo khoảng thời gian xác định
Điều này biến việc in gỗ tùy chỉnh thành một quy trình sản xuất thay vì một thử nghiệm thủ công.
In UV trực tiếp và UV DTF trên gỗ
EraSmart cung cấp cả quy trình làm việc UV phẳng và UV DTF, nhưng chúng không phải là cùng một quy trình.
In UV trực tiếp
Chọn máy in UV trực tiếp khi:
- bề mặt gỗ phẳng
- đối tượng phù hợp với giường in
- bạn muốn in trực tiếp lên sản phẩm
- bạn cần định vị chính xác
- bạn đang sản xuất các tấm bảng, bảng hiệu, bảng hiệu hoặc quà tặng
- bạn muốn hiệu ứng màu trắng và vecni trực tiếp trên sản phẩm
UV DTF
UV DTF có thể hữu ích khi:
- thành phẩm khó đặt trên mặt phẳng
- khu vực in ấn khó xử
- bạn muốn tạo đồ họa trước và áp dụng nó sau
- bạn đang trang trí một số đồ vật đã hoàn thiện
Tuy nhiên, độ bám dính UV DTF trên gỗ vẫn phụ thuộc rất nhiều vào bề mặt.
Một decal dính tốt vào gỗ mịn được dán kín có thể không hoạt động giống nhau trên:
- cây thông thô đầy bụi
- gỗ có kết cấu nặng
- gỗ sơn dầu
- bề mặt sáp
Vì vậy hãy thử nghiệm trước khi sản xuất thương mại.
Các vấn đề thường gặp khi in trên gỗ
Vấn đề 1: Màu sắc trông xỉn màu
Lý do có thể:
- không có nền trắng
- gỗ tối màu
- hạt tự nhiên mạnh mẽ
- tác phẩm nghệ thuật được thiết kế cho nền trắng
Giải pháp
Kiểm tra màu trắng + CMYK hoặc màu trắng chọn lọc.
Đồng thời điều chỉnh tác phẩm nghệ thuật có lưu ý đến nền gỗ thực tế.
Vấn đề 2: Độ bám dính của mực yếu
Nguyên nhân có thể:
- bụi
- dầu
- sáp
- lớp phủ không tương thích
- độ ẩm
- chuẩn bị bề mặt kém
Giải pháp
Làm sạch bề mặt chính xác và tiến hành kiểm tra độ bám dính.
Nếu cần, hãy đánh giá phương pháp xử lý sơ bộ tương thích thích hợp cho vật liệu đó.
Vấn đề 3: Văn bản nhỏ trông thô
Nguyên nhân có thể:
- hạt thô
- sợi lỏng lẻo
- tác phẩm nghệ thuật có độ phân giải thấp
- khoảng cách đầu in không chính xác
Giải pháp
Sử dụng gỗ mịn hơn, cải thiện việc chuẩn bị bề mặt, sử dụng văn bản vector và xác minh chiều cao in.
Vấn đề 4: Thay đổi vị trí in giữa các sản phẩm
Nguyên nhân có thể:
Định vị thủ công mà không cần tham chiếu lặp lại.
Giải pháp
Sử dụng vật cố định hoặc mẫu định vị.
Vấn đề 5: Bảng bị cong vênh
Sự cong vênh có thể tạo ra khoảng cách không nhất quán giữa đầu in và bề mặt.
Giải pháp
Sử dụng những tấm ván ổn định, đủ phẳng.
Bệ chân không có thể giúp cố định các vật liệu phẳng phù hợp nhưng không thể khắc phục tình trạng cong vênh nghiêm trọng.
Vấn đề 6: Thớ gỗ lấn át tác phẩm nghệ thuật
Đây thường là vấn đề về thiết kế hơn là vấn đề về máy in.
Giải pháp
Sử dụng lớp nền màu trắng ở nơi cần độ mờ mạnh hơn.
Hoặc thiết kế lại tác phẩm nghệ thuật có chủ ý xung quanh hạt tự nhiên.
Bạn có cần lớp phủ bảo vệ sau khi in UV không?
Không phải mọi sản phẩm gỗ đều yêu cầu lớp hoàn thiện rõ ràng bổ sung.
Quyết định phụ thuộc vào:
- sử dụng trong nhà và ngoài trời
- tần số xử lý
- mài mòn
- tiếp xúc với độ ẩm
- mong đợi của khách hàng
- loại gỗ
- in xong
Đối với các sản phẩm trang trí trong nhà, bản in xử lý bằng tia cực tím có thể mang lại hình thức như mong muốn.
Đối với các sản phẩm chịu mài mòn nặng hơn hoặc tiếp xúc với môi trường cụ thể, việc hoàn thiện bổ sung có thể được đánh giá.
Luôn kiểm tra lớp phủ sau in vì nó có thể thay đổi:
- độ bóng
- sự xuất hiện màu sắc
- kết cấu
- độ bám dính
- hiệu ứng sơn bóng
Máy in UV EraSmart thực tế để in gỗ
Đối với các sản phẩm gỗ vừa và nhỏ, máy phẳng UV loại A3 là hình thức sản xuất thiết thực.
Một lựa chọn làMáy in phun kỹ thuật số EraSmart A3 UV — Dual XP600.
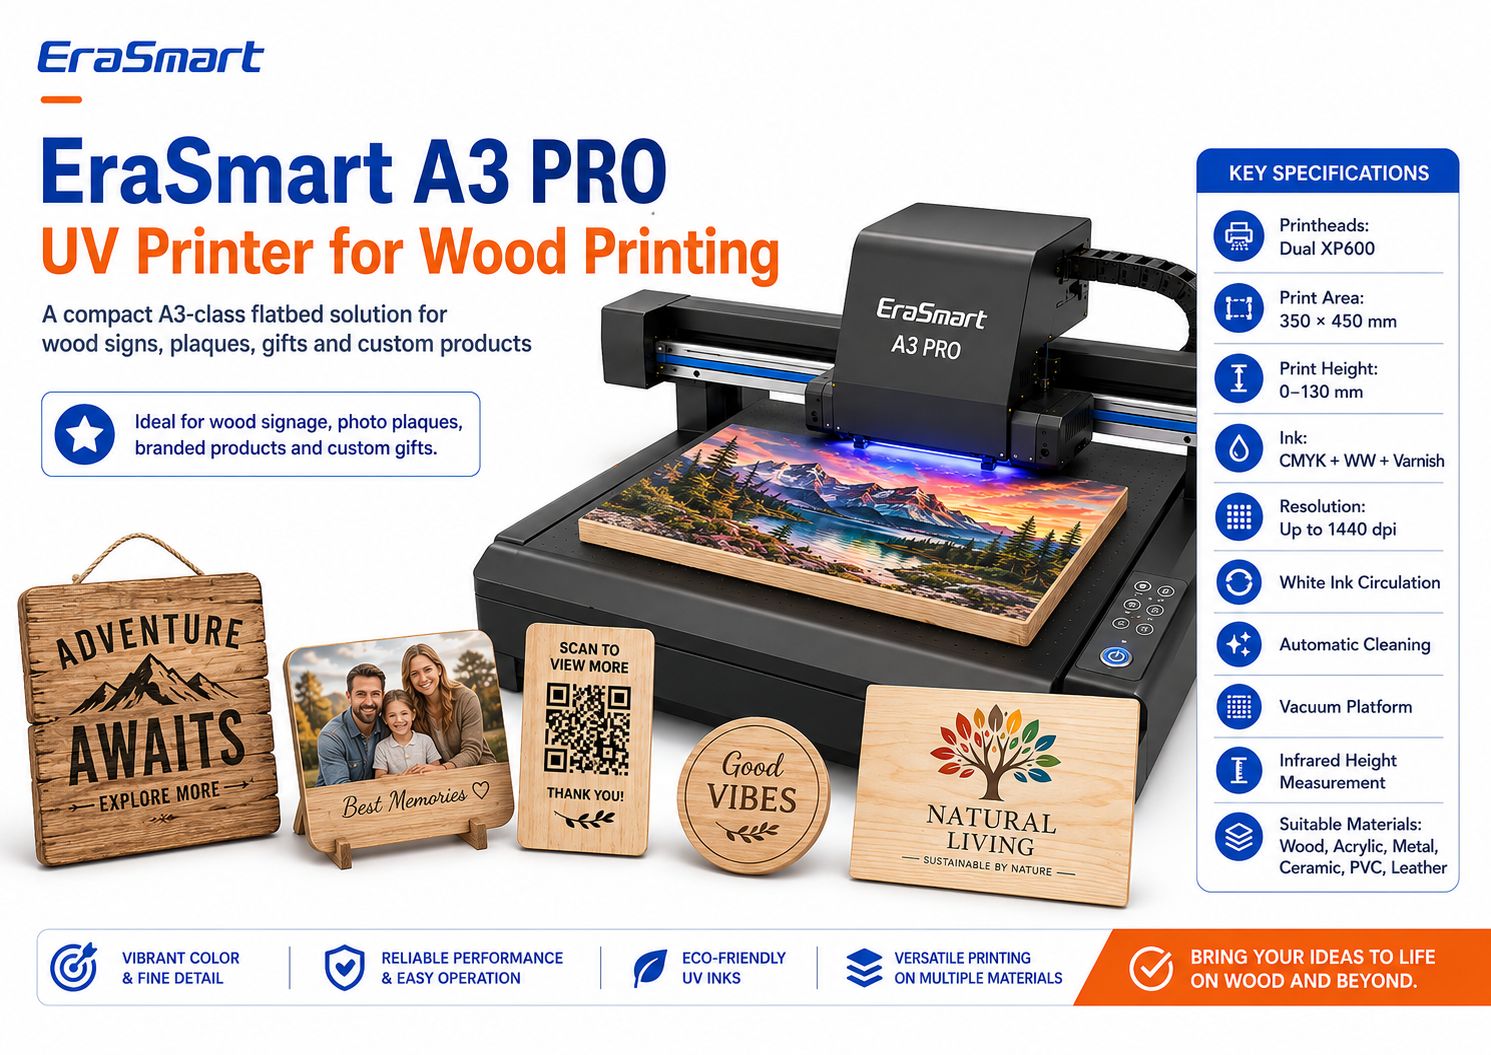
Thông số kỹ thuật chính của EraSmart A3 PRO
| Đặc điểm kỹ thuật | EraSmart A3 PRO |
|---|---|
| Đầu in | XP600 kép |
| Vùng in | 350×450mm |
| Chiều cao in | 0–130 mm |
| Cấu hình mực | CMYK + WW + Sơn bóng |
| Nghị quyết | Lên tới 1440 dpi |
| Lưu thông mực trắng | Đúng |
| Tự động làm sạch | Đúng |
| Nền tảng chân không | Đúng |
| Đo chiều cao | Hồng ngoại |
| Phần mềm RIP | Riin / PrivateRip |
Máy in hỗ trợ các vật liệu bao gồm:
- gỗ
- acrylic
- kim loại
- gốm sứ
- PVC
- TPU
- da thú
- bảng KT
Đối với các ứng dụng bằng gỗ, sự kết hợp củamực trắng, khả năng sơn bóng, bệ chân không và đo chiều cao bằng tia hồng ngoạiđặc biệt hữu ích cho việc tùy chỉnh sản phẩm phẳng hàng loạt nhỏ.
Sản phẩm gỗ nào phù hợp với quy trình làm việc của lớp A3?
Vùng in 350 × 450 mm có thể chứa nhiều sản phẩm tùy chỉnh nhỏ hơn, tùy thuộc vào kích thước cuối cùng.
Ví dụ bao gồm:
- mảng ảnh
- dấu hiệu QR
- biển hiệu thực đơn nhỏ
- quà tặng cá nhân
- đế lót ly
- hộp quà tặng thương hiệu
- giải thưởng bằng gỗ
- tấm trang trí
- bảng hiệu doanh nghiệp nhỏ
- mảnh cưới
Đối với các tấm gỗ lớn hơn, bảng hiệu hoặc nhiều mảnh trong một lô, một nền tảng lớn hơn có thể có ý nghĩa hơn.
EraSmart cũng cung cấpMáy in UV A2với khu vực làm việc lớn hơn dành cho các doanh nghiệp có kích thước sản phẩm cần nhiều không gian hơn.
Chọn kích thước máy in theo sản phẩm của bạn chứ không phải đơn giản vì máy lớn hơn nghe có vẻ chuyên nghiệp hơn.
Sản phẩm gỗ bạn có thể in bằng máy in UV
Gỗ có giá trị vì nó có thể phục vụ nhiều thị trường kinh doanh cùng một lúc.
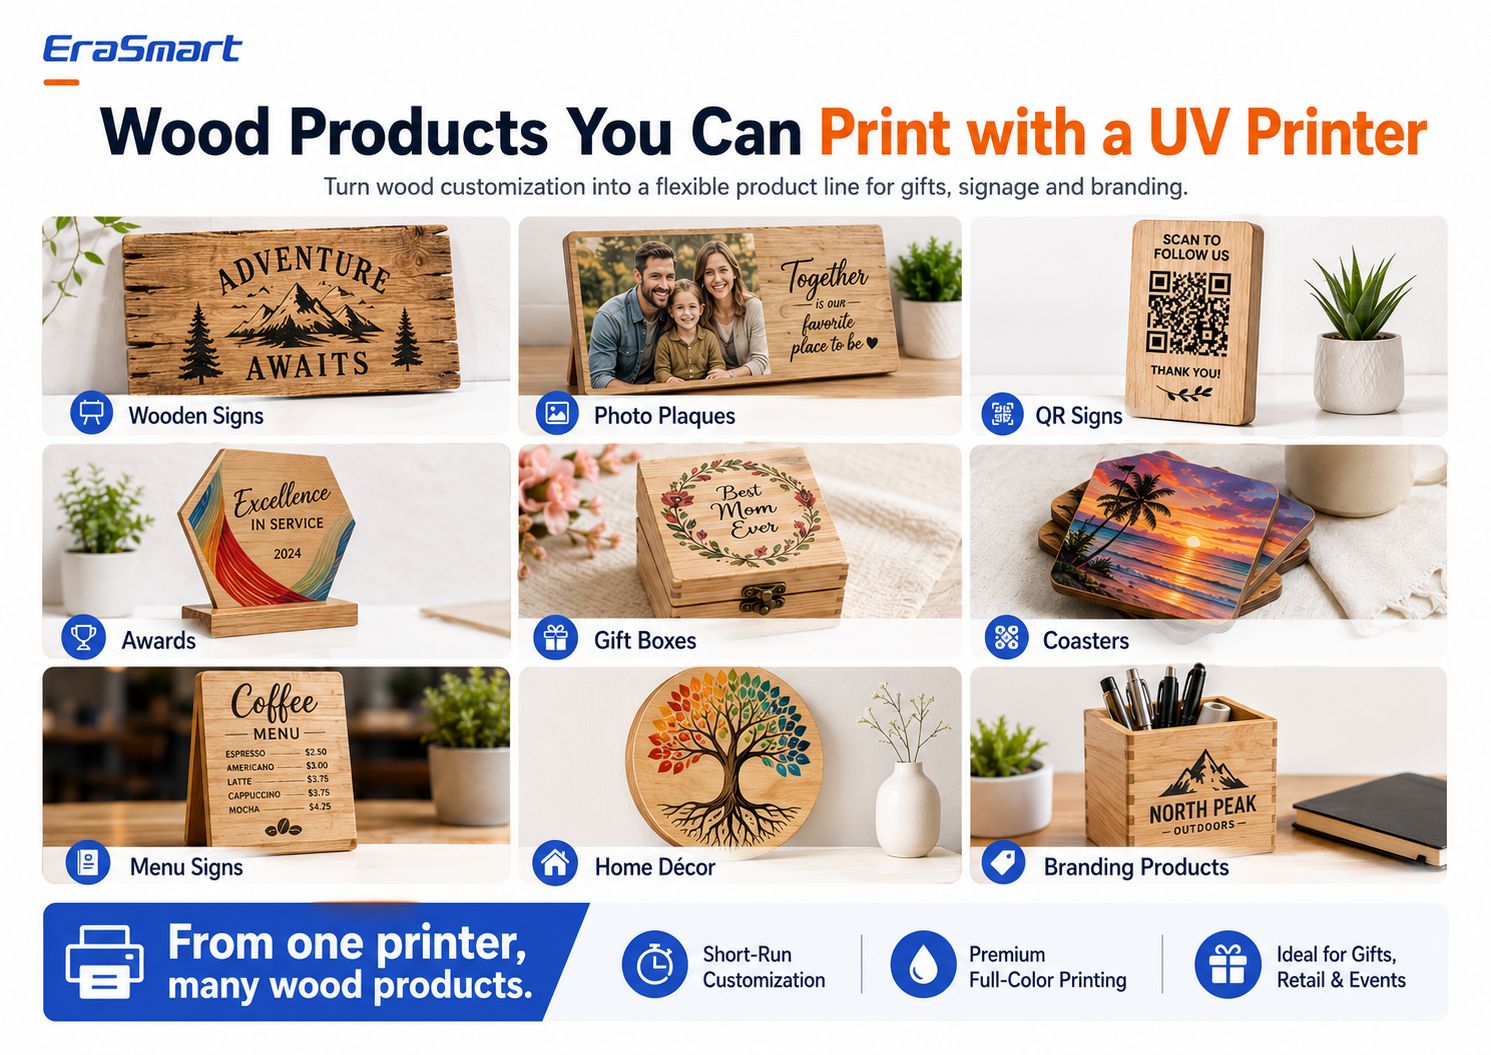
1. Biển hiệu bằng gỗ
Ví dụ:
- bảng hiệu cabin
- dấu hiệu tên gia đình
- dấu hiệu đám cưới
- bảng hiệu quán cà phê
- bảng hiệu cửa hàng
- biển chỉ dẫn
- báo giá trang trí
2. Tấm ảnh
In UV đủ màu có thể biến ảnh thành:
- quà tặng gia đình
- mảnh kỷ niệm
- tấm bia tưởng niệm
- quà cưới
- chân dung thú cưng
- kỷ niệm du lịch
Mực trắng thường hữu ích đằng sau tác phẩm nghệ thuật nhiếp ảnh.
3. Dấu hiệu mã QR
Các doanh nghiệp nhỏ ngày càng sử dụng màn hình QR cho:
- thực đơn
- thanh toán
- đánh giá
- Truy cập Wi-Fi
- phương tiện truyền thông xã hội
- trang đặt phòng
In và quét mã QR trước khi giao hàng.
Đừng chỉ dựa vào bản xem trước kỹ thuật số.
4. Giải thưởng bằng gỗ
Tạo nên:
- giải thưởng công ty
- phần ghi nhận nhân viên
- giải thưởng thể thao
- mảng câu lạc bộ
- giấy chứng nhận thương hiệu
5. Hộp quà
Hộp gỗ có thể được tùy chỉnh với:
- tên
- logo
- đồ họa hoa
- ngày cưới
- xây dựng thương hiệu doanh nghiệp
Hình dạng hộp chính xác phải vừa khít một cách an toàn với kích thước và khoảng trống được hỗ trợ của máy in.
6. Đế lót ly
Đế lót ly thích hợp cho:
- thiết kế du lịch
- bộ sưu tập nghệ thuật
- quán cà phê
- quà cưới
- hàng hóa có thương hiệu
Đối với các sản phẩm tiếp xúc với độ ẩm hoặc bị mài mòn nhiều lần, hãy kiểm tra thành phẩm theo công dụng thực tế của nó.
7. Biển hiệu thực đơn
Menu gỗ có thể dùng cho:
- quán cà phê
- nhà hàng
- thanh
- xe tải thực phẩm
- đám cưới
- sự kiện
8. Trang trí nhà cửa
Ví dụ:
- nghệ thuật thực vật
- tên gia đình
- trang trí vườn ươm
- tấm cảnh quan
- dấu hiệu trích dẫn
- trang trí ngày lễ
9. Xây dựng thương hiệu sản phẩm
Doanh nghiệp có thể đặt hàng:
- dấu hiệu truy cập
- mảng logo
- quà tặng khuyến mãi
- miếng trưng bày
- trang trí bán lẻ
- Sản phẩm bàn có thương hiệu
Đơn đặt hàng B2B có thể đặc biệt có giá trị vì khách hàng có thể sắp xếp lại cùng một mẫu với văn bản cập nhật hoặc tên nhân viên khác.
Làm thế nào một thiết kế gỗ có thể trở thành nhiều sản phẩm
Một doanh nghiệp tùy biến thông minh có thể tái sử dụng tác phẩm nghệ thuật.
Ví dụ: một hình minh họa về ngọn núi có thể trở thành:
- ký hiệu cabin
- bộ đế lót ly
- nền khung ảnh
- hộp quà
- tấm lưu niệm
- ký hiệu QR
- mặt hàng bàn có thương hiệu
Thiết kế giống nhau không cần phải được tạo lại cho mọi sản phẩm.
Thay vào đó, hãy thích nghi:
- kích thước
- mùa vụ
- chữ
- mặt nạ mực trắng
- mẫu sản phẩm
Điều này làm tăng giá trị của mỗi tập tin tác phẩm nghệ thuật.
Ý Tưởng Kinh Doanh In UV Gỗ
Cửa hàng quà tặng cá nhân
Bán:
- mảng ảnh
- dấu hiệu gia đình
- quà cưới
- sản phẩm vật nuôi
- hộp cá nhân
Cửa hàng bảng hiệu địa phương
Lời đề nghị:
- bảng hiệu quán cà phê
- thực đơn
- hiển thị QR
- mảng bàn
- logo kinh doanh
Etsy hoặc người bán trực tuyến
Tạo nên:
- dấu hiệu mộc mạc
- trang trí theo mùa
- quà tặng cá nhân
- bộ đế lót ly
- sản phẩm đám cưới
Kinh doanh du lịch và lưu niệm
In:
- nơi đến
- bản đồ địa phương
- đồ họa mang tính bước ngoặt
- mảng lưu niệm
- bộ sưu tập tàu lượn
Kinh doanh tiệc cưới và sự kiện
Sản xuất:
- dấu hiệu chào mừng
- miếng bàn
- ân huệ
- mảng nhỏ
- vật kỷ niệm
Nhà cung cấp quà tặng doanh nghiệp
Lời đề nghị:
- giải thưởng
- hộp có thương hiệu
- mảng bàn
- quà tặng công nhận
- hàng hóa logo
Cách định giá in gỗ theo yêu cầu
Đừng tính giá chỉ bằng mực và gỗ.
Bao gồm:
- trống gỗ
- chuẩn bị bề mặt
- mực
- mực trắng
- sơn bóng
- mẫu thử
- in thất bại
- thiết lập tác phẩm nghệ thuật
- cá nhân hóa
- thời gian máy
- nhân công
- hoàn thiện
- bao bì
- phí nền tảng
- vật liệu vận chuyển
- BẢO TRÌ
- lợi nhuận
Việc cá nhân hóa thường tạo ra nhiều giá trị hơn vì khách hàng không mua một tấm gỗ thông thường.
Họ đang mua một sản phẩm tùy chỉnh đã hoàn thành.
Những sai lầm phổ biến cần tránh
Sai lầm 1: Giả sử tất cả các bản in gỗ đều giống nhau
Nó không.
Kiểm tra vật liệu chính xác.
Sai lầm 2: In trên gỗ có bụi
Bụi chà nhám có thể làm giảm chất lượng và độ bám dính.
Sai lầm 3: Bỏ qua mực trắng
Mực trắng là một trong những công cụ sáng tạo quan trọng nhất để kiểm soát màu sắc trên gỗ tự nhiên.
Sai lầm 4: In toàn bộ đơn hàng mà không có mẫu
Luôn phê duyệt mẫu vật lý trước tiên.
Sai lầm 5: Sử dụng gỗ bị cong vênh nặng
Độ phẳng đóng vai trò quan trọng đối với khoảng trống đầu in nhất quán.
Sai lầm 6: Bỏ qua lớp phủ bề mặt hiện có
Sáp, dầu, sơn mài, sơn và các chất phủ khác có thể ảnh hưởng đến độ bám dính.
Sai lầm 7: Sử dụng cùng một tác phẩm nghệ thuật cho giấy trắng và gỗ
Thiết kế cho chất nền thực tế.
Sai lầm 8: Định vị lại mọi sản phẩm theo cách thủ công
Xây dựng một thiết bị cố định có thể lặp lại cho sản xuất hàng loạt.
Danh sách kiểm tra in gỗ chuyên nghiệp
Trước khi in:
Vật liệu
- loại gỗ đã được xác nhận
- bề mặt sạch sẽ
- ván khô
- đủ phẳng
- lớp phủ được xác định
- kế hoạch kiểm tra độ bám dính
tác phẩm nghệ thuật
- kích thước cuối cùng chính xác
- hình ảnh có độ phân giải cao
- văn bản/logo vector nếu có thể
- mặt nạ mực trắng đã chuẩn bị
- chuẩn bị lớp sơn bóng nếu cần
Máy in
- kiểm tra vòi phun hoàn tất
- chiều cao in chính xác
- thiết lập chân không hoặc định vị đã sẵn sàng
- Đã chọn cài đặt trước RIP
Vật mẫu
- đã kiểm tra màu
- đã kiểm tra chi tiết
- đã kiểm tra mực trắng
- đã kiểm tra độ bám dính
- vị trí được phê duyệt
Sản xuất
- lịch thi đấu bị khóa
- phiên bản tác phẩm nghệ thuật đã được xác nhận
- đã kiểm tra số lượng hàng loạt
- QC định kỳ được thực hiện
hoàn thiện
- đã kiểm tra vết xước
- đã kiểm tra các cạnh
- chuẩn bị đóng gói
- số lượng cuối cùng đã được xác minh
Câu trả lời cuối cùng: Bạn in trên gỗ như thế nào?
Để in trực tiếp chuyên nghiệp trên các sản phẩm gỗ phù hợp, in UV cung cấp quy trình làm việc linh hoạt cho tác phẩm nghệ thuật đầy màu sắc, mực trắng, hiệu ứng sơn bóng, cá nhân hóa và sản xuất hàng loạt nhỏ.
Quá trình này là:
chuẩn bị gỗ → chuẩn bị tác phẩm nghệ thuật → chọn chiến lược mực trắng → định vị sản phẩm → đặt chiều cao in → in mẫu → kiểm tra độ bám dính → chuẩn hóa vị trí → bắt đầu sản xuất hàng loạt
Yếu tố lớn nhất không phải là độ phân giải máy in tối đa.
Đó làkiểm soát bề mặt.
Một sản phẩm gỗ sạch sẽ, mịn màng, ổn định với thiết lập in đã được thử nghiệm thường sẽ cho kết quả dễ đoán hơn so với in bằng máy đắt tiền trên bề mặt không phù hợp, nhiều bụi, dính dầu hoặc cong vênh.
Mực trắng là yếu tố chính thứ hai.
Sử dụng:
- chỉ CMYKkhi bạn muốn vân gỗ tự nhiên
- Trắng + CMYKkhi bạn muốn độ mờ mạnh hơn
- Trắng chọn lọc + CMYKkhi bạn muốn kết hợp đặc tính vật liệu tự nhiên với màu sắc sống động
Đối với các doanh nghiệp sản xuất bảng gỗ, bảng hiệu, quà tặng, màn hình QR, đế lót ly, giải thưởng, hộp và các sản phẩm tùy chỉnh phẳng khác,Máy in UV EraSmart A3 PROcung cấp nền tảng loại A3 350 × 450 mm với đầu in Dual XP600, mực trắng, khả năng sơn bóng, tuần hoàn mực trắng, làm sạch tự động, bệ chân không và đo chiều cao hồng ngoại.
Mục tiêu không chỉ đơn giản là in trên gỗ.
Mục tiêu là tạo ra một quy trình công việc có thể tạo rachất lượng như nhau nhiều lần.
Câu hỏi thường gặp
Máy in UV có in trực tiếp lên gỗ được không?
Đúng. Máy in phẳng UV có thể in trực tiếp trên nhiều bề mặt gỗ phù hợp. Gỗ phải sạch, ổn định, đủ phẳng và được kiểm tra độ bám dính trước khi sản xuất thương mại.
Tôi có cần chà nhám gỗ trước khi in UV không?
Không phải lúc nào cũng vậy. Gỗ được chuẩn bị mịn có thể đã phù hợp. Bề mặt gồ ghề, sợi lỏng lẻo hoặc lớp hoàn thiện không đều có thể được hưởng lợi từ việc chà nhám. Luôn loại bỏ bụi chà nhám trước khi in.
Loại gỗ tốt nhất để in UV là gì?
Gỗ mịn, sạch, ổn định thường tạo ra kết quả dễ đoán nhất. Tất cả các loại gỗ dán bạch dương, gỗ phong, gỗ thông đã sơ chế, tre, MDF và gỗ phủ đều có thể được sử dụng tùy thuộc vào điều kiện bề mặt và độ hoàn thiện cần thiết.
Bạn có thể in UV trên gỗ thô không?
Có, nhưng gỗ thô có thể xốp và có kết cấu hơn. Kết quả phụ thuộc vào hạt, độ mịn bề mặt, độ ẩm, bụi và tác phẩm nghệ thuật.
Tôi có cần mực trắng khi in trên gỗ không?
Không phải lúc nào cũng vậy.
Chỉ sử dụng CMYK khi bạn muốn thể hiện rõ đường vân tự nhiên.
Sử dụng màu trắng dưới CMYK khi bạn cần màu đục hơn, sống động hơn hoặc có thể đoán trước được.
In UV có thể tái tạo ảnh trên gỗ không?
Đúng. Đối với các sản phẩm nhiếp ảnh, hãy sử dụng tác phẩm nghệ thuật chất lượng cao và xem xét lớp nền màu trắng nếu bạn muốn màu sắc của hình ảnh vẫn mạnh mẽ hơn và ít bị ảnh hưởng bởi tông màu gỗ.
Tôi có thể in mã QR trên gỗ không?
Có, nhưng mã QR phải đủ lớn, sắc nét và có độ tương phản cao. Luôn kiểm tra mã in thành phẩm với nhiều điện thoại trước khi giao hàng.
Có phải sản phẩm gỗ nào cũng cần sơn lót?
Không. Yêu cầu về lớp sơn lót phụ thuộc vào yêu cầu chính xác về bề mặt gỗ, lớp phủ, mực và độ bám dính. Hãy kiểm tra trước thay vì tự động bôi sơn lót.
Máy in UV có in được hộp gỗ không?
Có khả năng là nếu sản phẩm vừa với kích thước, chiều cao, trọng lượng được hỗ trợ của máy in và khoảng trống đầu in an toàn. Vùng in được cũng phải đủ phẳng.
Máy in EraSmart nào phù hợp cho việc in gỗ?
Đối với các sản phẩm gỗ dẹt vừa và nhỏ,Máy in phun kỹ thuật số EraSmart A3 UV — Dual XP600là một lựa chọn phù hợp. Đối với những miếng gỗ lớn hơn, hãy xem lạiMáy in UV EraSmartphạm vi và chọn vùng in dựa trên kích thước sản phẩm thực tế của bạn.
Bạn muốn xây dựng một doanh nghiệp in ấn gỗ theo yêu cầu?
Hãy nói với EraSmart:
- sản phẩm gỗ nào bạn muốn in
- kích thước sản phẩm của bạn
- loại gỗ
- cho dù bề mặt là thô, sơn hoặc tráng
- sản lượng dự kiến hàng tháng
- bạn có cần mực trắng không
- liệu bạn có cần hiệu ứng sơn bóng không
- không gian làm việc của bạn
- kế hoạch sản phẩm tương lai của bạn
Nhóm của chúng tôi có thể giúp bạn so sánh đúngMáy in UV EraSmartvà quy trình sản xuất bảng hiệu gỗ, bảng ảnh, quà tặng cá nhân, sản phẩm có thương hiệu, bảng hiệu QR, đế lót ly, hộp và các ứng dụng gỗ tùy chỉnh khác.
Chuẩn bị bề mặt. Kiểm soát mực trắng. Kiểm tra mẫu. Sau đó mở rộng quy trình làm việc.
Có thể bạn cũng thích

Bản quyền 2020 © Erasmart. | SITEMAP