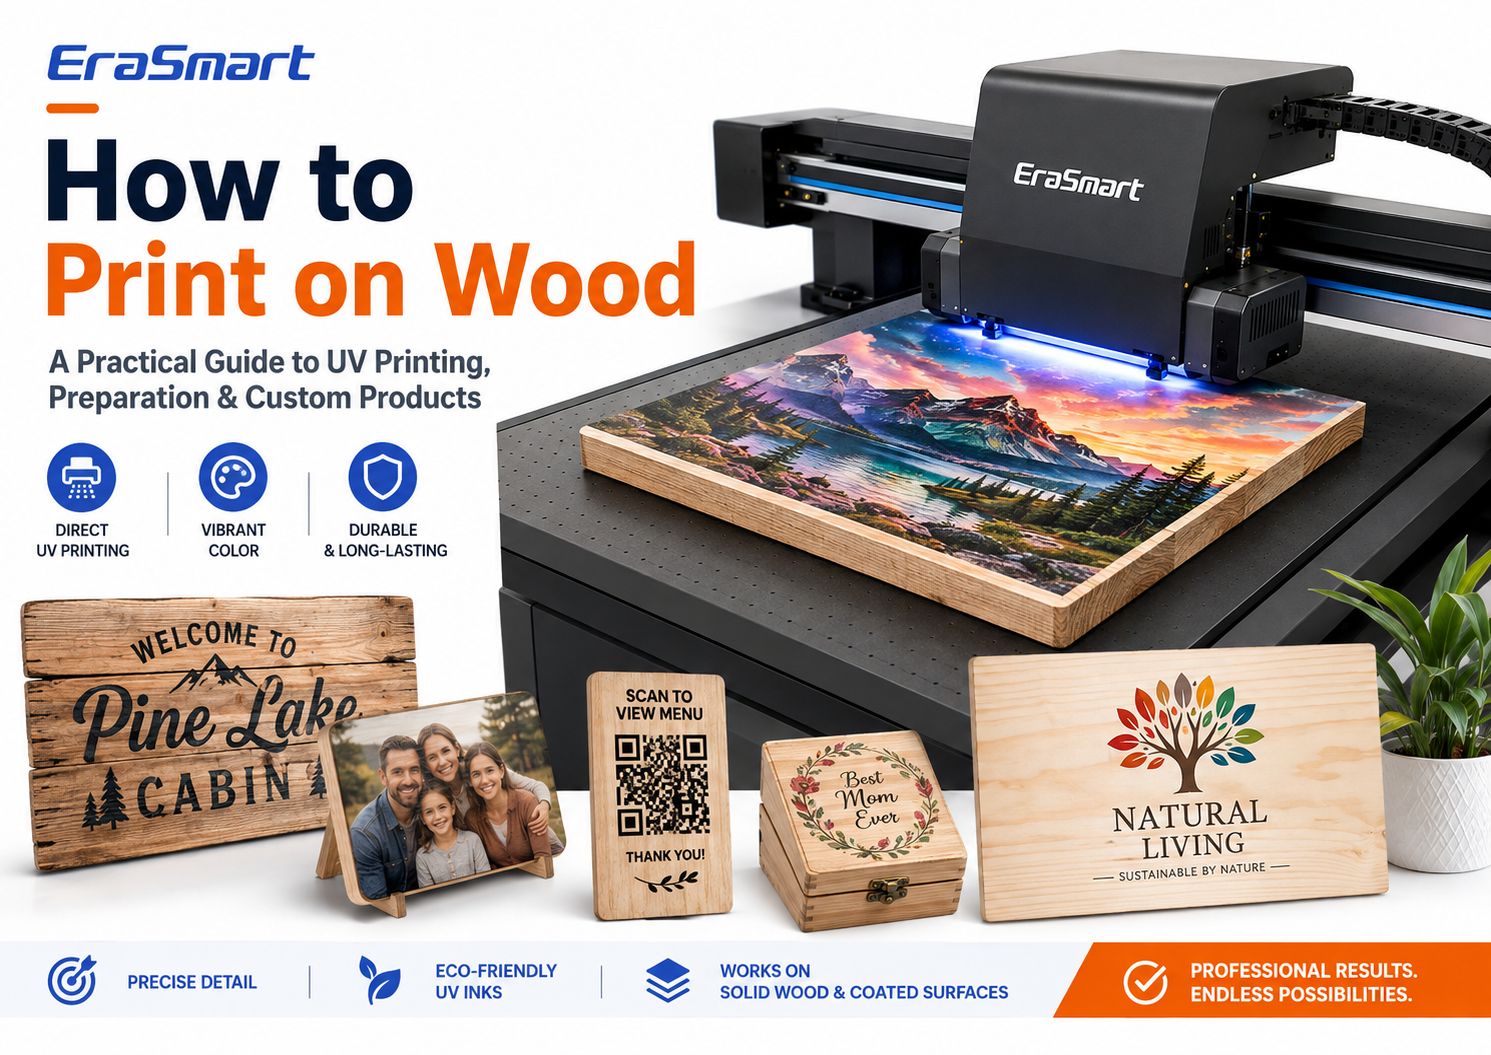
Sí, puedes imprimir directamente sobre madera.
Para una personalización profesional a todo color, la impresión plana UV es uno de los métodos más prácticos porque la impresora puede colocar CMYK, tinta blanca y barniz opcional directamente sobre superficies de madera adecuadas sin papel de transferencia.
Esto hace posible producir letreros de madera, placas fotográficas, exhibidores de códigos QR, premios, cajas de regalo, posavasos, tableros de menú, decoración del hogar, productos de marca y obsequios personalizados en lotes pequeños o medianos.
Pero una impresión exitosa en madera no es simplemente cuestión de colocar una tabla de madera en una impresora UV y presionar Imprimir.
La madera es un material natural. El grano, la porosidad, el polvo, la humedad, los revestimientos superficiales, la planicidad, los aceites, las ceras y la textura pueden afectar la calidad de impresión y la adhesión de la tinta.
Un panel de madera contrachapada de abedul liso puede comportarse de manera muy diferente a un pino en bruto. Una tabla de bambú en bruto puede comportarse de manera diferente a un producto de bambú lacado. Incluso dos piezas de madera visualmente similares pueden producir resultados diferentes si sus revestimientos son diferentes.
Por tanto, el enfoque profesional es:
preparar la superficie → probar el material → elegir la estrategia de tinta blanca adecuada → imprimir una muestra → comprobar la adhesión → estandarizar el flujo de trabajo
Esta guía explica las principales formas de imprimir en madera, cómo funciona la impresión UV directa, qué superficies de madera son más fáciles de imprimir, cómo preparar el material, cuándo utilizar tinta blanca, cómo crear un flujo de trabajo de producción repetible y qué productos se pueden crear con unaImpresora UV EraSmart.
Respuesta rápida: ¿Cuál es la mejor forma de imprimir en madera?
No existe un método óptimo para cada producto de madera.
El método correcto depende de:
- si la madera está en bruto o recubierta
- si necesitas todo color
- si necesitas tinta blanca
- cantidad de pedido
- forma de superficie
- complejidad del diseño
- acabado requerido
- velocidad de producción
- si el producto es una artesanía de bricolaje o un producto comercial
Para personalización comercial a todo color en productos planos de madera,La impresión UV directa es una de las opciones más flexibles..
Permite imprimir ilustraciones directamente sobre la superficie y es especialmente útil cuando necesita:
- gráficos a todo color
- fotografías
- logotipos
- tinta blanca
- producción en lotes pequeños
- nombres personalizados
- diseños variables
- plantillas de productos repetidas
Sin embargo, otros métodos todavía tienen sus propios usos.
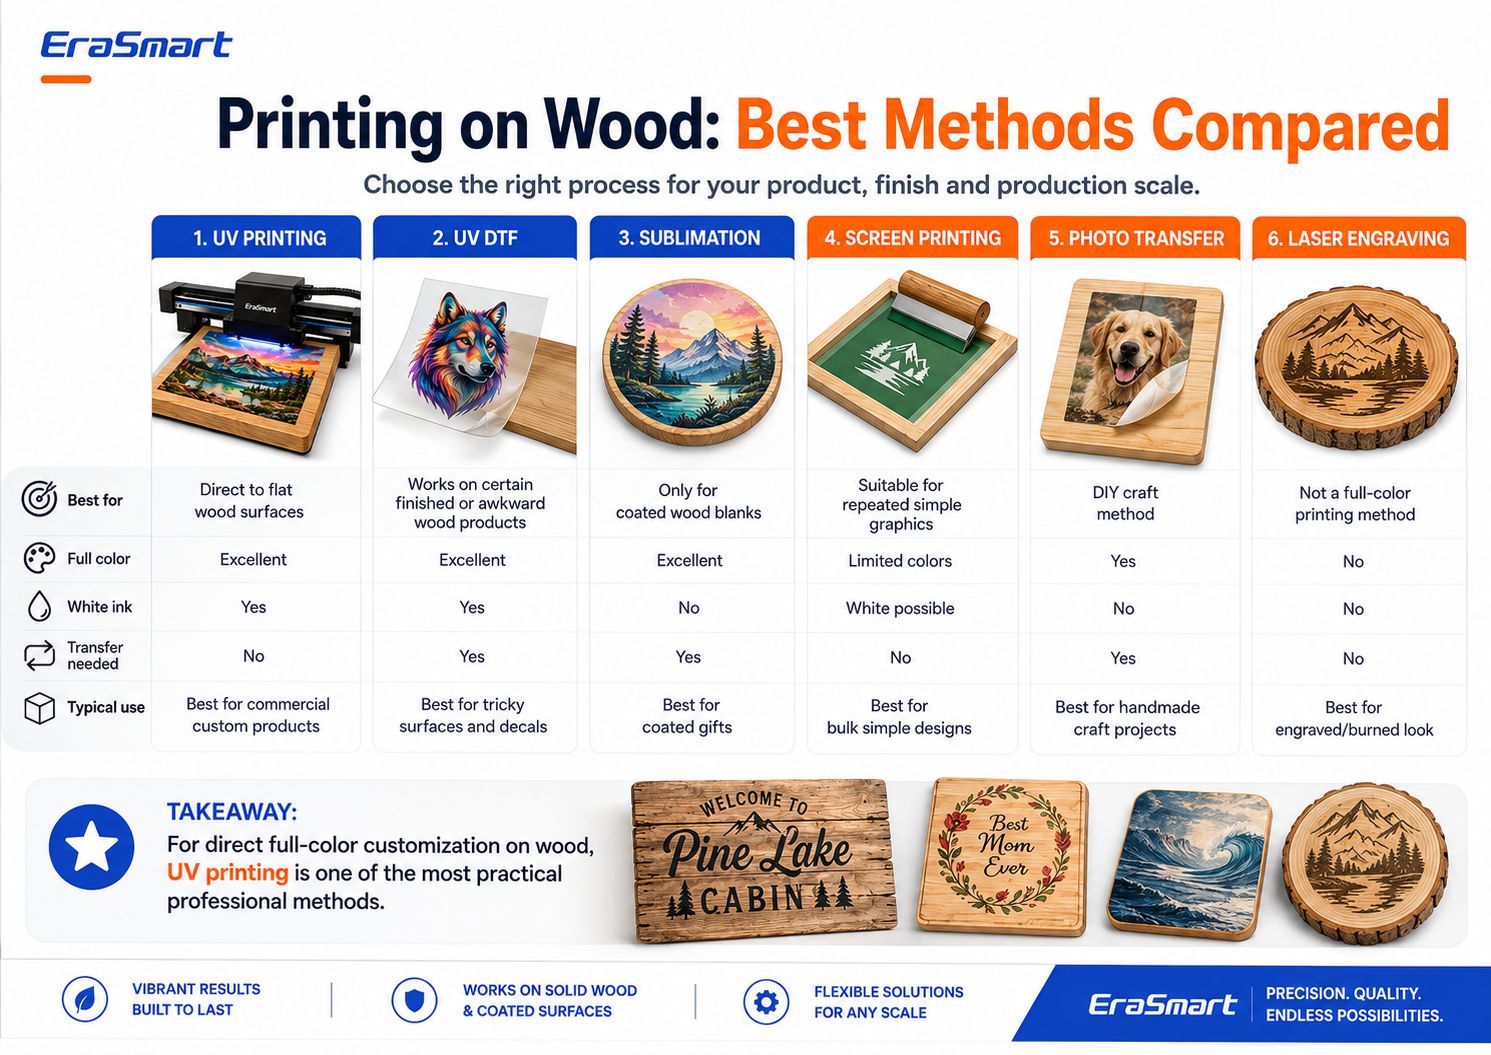
| Método |
A todo color |
tinta blanca |
Transferencia necesaria |
Mejor uso |
| Impresión UV |
Excelente |
sí |
No |
Personalización comercial directa de madera. |
| UVDTF |
Excelente |
sí |
sí |
Productos terminados o difíciles de posicionar |
| Sublimación |
Excelente |
No |
sí |
Piezas en bruto de madera recubiertas por sublimación |
| Serigrafía |
Limitado por la configuración |
Posible |
No |
Gráficos simples repetidos. |
| Transferencia de fotos |
sí |
No |
sí |
Proyectos de manualidades de bricolaje. |
| Grabado láser |
Sin color completo |
No |
No |
Efecto madera quemada o grabada |
El punto clave es queimpresión en maderano es un solo proceso.
Elija el método según el producto terminado que desee vender.
Por qué la impresión UV funciona bien en madera
Una impresora UV utiliza tinta que se cura con luz ultravioleta durante el proceso de impresión.
En lugar de depender del papel de transferencia, la impresora inyecta tinta directamente sobre la superficie de madera.
Para productos de madera adecuados, esto genera varias ventajas.
Impresión directa a la superficie
La obra de arte se imprime directamente en el tablero.
Esto puede reducir los pasos de producción en comparación con los flujos de trabajo que requieren:
- papel de transferencia
- adhesivo separado
- transferencia de calor
- transferencia manual de fotos
Ilustraciones a todo color
La impresión UV es adecuada para diseños como:
- fotografías
- ilustraciones coloridas
- logotipos
- paisajes
- gráficos de boda
- patrones decorativos
- códigos QR
- nombres personalizados
- marca del producto
tinta blanca
La tinta blanca es especialmente útil en madera porque el sustrato natural no es blanco.
Puede utilizar tinta blanca para crear una opacidad más fuerte y colores más predecibles.
Efectos de barniz
En configuraciones de impresoras UV compatibles, se puede agregar barniz de forma selectiva para:
- brillo puntual
- detalles en relieve
- aspectos destacados del logotipo
- acentos decorativos
- efectos de superficie premium
Personalización de lotes pequeños
La impresión digital facilita la producción:
- una placa de foto
- diez nombres diferentes
- múltiples signos QR
- productos de regalo de corta duración
- piezas de boda personalizadas
- señalización de negocios locales
sin crear una pantalla o plancha de impresión tradicional independiente para cada diseño.
¿En qué tipos de madera se puede imprimir con luz ultravioleta?
Las impresoras UV pueden funcionar con muchos sustratos de madera y a base de madera, pero la especie de madera por sí sola no determina la calidad de la impresión.
El estado de la superficie es igualmente importante.
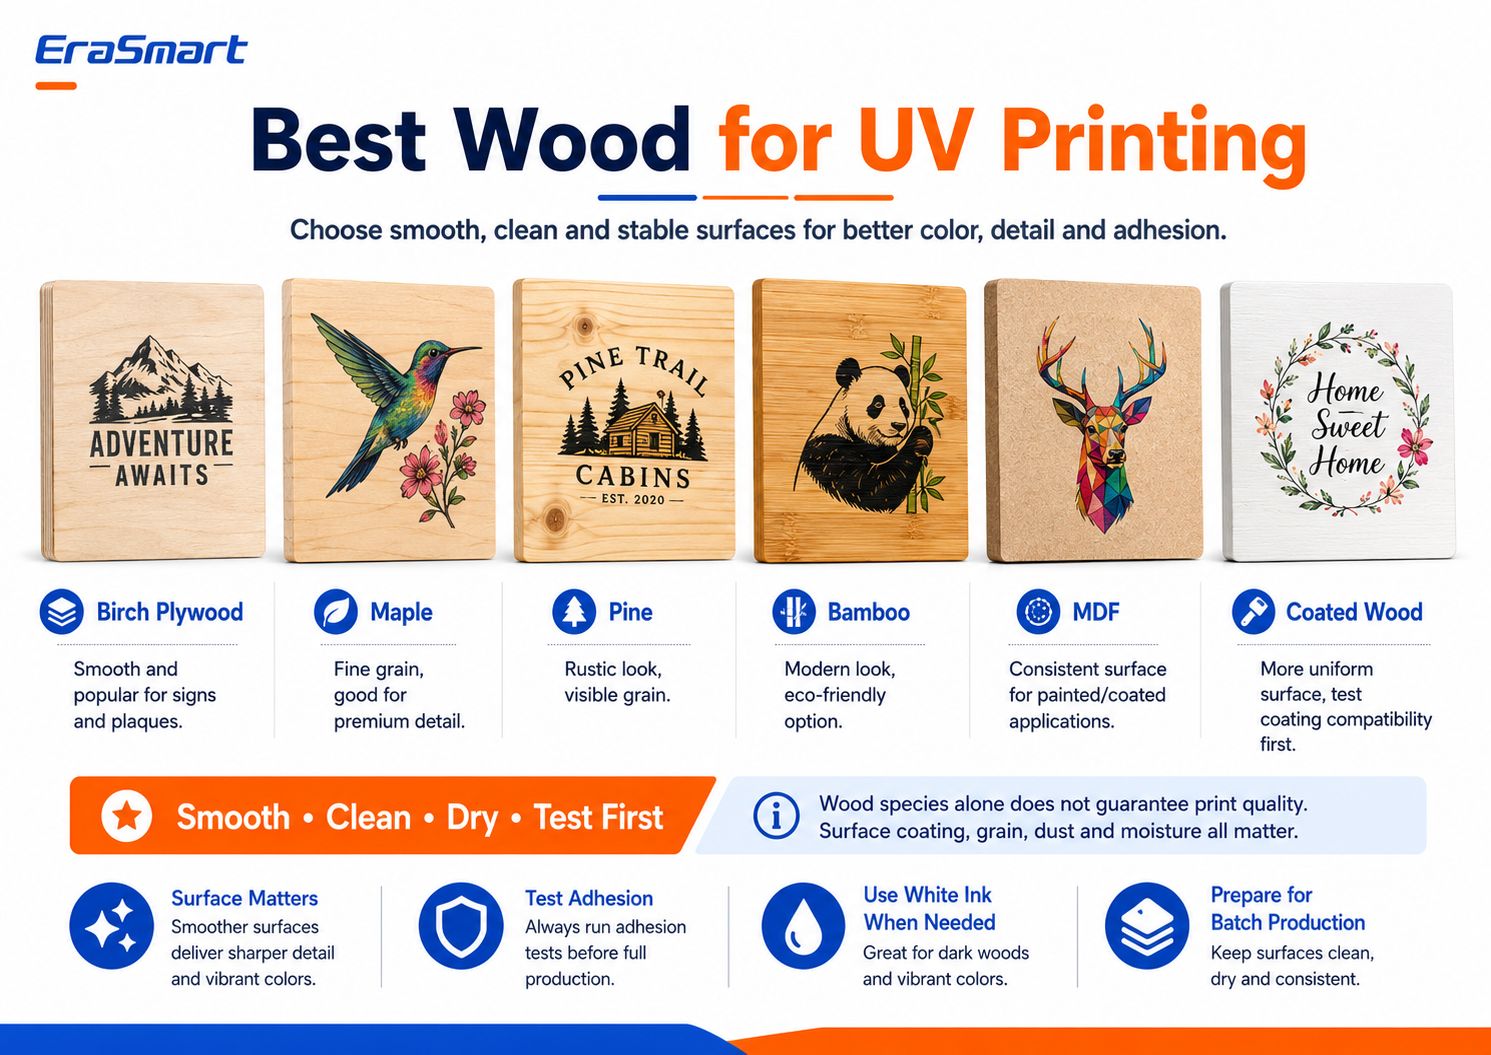
Los materiales comunes incluyen:
- contrachapado de abedul
- arce
- pino
- bambú
- MDF
- madera revestida
- madera pintada
- madera sellada
- paneles de madera preparados
Contrachapado de abedul
El contrachapado de abedul es popular por:
- señales
- placas
- piezas decorativas
- Regalos personalizados
Una superficie lisa de madera contrachapada puede proporcionar buenos detalles y un posicionamiento predecible.
Sin embargo, la calidad del contrachapado varía. Verifique si hay deformaciones, defectos superficiales y consistencia del revestimiento.
Arce
El arce tiene una veta relativamente fina y puede funcionar bien para productos donde los pequeños detalles importan.
Puede ser adecuado para:
- placas premium
- productos fotográficos
- pequeños signos
- regalos de marca
Pino
El pino ofrece un aspecto más rústico.
Las vetas y los nudos visibles pueden convertirse en parte del diseño, especialmente cuando se imprime sin una base completamente blanca.
Sin embargo, el pino más rugoso puede necesitar lijado y preparación adicionales.
Bambú
Los productos de bambú son populares por:
- regalos
- decoración
- accesorios de cocina
- placas
- productos de marca
Debido a que los productos de bambú terminados pueden tener diferentes revestimientos de superficie, pruebe el producto exacto antes de la producción.
MDF
El MDF proporciona una superficie de fabricación más uniforme que la veta de la madera natural.
Puede ser útil para:
- paneles pintados
- señalización
- decoración
- mostrar productos
El MDF en bruto es poroso, por lo que el estado de su superficie y cualquier proceso de recubrimiento o sellado deben evaluarse antes de la producción.
Madera revestida
La madera revestida o pintada puede ofrecer una apariencia más uniforme.
Sin embargo, un recubrimiento introduce otra variable:
¿La tinta UV se adherirá correctamente a ese recubrimiento?
Un revestimiento brillante, cera, laca, pintura, sellador o acabado de baja energía superficial pueden afectar la adhesión.
Pruebe siempre el material acabado real.
La regla más importante: suave, limpia, seca y estable
Al elegir madera para impresión UV, busque cuatro características:
Liso
Una superficie más suave generalmente admite textos más nítidos, líneas más limpias y detalles de imagen más consistentes.
Limpio
El polvo del lijado o manipulación puede interferir con la impresión y la adhesión.
Seco
La humedad puede afectar la superficie y la estabilidad del producto a largo plazo.
Estable
La placa debe quedar lo suficientemente plana para que el espacio entre los cabezales de impresión sea seguro y uniforme.
Esto importa más que simplemente seleccionar una especie de una lista.
Para obtener una visión más amplia de los sustratos compatibles con UV, consulte EraSmartGuía de materiales para impresoras UV.
Madera en bruto versus madera revestida
La madera en bruto y la revestida crean diferentes oportunidades.
Impresión sobre madera en bruto
La madera en bruto conserva el carácter natural del material.
Esto es útil cuando la veta es intencionalmente parte del diseño.
Las ventajas incluyen:
- apariencia natural
- efecto rústico
- textura de madera visible
- variación única del producto
Los desafíos pueden incluir:
- mayor porosidad
- grano desigual
- polvo
- fibras superficiales
- absorción variable
- adhesión inconsistente
La madera en bruto suele beneficiarse de un lijado y una limpieza cuidadosos.
Impresión sobre madera recubierta o sellada
La madera revestida puede proporcionar una superficie visual más uniforme.
Posibles ventajas:
- acabado más suave
- apariencia más consistente
- grano menos visible
- color más predecible en algunos casos
Pero el recubrimiento en sí debe ser compatible con la tinta UV.
Los problemas potenciales incluyen:
- adherencia débil
- rayado
- peladura
- tinta asentada sobre una superficie incompatible
Por eso el enfoque más seguro es:
Nunca apruebe un material de madera para la producción basándose únicamente en su nombre. Pruebe el producto exacto en blanco o terminado.
Cómo preparar la madera antes de la impresión UV
La preparación de la superficie es una de las partes más importantes de todo el proceso.
Paso 1: inspeccionar el tablero
Controlar:
- llanura
- arañazos
- abolladuras
- nudos
- fibras sueltas
- revestimientos
- pandeo
- humedad
- aceites o cera
No empieces a imprimir hasta que sepas con qué superficie estás trabajando.
Paso 2: lije si es necesario
Si el tablero es rugoso, un lijado ligero puede ayudar a crear una superficie de impresión más consistente.
El objetivo no siempre es eliminar el carácter natural de la madera.
El objetivo es eliminar:
- fibras sueltas
- puntos altos ásperos
- astillas
- defectos superficiales no deseados
Un lijado fino suele ser más apropiado para la preparación de la impresión que dejar una superficie rugosa sin terminar.
Paso 3: eliminar todo el polvo del lijado
Este paso es fácil de subestimar.
El polvo de madera puede interferir con:
- colocación de tinta
- nitidez del borde
- adhesión
- apariencia final
Utilice un método de limpieza adecuado sin pelusa y asegúrese de que la superficie esté limpia antes de imprimir.
Paso 4: eliminar el aceite y la contaminación
Algunos productos de madera terminados pueden contener:
- aceite
- cera
- compuestos de pulido
- huellas dactilares
- residuos de fabricación
Estos pueden reducir la adherencia de la tinta.
Paso 5: Verifique los recubrimientos existentes
Si el producto está pintado, sellado, lacado o revestido, realice una prueba de adherencia.
No asuma que todos los productos de madera pintados o sellados se pueden imprimir automáticamente con rayos UV.
Paso 6: prueba antes de la producción
Imprima una pequeña muestra usando el mismo:
- madera
- tratamiento superficial
- tipo de obra de arte
- estrategia de tinta blanca
- ajustes de curado
que planea utilizar para el pedido final del cliente.
Si es necesario para un sustrato específico, una imprimación o pretratamiento adecuado puede mejorar la adhesión.
No utilice imprimación automáticamente en cada pieza de madera.
Úselo cuando las pruebas demuestren que el material lo requiere.
Prepare la obra de arte para la impresión en madera
Una buena impresión en madera comienza antes de que el material llegue a la impresora.
Controlar:
- dimensiones del producto final
- resolución de la obra de arte
- logotipos
- tamaño del texto
- calidad de imagen
- capa de tinta blanca
- capa de barniz
- áreas transparentes
- sangrar
- márgenes seguros
Ilustraciones de trama
Para fotografías e ilustraciones detalladas, alrededor300 DPI en el tamaño de impresión finales un punto de partida práctico para productos de vista cercana.
Ilustraciones vectoriales
Los archivos vectoriales son preferibles para:
- logotipos
- códigos QR
- texto
- iconos
- arte lineal
- gráficos de marca
porque permanecen nítidos cuando se les cambia el tamaño.
Diseño para la madera, no solo para la pantalla
Un diseño preparado sobre un lienzo blanco de computadora puede verse completamente diferente cuando se imprime sobre madera natural.
Por eso es tan importante la decisión sobre la tinta blanca.
Tinta blanca versus veta de madera natural: ¿cuál debería elegir?
Esta es una de las decisiones creativas más importantes en la impresión UV sobre madera.
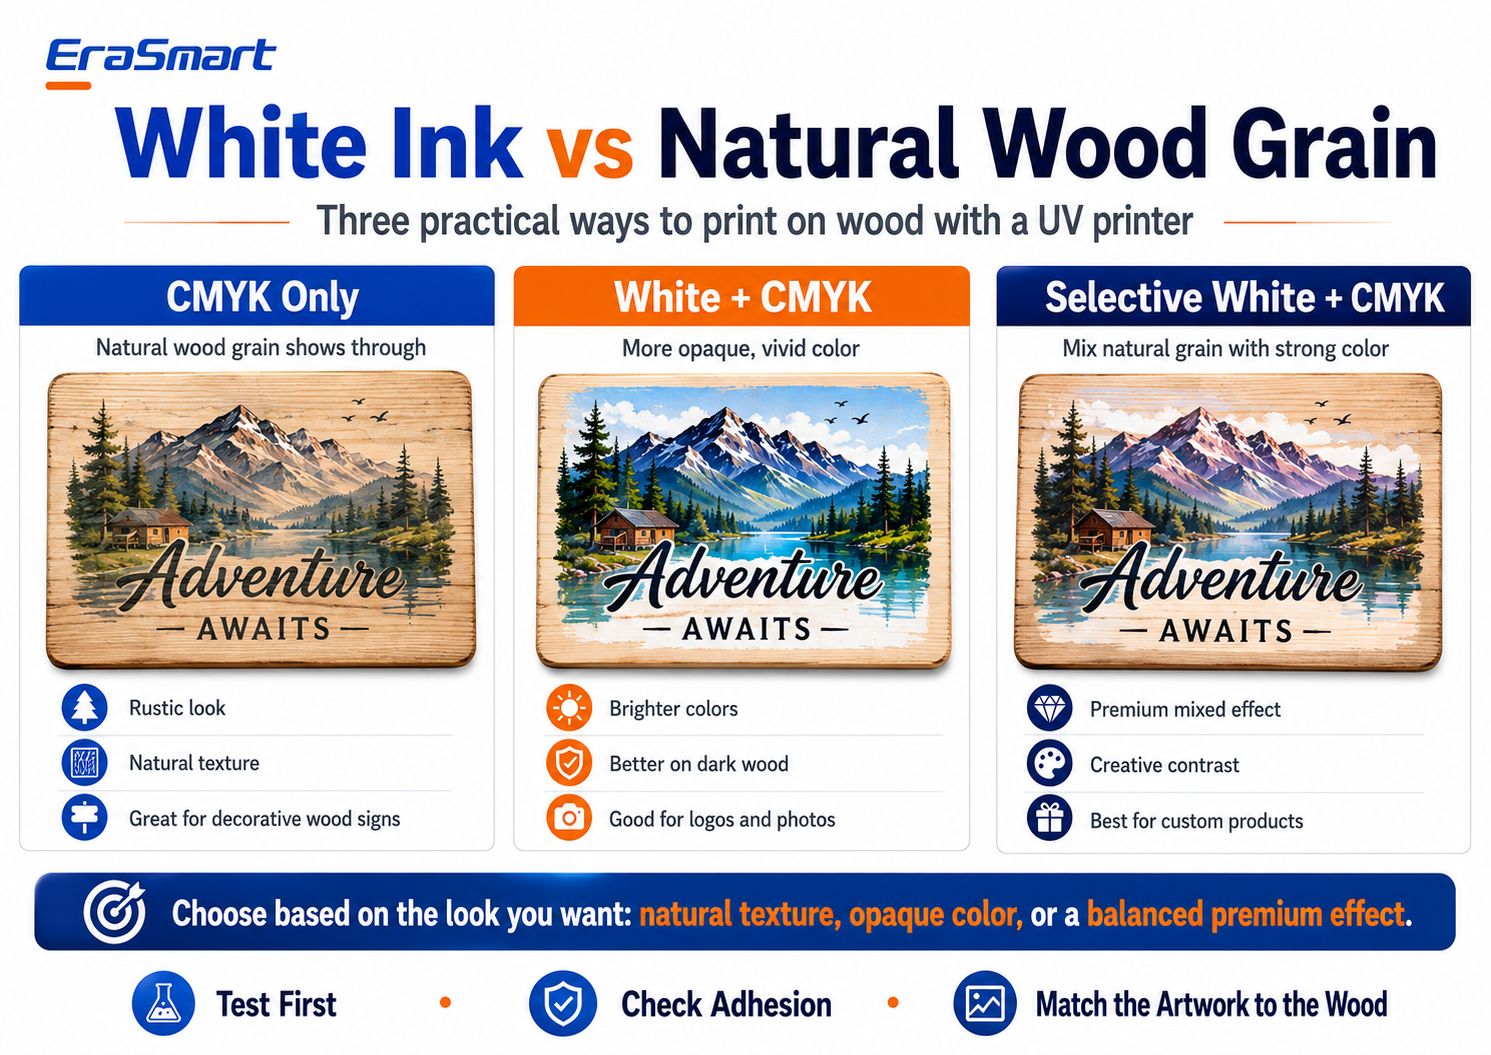
Hay tres enfoques prácticos.
Opción 1: solo CMYK
Con la impresión únicamente CMYK, la madera natural permanece visible a través de las partes más claras de la obra de arte.
Esto puede crear un:
- aspecto rústico
- apariencia antigua
- textura natural
- sensación artesanal
Funciona especialmente bien para diseños creados intencionalmente sobre un fondo de madera.
Los productos adecuados incluyen:
- señales de cabina
- placas decorativas
- signos de cafe
- regalos rusticos
- decoración del hogar natural
La limitación importante es la previsibilidad del color.
Debido a que el sustrato es marrón o tostado en lugar de blanco, el color final interactuará con la madera.
Las áreas claras pueden aparecer más oscuras o más transparentes que en la pantalla.
Opción 2: Blanco + CMYK
Una base blanca crea una base más opaca debajo de la obra de arte en color.
Esto es útil cuando necesitas:
- color más fuerte
- fotos más brillantes
- logotipos más claros
- colores de marca más consistentes
- mejor visibilidad en madera oscura
Las aplicaciones típicas incluyen:
- fotografías
- logotipos de empresas
- ilustraciones coloridas
- marca del producto
- obra de arte detallada
Blanco + CMYK reduce la influencia del color natural de la madera.
Opción 3: Blanco selectivo + CMYK
El blanco selectivo suele ser la opción más interesante para los productos de madera de primera calidad.
En lugar de imprimir en blanco debajo de toda la imagen, utilice blanco sólo donde se necesita opacidad.
Por ejemplo:
- blanco bajo el colorido paisaje
- No hay áreas blancas detrás del fondo de madera.
- blanco debajo del logotipo de la empresa
- veta natural alrededor de elementos decorativos
Esto crea una combinación de:
madera natural + color controlado
y puede darle al producto terminado una apariencia más diseñada intencionalmente.
¿Qué modo de tinta blanca debería utilizar?
Una regla de decisión simple:
¿Quieres la máxima textura natural?
Utilice únicamente CMYK.
¿Quieres colores más predecibles y vivos?
Utilice blanco + CMYK.
¿Quieres un efecto mixto premium?
Utilice blanco selectivo + CMYK.
La mejor opción depende de la obra de arte y del posicionamiento del producto.
Cómo imprimir UV sobre madera paso a paso
Una vez que el material y la obra de arte estén preparados, cree un proceso de producción repetible.
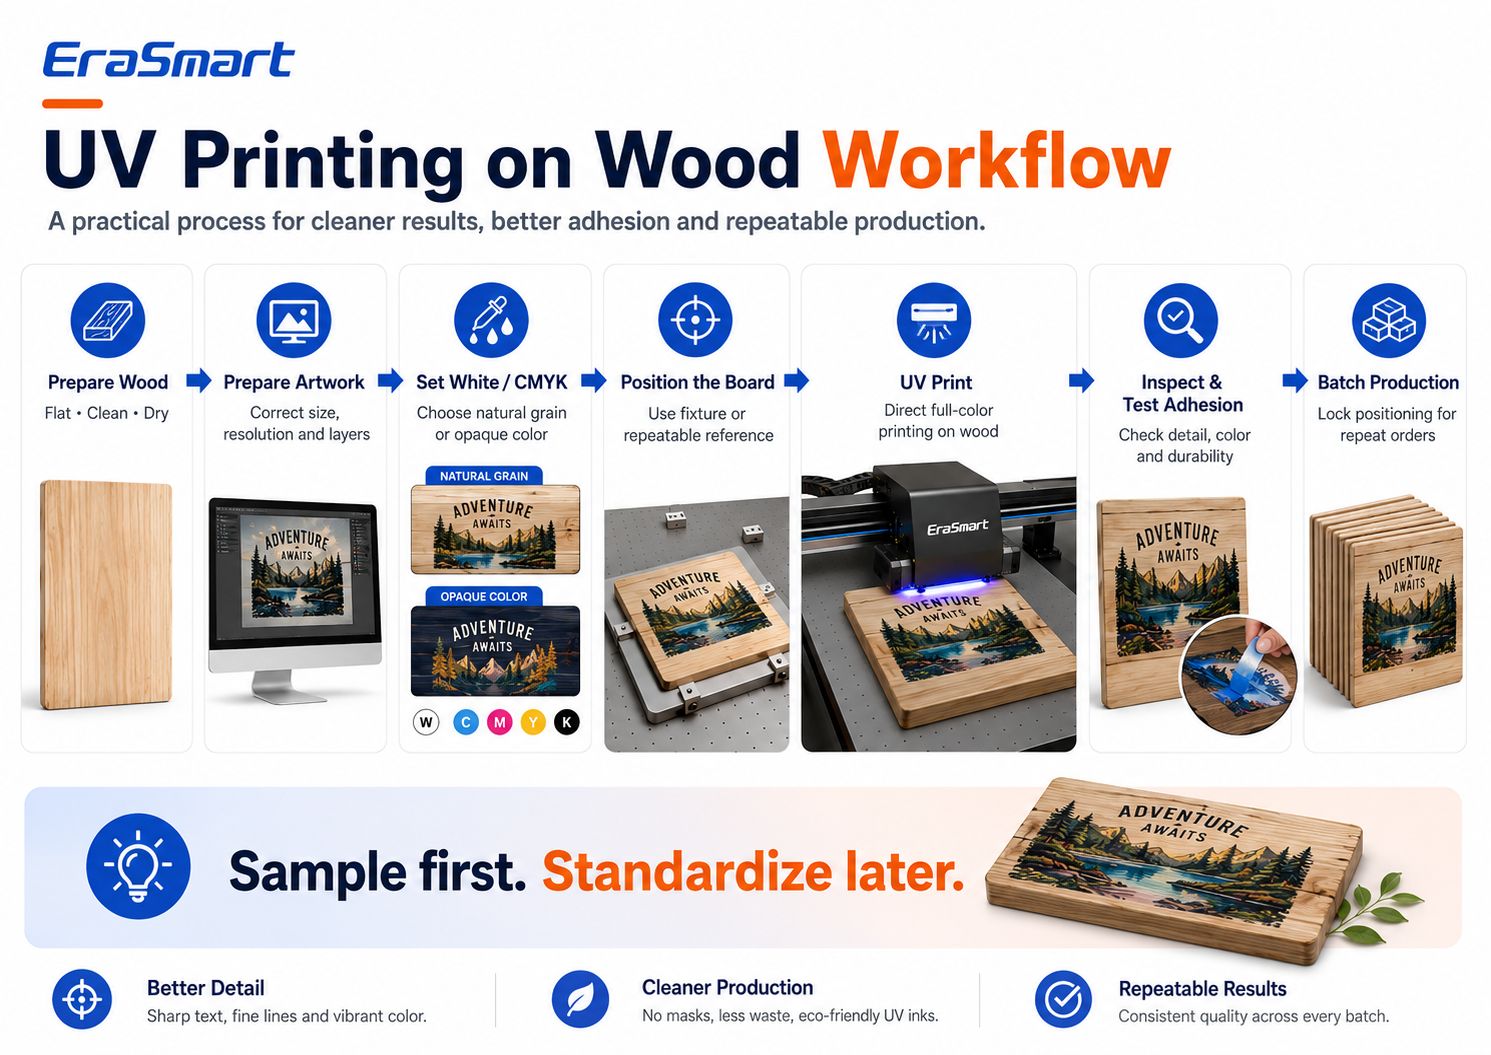
Paso 1: preparar la madera
Asegúrese de que el tablero esté:
- limpio
- seco
- departamento
- libre de polvo
- adecuado para pruebas
Paso 2: preparar la obra de arte
Colocar:
- dimensiones finales
- resolución de imagen
- posición de impresión
- capas CMYK
- capas de tinta blanca
- capas de barniz si es necesario
Paso 3: elija su estrategia de tinta blanca
Decidir entre:
- Sólo CMYK
- Blanco + CMYK
- Blanco selectivo + CMYK
antes de enviar el trabajo a la impresora.
Paso 4: Coloque el tablero
Coloque la madera de forma segura en la plataforma de impresión.
Para productos repetidos, considere usar:
- marcas de posicionamiento
- referencias de borde
- accesorios
- plantillas
- plantillas
Esto reduce los errores de alineación.
Paso 5: establezca la altura de impresión
La separación correcta del cabezal de impresión es fundamental.
Una superficie muy deformada o colocada demasiado alta puede crear:
- problemas de calidad de impresión
- distancia de chorro incorrecta
- riesgo potencial del cabezal de impresión
No utilice la impresora para compensar madera muy deformada.
Utilice productos estables y suficientemente planos.
Paso 6: imprima una muestra
No inicie inmediatamente un lote de 100 piezas.
Imprima una muestra primero.
Controlar:
- color
- detalle
- alineación de tinta blanca
- posición de impresión
- adhesión
- resistencia al rayado
- apariencia general
Paso 7: prueba de adherencia
Después del curado, pruebe si la capa de tinta es adecuada para la aplicación prevista.
La prueba exacta depende del producto.
Una placa decorativa para interiores tiene requisitos diferentes a los de un artículo que se manipulará con frecuencia.
Paso 8: bloquear la posición
Una vez aprobada la muestra:
- guardar la configuración RIP
- registrar la posición X/Y
- estandarizar el accesorio
- documentar el tamaño del tablero
Paso 9: iniciar la producción por lotes
Ahora se pueden producir varias piezas con un flujo de trabajo más repetible.
Paso 10: control de calidad final
Verifique cada lote para:
- alineación
- defectos de la boquilla
- arañazos
- defectos del tablero
- obra de arte incorrecta
- variación de color
- problemas de adherencia
Esto es particularmente importante para trabajos personalizados.
Muestra primero. Estandarizar más tarde.
Una de las mayores diferencias entre la impresión por hobby y la producción profesional es la estandarización.
Para un solo letrero de madera, el posicionamiento manual puede ser aceptable.
Para 50 carteles QR de café idénticos, el objetivo debería ser:
Mismo material + mismo dispositivo + mismo preajuste RIP + misma posición + mismo control de calidad
Esto reduce:
- tiempo de configuración
- erratas
- espacios en blanco desperdiciados
- quejas de los clientes
Cómo colocar la madera para pedidos repetidos
Si imprime regularmente la misma pieza de madera, cree un sistema de posicionamiento repetible.
Los posibles enfoques incluyen:
- paradas de esquina
- plantillas fisicas
- plantillas impresas
- reglas de posicionamiento
- accesorios dedicados
El objetivo es evitar adivinar manualmente la ubicación de cada producto.
Por ejemplo, si un cliente pide 30 carteles de menú de madera:
- use las mismas dimensiones del tablero
- fijar el tablero en la misma posición de referencia
- bloquear las coordenadas RIP
- cambiar sólo los datos de la obra de arte cuando sea necesario
- inspeccionar a intervalos definidos
Esto convierte la impresión en madera personalizada en un flujo de trabajo de producción en lugar de un experimento artesanal.
Impresión UV directa frente a DTF UV en madera
EraSmart ofrece flujos de trabajo UV de superficie plana y UV DTF, pero no son el mismo proceso.
Impresión UV directa
Elija una impresora UV directa cuando:
- la superficie de la madera es plana
- el objeto se adapta a la cama de impresión
- desea impresión directa al producto
- necesitas un posicionamiento preciso
- estás produciendo placas, paneles, letreros o regalos
- desea efectos de blanco y barniz directamente sobre el producto
UVDTF
UV DTF puede resultar útil cuando:
- el producto terminado es difícil de colocar en una plataforma
- el área de impresión es incómoda
- quieres hacer el gráfico primero y aplicarlo después
- estás decorando ciertos objetos terminados
Sin embargo, la adhesión del DTF UV a la madera todavía depende en gran medida de la superficie.
Es posible que una calcomanía que se adhiere bien a la madera lisa sellada no se comporte igual en:
- pino crudo polvoriento
- madera muy texturizada
- madera acabada al aceite
- superficies enceradas
Así que pruebe antes de la producción comercial.
Problemas comunes al imprimir en madera
Problema 1: los colores se ven apagados
Posibles razones:
- sin base blanca
- madera oscura
- grano natural fuerte
- obra de arte diseñada para un fondo blanco
Solución
Prueba Blanco + CMYK o blanco selectivo.
También ajuste la obra de arte teniendo en cuenta el fondo de madera real.
Problema 2: la adherencia de la tinta es débil
Posibles causas:
- polvo
- aceite
- cera
- revestimiento incompatible
- humedad
- mala preparación de la superficie
Solución
Limpie el sustrato exacto y realice una prueba de adherencia.
Si es necesario, evaluar un pretratamiento compatible adecuado para ese material.
Problema 3: el texto pequeño parece tosco
Posibles causas:
- grano rugoso
- fibras sueltas
- ilustraciones de baja resolución
- distancia incorrecta del cabezal de impresión
Solución
Utilice madera más lisa, mejore la preparación de la superficie, utilice texto vectorial y verifique la altura de impresión.
Problema 4: cambios de posición de impresión entre productos
Posible causa:
Posicionamiento manual sin referencia repetible.
Solución
Utilice un accesorio o plantilla de posicionamiento.
Problema 5: el tablero está deformado
La deformación puede crear una distancia inconsistente entre el cabezal de impresión y la superficie.
Solución
Utilice tablas estables y suficientemente planas.
Una plataforma de vacío puede ayudar a asegurar materiales planos adecuados, pero no se debe esperar que corrija deformaciones severas.
Problema 6: La veta de la madera domina la obra de arte
Esto suele ser una cuestión de diseño más que un problema de impresora.
Solución
Utilice una base blanca donde se requiera una opacidad más fuerte.
O rediseñe la obra de arte intencionalmente alrededor de la veta natural.
¿Necesita una capa protectora después de la impresión UV?
No todos los productos de madera requieren un acabado transparente adicional.
La decisión depende de:
- uso interior versus exterior
- frecuencia de manejo
- abrasión
- exposición a la humedad
- expectativas del cliente
- tipo de madera
- acabado impreso
Para productos decorativos de interior, es posible que la impresión curada con UV ya proporcione la apariencia deseada.
Para productos que experimentarán un mayor desgaste o exposición ambiental específica, se puede evaluar un acabado adicional.
Pruebe siempre cualquier recubrimiento posterior a la impresión porque puede cambiar:
- brillo
- apariencia del color
- textura
- adhesión
- efecto barniz
Una práctica impresora UV EraSmart para impresión en madera
Para productos de madera pequeños y medianos, una cama plana UV de clase A3 es un formato de producción práctico.
Una opción es laImpresora UV A3 de inyección de tinta digital EraSmart: doble XP600.
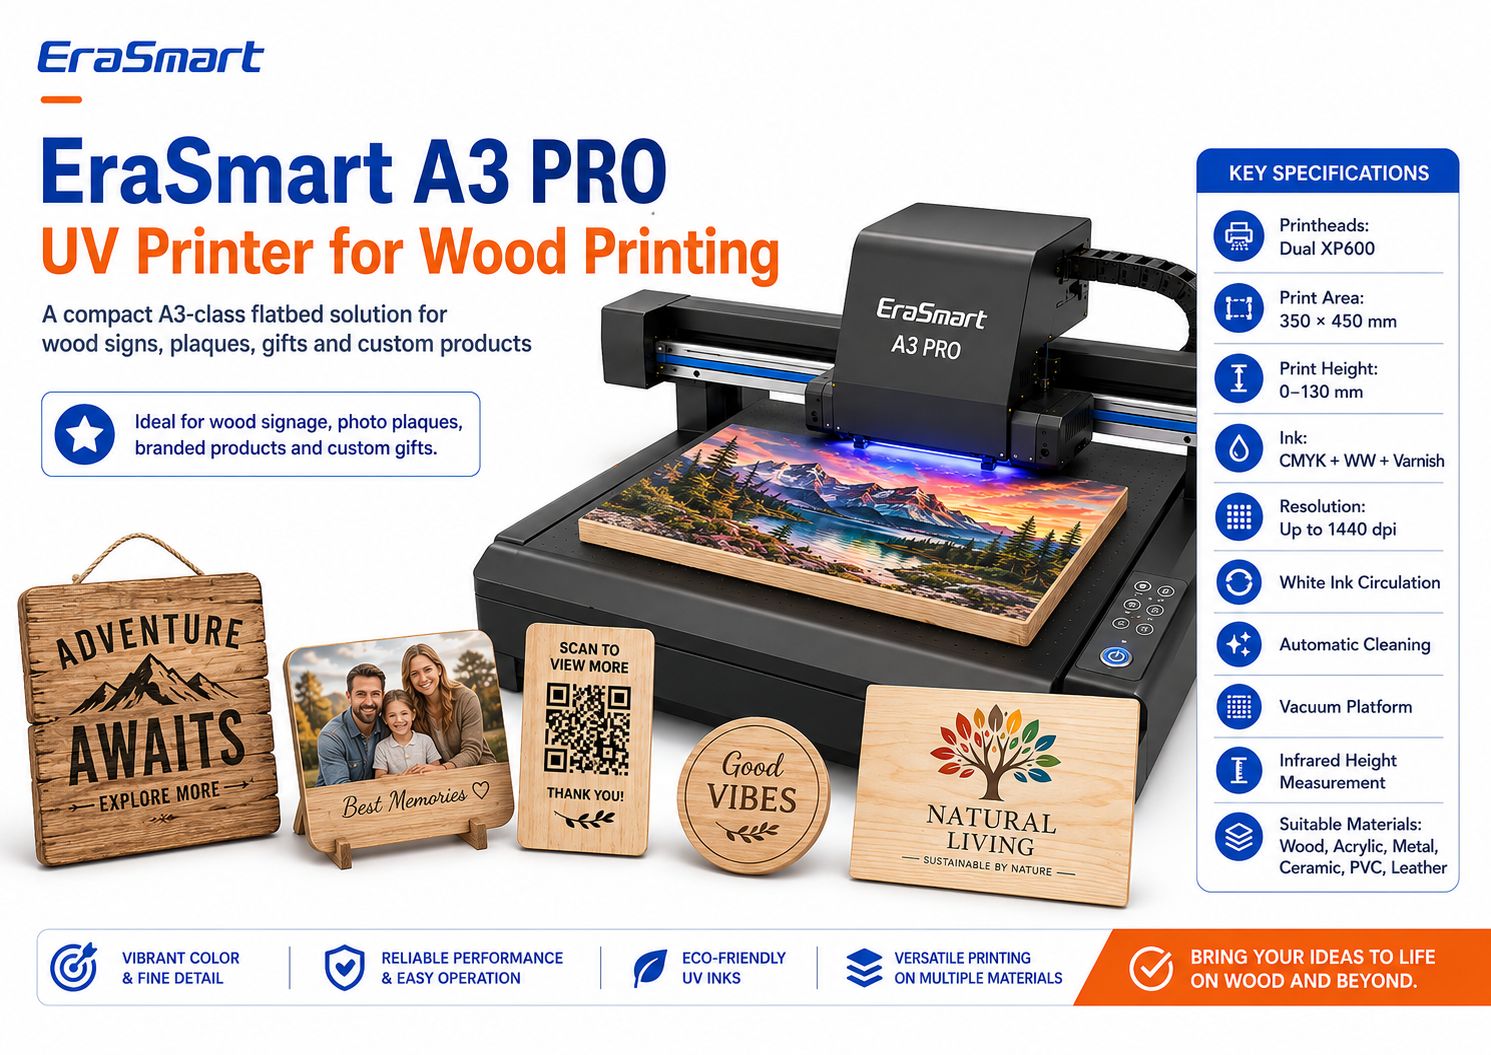
Especificaciones clave de EraSmart A3 PRO
| Especificación |
EraSmart A3 PRO |
| Cabezales de impresión |
Doble XP600 |
| Área de impresión |
350 × 450 milímetros |
| Altura de impresión |
0–130 milímetros |
| Configuración de tinta |
CMYK + WW + Barniz |
| Resolución |
Hasta 1440 ppp |
| Circulación de tinta blanca |
sí |
| Limpieza automática |
sí |
| Plataforma de vacío |
sí |
| Medición de altura |
Infrarrojo |
| Software RIP |
Riin / PrivadoRip |
La impresora admite materiales que incluyen:
- madera
- acrílico
- metal
- cerámico
- CLORURO DE POLIVINILO
- TPU
- cuero
- Tablero KT
Para aplicaciones de madera, la combinación detinta blanca, capacidad de barniz, plataforma de vacío y medición de altura por infrarrojosEs particularmente útil para la personalización de productos planos en lotes pequeños.
¿Qué productos de madera se adaptan a un flujo de trabajo de clase A3?
Un área de impresión de 350 × 450 mm puede acomodar muchos productos personalizados más pequeños, dependiendo de las dimensiones finales.
Los ejemplos incluyen:
- placas fotográficas
- signos qr
- pequeños carteles de menú
- Regalos personalizados
- posavasos
- cajas de regalo de marca
- premios de madera
- paneles decorativos
- señalización para pequeñas empresas
- piezas de boda
Para paneles de madera más grandes, señalización o varias piezas por lote, una plataforma más grande puede tener más sentido.
EraSmart también ofrece laImpresora UV A2con un área de trabajo más grande para empresas cuyas dimensiones de producto requieren más espacio.
Elija el tamaño de la impresora según sus productos, no simplemente porque una máquina más grande parezca más profesional.
Productos de madera que puede imprimir con una impresora UV
La madera es valiosa porque puede atender a varios mercados comerciales a la vez.
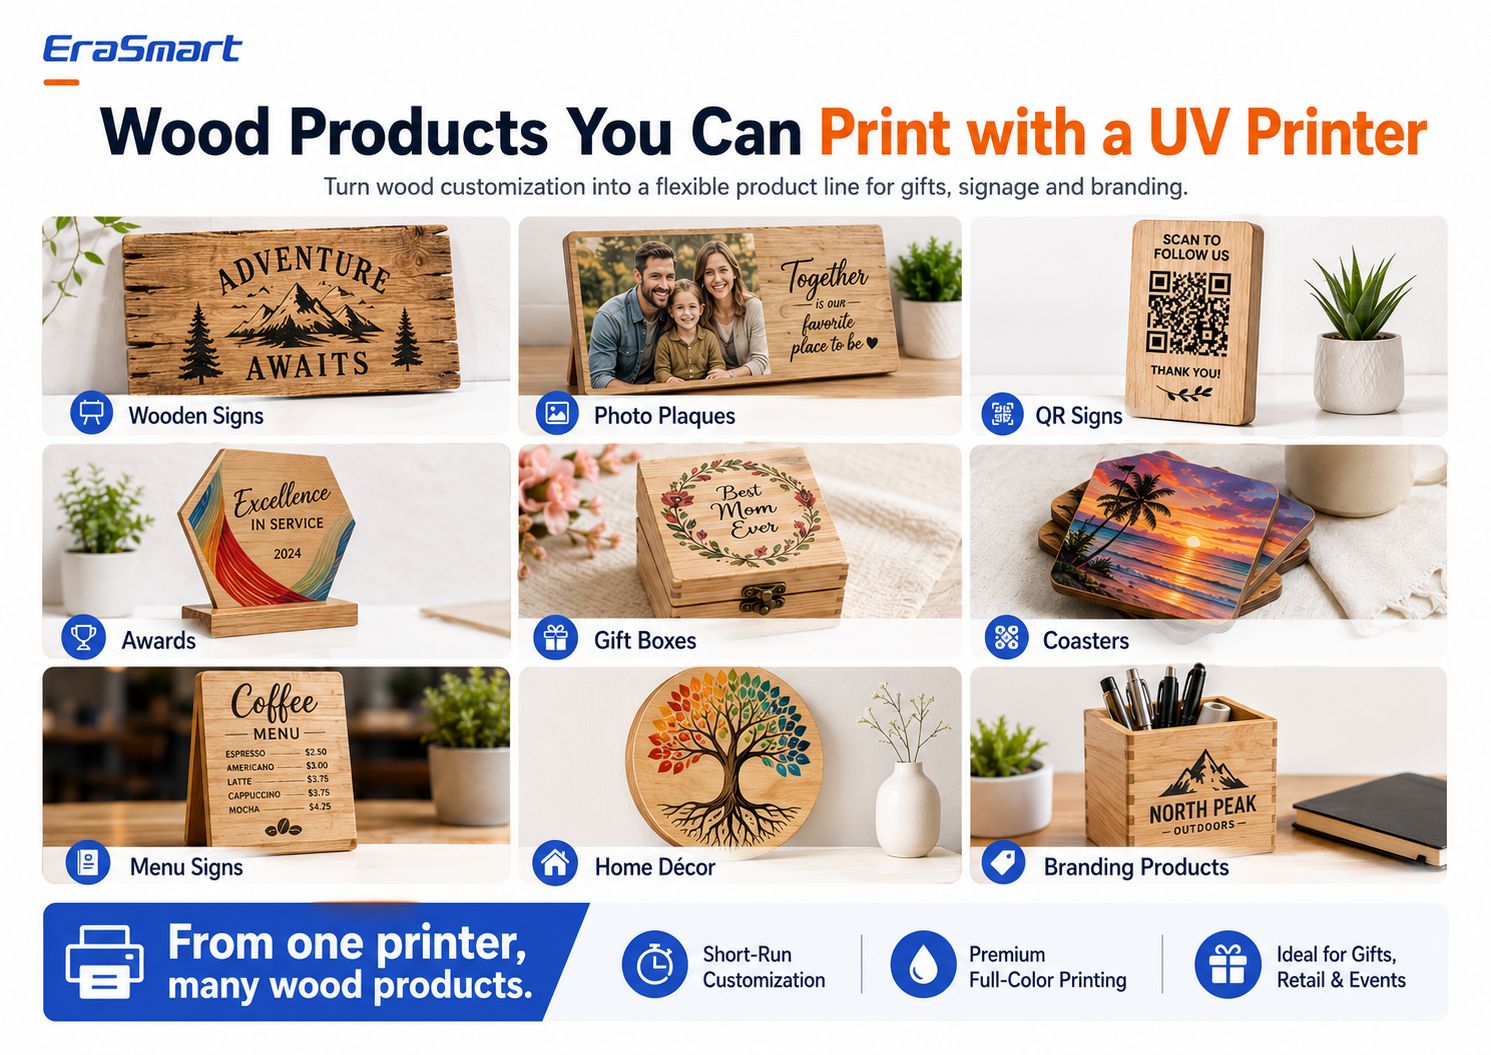
1. Letreros de madera
Ejemplos:
- señales de cabina
- signos de apellido
- signos de boda
- signos de cafe
- letreros de tienda
- señales direccionales
- citas decorativas
2. Placas fotográficas
La impresión UV a todo color puede convertir fotografías en:
- regalos familiares
- piezas de aniversario
- placas conmemorativas
- regalos de boda
- retratos de mascotas
- recuerdos de viaje
La tinta blanca suele ser útil detrás de obras de arte fotográficas.
3. Señales de códigos QR
Las pequeñas empresas utilizan cada vez más pantallas QR para:
- menús
- pagos
- opiniones
- acceso wifi
- redes sociales
- páginas de reserva
Imprima y escanee físicamente el código QR antes de la entrega.
No confíes sólo en la vista previa digital.
4. Premios de madera
Crear:
- premios de la empresa
- piezas de reconocimiento de empleados
- premios deportivos
- placas del club
- certificados de marca
5. Cajas de regalo
Las cajas de madera se pueden personalizar con:
- nombres
- logotipos
- gráficos florales
- fechas de boda
- marca corporativa
La geometría exacta de la caja debe encajar de forma segura dentro de las dimensiones y el espacio libre admitidos por la impresora.
6. Posavasos
Los posavasos son adecuados para:
- diseños turísticos
- colecciones de arte
- cafés
- regalos de boda
- mercancía de marca
Para productos expuestos a humedad o abrasión repetida, pruebe el producto terminado según su uso real.
7. Señales de menú
Los menús de madera pueden funcionar para:
- cafés
- restaurantes
- verja
- camiones de comida
- bodas
- eventos
8. Decoración del hogar
Ejemplos:
- arte botánico
- apellidos
- decoración infantil
- paneles de paisaje
- signos de cita
- decoración navideña
9. Productos de marca
Las empresas pueden solicitar:
- signos de contador
- placas de logotipo
- regalos promocionales
- piezas de exhibición
- decoración minorista
- productos de escritorio de marca
Los pedidos B2B pueden ser especialmente valiosos porque los clientes pueden volver a solicitar la misma plantilla con texto actualizado o nombres de personal diferentes.
Cómo un diseño de madera puede convertirse en múltiples productos
Una empresa de personalización inteligente puede reutilizar obras de arte.
Por ejemplo, una ilustración de montaña puede convertirse en:
- letrero de cabina
- conjunto de posavasos
- fondo del marco de fotos
- caja de regalo
- placa de recuerdo
- signo qr
- artículo de escritorio de marca
No es necesario recrear el mismo diseño para cada producto.
En su lugar, adáptese:
- dimensiones
- cultivo
- texto
- máscara de tinta blanca
- plantilla de producto
Esto aumenta el valor de cada archivo de arte.
Ideas de negocio para la impresión de madera UV
Tienda de regalos personalizada
Vender:
- placas fotográficas
- signos familiares
- regalos de boda
- productos para mascotas
- cajas personalizadas
Tienda de letreros locales
Oferta:
- signos de cafe
- menús
- pantallas QR
- placas de escritorio
- logotipos de empresas
Etsy o vendedor en línea
Crear:
- letreros rusticos
- decoración de temporada
- Regalos personalizados
- juegos de posavasos
- productos de boda
Negocio de turismo y souvenirs.
Imprimir:
- obra de arte de destino
- mapas locales
- gráficos emblemáticos
- placas de recuerdo
- colecciones de posavasos
Negocio de bodas y eventos
Producir:
- carteles de bienvenida
- piezas de mesa
- favores
- pequeñas placas
- recuerdos
Proveedor de regalos corporativos
Oferta:
- premio
- cajas de marca
- placas de escritorio
- regalos de reconocimiento
- mercancía del logotipo
Cómo fijar el precio de la impresión en madera personalizada
No calcule el precio utilizando únicamente tinta y madera.
Incluir:
- madera en blanco
- preparación de la superficie
- tinta
- tinta blanca
- barniz
- piezas de prueba
- impresiones fallidas
- configuración de obras de arte
- personalización
- tiempo de la máquina
- mano de obra
- refinamiento
- embalaje
- tarifas de plataforma
- materiales de envío
- mantenimiento
- ganancia
La personalización suele crear más valor porque los clientes no compran una tabla de madera genérica.
Están comprando un producto personalizado terminado.
Errores comunes a evitar
Error 1: asumir que todos los grabados en madera son iguales
No es así.
Pruebe el material exacto.
Error 2: imprimir sobre madera polvorienta
El polvo del lijado puede reducir la calidad y la adherencia.
Error 3: ignorar la tinta blanca
La tinta blanca es una de las herramientas creativas más importantes para controlar el color en la madera natural.
Error 4: imprimir el pedido completo sin muestra
Apruebe siempre primero una muestra física.
Error 5: usar madera muy deformada
La planitud es importante para lograr una holgura uniforme del cabezal de impresión.
Error 6: Ignorar los revestimientos superficiales existentes
La cera, el aceite, la laca, la pintura y otros revestimientos pueden afectar la adhesión.
Error 7: usar la misma obra de arte para papel blanco y madera
Diseño para el sustrato real.
Error 8: reposicionar manualmente cada producto
Construya un dispositivo repetible para la producción por lotes.
Lista de verificación de impresión profesional en madera
Antes de imprimir:
Material
- tipo de madera confirmado
- superficie limpia
- tabla seca
- suficientemente plano
- revestimiento identificado
- prueba de adherencia prevista
Obra de arte
- dimensiones finales correctas
- imagen de alta resolución
- texto/logotipo vectorial siempre que sea posible
- máscara de tinta blanca preparada
- capa de barniz preparada si es necesario
Impresora
- revisión de boquillas completa
- altura de impresión correcta
- Configuración de vacío o posicionamiento lista
- Preajuste RIP seleccionado
Muestra
- color comprobado
- detalle comprobado
- tinta blanca marcada
- adherencia comprobada
- puesto aprobado
Producción
- accesorio bloqueado
- versión del arte confirmada
- cantidades de lote comprobadas
- control de calidad periódico realizado
Refinamiento
- arañazos comprobados
- bordes comprobados
- embalaje preparado
- cantidad final verificada
Respuesta final: ¿Cómo se imprime en madera?
Para la impresión directa profesional sobre productos de madera adecuados, la impresión UV proporciona un flujo de trabajo flexible para obras de arte a todo color, tinta blanca, efectos de barniz, personalización y producción en pequeños lotes.
El proceso es:
preparar la madera → preparar la obra de arte → elegir la estrategia de tinta blanca → posicionar el producto → establecer la altura de impresión → imprimir una muestra → probar la adhesión → estandarizar la posición → comenzar la producción por lotes
El factor más importante no es la resolución máxima de la impresora.
Escontrol de superficie.
Un producto de madera limpio, liso y estable con una configuración de impresión probada generalmente producirá resultados más predecibles que una máquina costosa que imprima sobre una superficie inadecuada, polvorienta, aceitosa o muy deformada.
La tinta blanca es el segundo factor importante.
Usar:
- Sólo CMYKcuando quieres vetas de madera naturales
- Blanco + CMYKcuando quieres una opacidad más fuerte
- Blanco selectivo + CMYKcuando desea combinar el carácter del material natural con colores vivos
Para las empresas que producen placas de madera, letreros, obsequios, expositores QR, posavasos, premios, cajas y otros productos planos personalizados, elImpresora UV EraSmart A3 PROproporciona una plataforma de clase A3 de 350 × 450 mm con cabezales de impresión XP600 duales, tinta blanca, capacidad de barnizado, circulación de tinta blanca, limpieza automática, plataforma de vacío y medición de altura por infrarrojos.
El objetivo no es simplemente imprimir sobre madera.
El objetivo es crear un flujo de trabajo que pueda producir elLa misma calidad una y otra vez..
Preguntas frecuentes
¿Puede una impresora UV imprimir directamente sobre madera?
Sí. Las impresoras planas UV pueden imprimir directamente sobre muchas superficies de madera adecuadas. La madera debe estar limpia, estable, suficientemente plana y sometida a prueba de adherencia antes de la producción comercial.
¿Necesito lijar la madera antes de imprimir con UV?
No siempre. La madera lisa preparada puede que ya sea adecuada. Las superficies rugosas, las fibras sueltas o los acabados irregulares pueden beneficiarse del lijado. Retire siempre el polvo del lijado antes de imprimir.
¿Cuál es la mejor madera para impresión UV?
La madera lisa, limpia y estable generalmente produce los resultados más predecibles. Se puede utilizar madera contrachapada de abedul, arce, pino preparado, bambú, MDF y madera revestida dependiendo de la condición de la superficie y el acabado requerido.
¿Se puede imprimir con luz ultravioleta sobre madera en bruto?
Sí, pero la madera en bruto puede ser más porosa y texturizada. El resultado depende de la veta, la suavidad de la superficie, la humedad, el polvo y la obra de arte.
¿Necesito tinta blanca al imprimir sobre madera?
No siempre.
Utilice CMYK sólo cuando desee que se vea la veta natural.
Utilice blanco bajo CMYK cuando necesite colores más opacos, vibrantes o predecibles.
¿Puede la impresión UV reproducir fotografías sobre madera?
Sí. Para productos fotográficos, utilice obras de arte de alta calidad y considere una base blanca si desea que los colores de la imagen permanezcan más fuertes y menos influenciados por el tono de la madera.
¿Puedo imprimir códigos QR en madera?
Sí, pero los códigos QR deben seguir siendo lo suficientemente grandes, nítidos y de alto contraste. Pruebe siempre el código impreso terminado con varios teléfonos antes de la entrega.
¿Todos los productos de madera necesitan imprimación?
No. Los requisitos de imprimación dependen de la superficie exacta de la madera, el recubrimiento, la tinta y los requisitos de adhesión. Pruebe primero en lugar de aplicar la imprimación automáticamente.
¿Puede una impresora UV imprimir cajas de madera?
Potencialmente, si el producto se ajusta a las dimensiones, altura, peso y espacio libre seguro para el cabezal de impresión admitidos por la impresora. El área imprimible también debe ser suficientemente plana.
¿Qué impresora EraSmart es adecuada para imprimir en madera?
Para productos de madera planos pequeños y medianos, elImpresora UV A3 de inyección de tinta digital EraSmart: doble XP600es una opción adecuada. Para piezas de madera más grandes, revise laImpresora UV EraSmartrango y seleccione un área de impresión según las dimensiones reales del producto.
¿Quiere crear un negocio de impresión de madera personalizado?
Dígale a EraSmart:
- ¿Qué productos de madera quieres imprimir?
- dimensiones de su producto
- tipo de madera
- ya sea que la superficie esté cruda, pintada o recubierta
- producción mensual esperada
- si necesitas tinta blanca
- si necesitas efectos de barniz
- tu espacio de trabajo
- sus planes futuros de productos
Nuestro equipo puede ayudarle a comparar el derechoImpresora UV EraSmarty flujo de trabajo de producción para letreros de madera, placas fotográficas, obsequios personalizados, productos de marca, letreros QR, posavasos, cajas y otras aplicaciones de madera personalizadas.
Prepara la superficie. Controla la tinta blanca. Pruebe la muestra. Luego escale el flujo de trabajo.