Fabricant d'imprimantes à jet d'encre à plat de petite taille

Comment imprimer sur du bois : un guide pratique sur l'impression UV, la préparation et les produits personnalisés
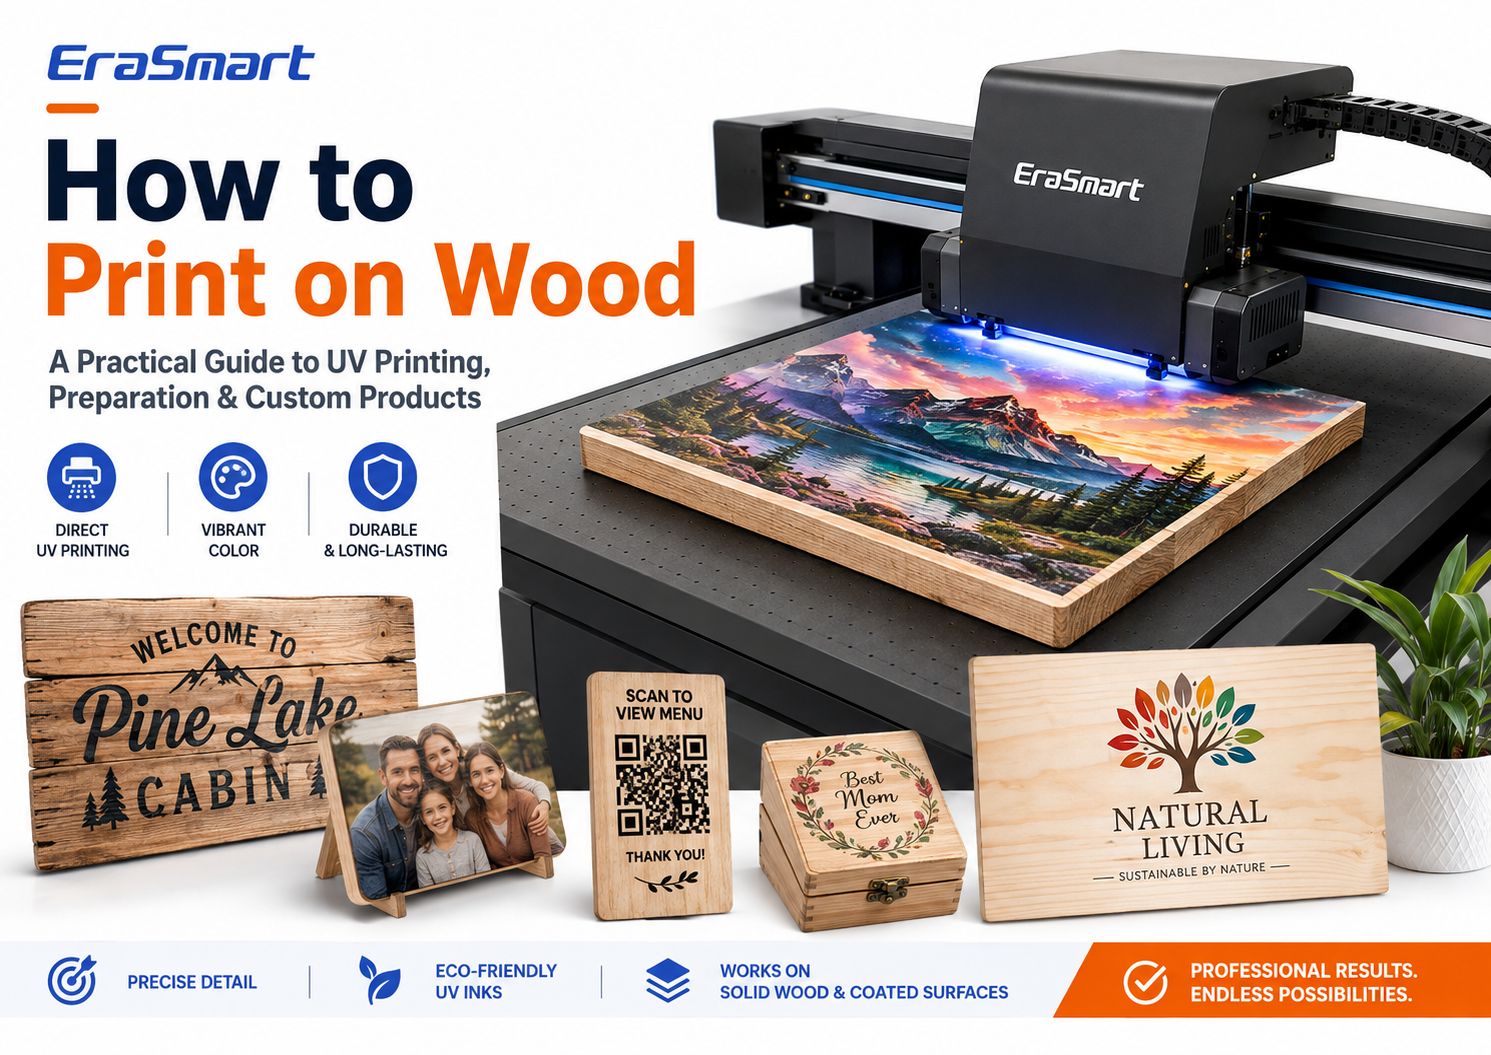
Oui, vous pouvez imprimer directement sur du bois.
Pour une personnalisation professionnelle en couleur, l'impression UV à plat est l'une des méthodes les plus pratiques car l'imprimante peut placer du CMJN, de l'encre blanche et du vernis en option directement sur des surfaces en bois appropriées sans papier transfert.
Cela permet de produire des panneaux en bois, des plaques photo, des affichages de codes QR, des récompenses, des coffrets cadeaux, des sous-verres, des tableaux de menu, des décorations pour la maison, des produits de marque et des cadeaux personnalisés en petits ou moyens lots.
Mais une impression sur bois réussie ne consiste pas simplement à placer une planche de bois sur une imprimante UV et à appuyer sur Print.
Le bois est un matériau naturel. Le grain, la porosité, la poussière, l'humidité, les revêtements de surface, la planéité, les huiles, les cires et la texture peuvent tous affecter la qualité d'impression et l'adhérence de l'encre.
Un panneau de contreplaqué de bouleau lisse peut se comporter très différemment du pin brut. Une planche de bambou brut peut se comporter différemment d’un produit en bambou laqué. Même deux ébauches de bois visuellement similaires peuvent produire des résultats différents si leurs revêtements sont différents.
La démarche professionnelle est donc :
préparer la surface → tester le matériau → choisir la bonne stratégie d'encre blanche → imprimer un échantillon → vérifier l'adhérence → standardiser le flux de travail
Ce guide explique les principales façons d'imprimer sur du bois, comment fonctionne l'impression UV directe, quelles surfaces en bois sont plus faciles à imprimer, comment préparer le matériau, quand utiliser de l'encre blanche, comment créer un flux de production reproductible et quels produits vous pouvez créer avec unImprimante UV EraSmart.
Réponse rapide : quelle est la meilleure façon d’imprimer sur du bois ?
Il n’existe pas de méthode unique pour chaque produit en bois.
La bonne méthode dépend de :
- que le bois soit brut ou enduit
- si vous avez besoin de couleur
- si vous avez besoin d'encre blanche
- quantité commandée
- forme de la surface
- complexité de conception
- finition requise
- vitesse de production
- si le produit est un produit artisanal ou commercial
Pour une personnalisation commerciale en couleur sur des produits plats en bois,l'impression UV directe est l'une des options les plus flexibles.
Il permet d'imprimer des illustrations directement sur la surface et est particulièrement utile lorsque vous avez besoin de :
- graphiques en couleur
- photographies
- logos
- encre blanche
- production en petites séries
- noms personnalisés
- conceptions variables
- modèles de produits répétés
Cependant, d’autres méthodes ont encore leurs propres utilisations.
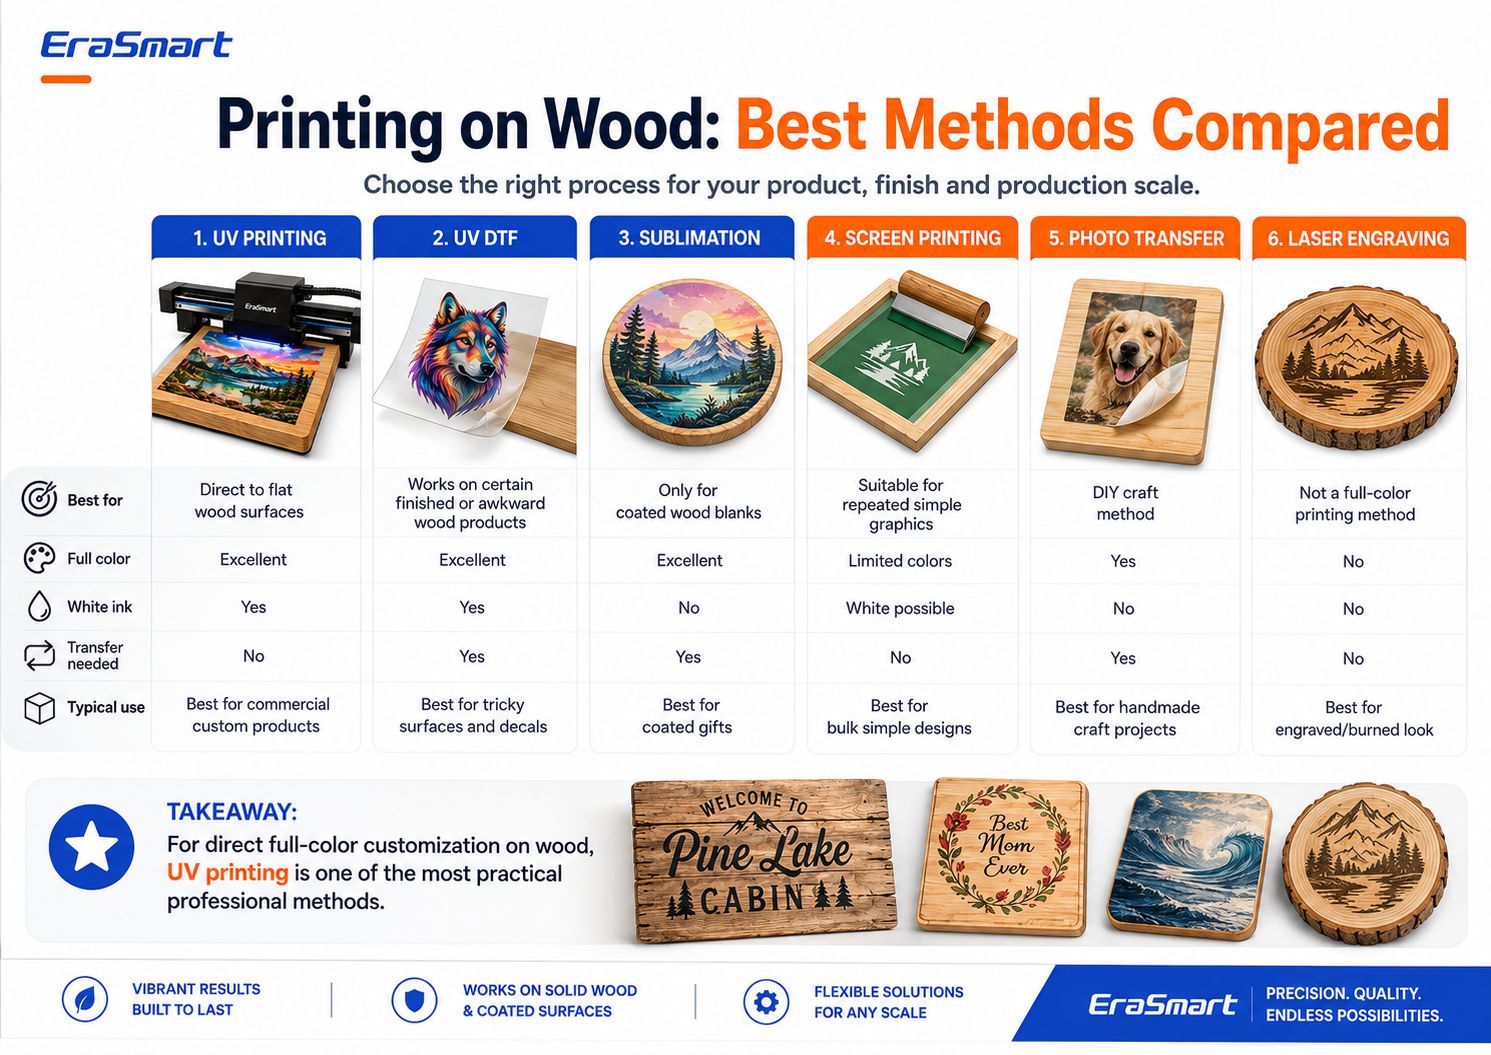
| Méthode | Pleine couleur | Encre blanche | Transfert nécessaire | Meilleure utilisation |
|---|---|---|---|---|
| Impression UV | Excellent | Oui | Non | Personnalisation commerciale directe du bois |
| UVDTF | Excellent | Oui | Oui | Produits finis ou difficiles à positionner |
| Sublimation | Excellent | Non | Oui | Ébauches de bois recouvertes par sublimation |
| Impression d'écran | Limité par la configuration | Possible | Non | Graphiques simples répétés |
| Transfert de photos | Oui | Non | Oui | Projets de bricolage |
| Gravure Laser | Pas de couleur | Non | Non | Effet bois brûlé ou gravé |
Le point clé est queimpression sur boisn’est pas un processus unique.
Choisissez la méthode en fonction du produit fini que vous souhaitez vendre.
Pourquoi l'impression UV fonctionne bien sur le bois
Une imprimante UV utilise de l'encre qui est durcie par la lumière UV pendant le processus d'impression.
Au lieu de recourir au papier transfert, l’imprimante projette de l’encre directement sur la surface en bois.
Pour les produits en bois adaptés, cela présente plusieurs avantages.
Impression directe sur surface
L'illustration est imprimée directement sur le tableau.
Cela peut réduire les étapes de production par rapport aux flux de travail qui nécessitent :
- papier transfert
- adhésif séparé
- transfert de chaleur
- transfert de photos manuel
Illustration en couleur
L’impression UV convient aux designs tels que :
- photographies
- illustrations colorées
- logos
- paysages
- graphiques de mariage
- motifs décoratifs
- Codes QR
- noms personnalisés
- image de marque du produit
Encre blanche
L'encre blanche est particulièrement utile sur le bois car le substrat naturel n'est pas blanc.
Vous pouvez utiliser de l'encre blanche pour créer une opacité plus forte et des couleurs plus prévisibles.
Effets de vernis
Sur les configurations d'imprimantes UV compatibles, le vernis peut être ajouté de manière sélective pour :
- brillant ponctuel
- détails en relief
- points forts du logo
- accents décoratifs
- effets de surface haut de gamme
Personnalisation en petits lots
L’impression numérique facilite la production :
- une plaque photo
- dix noms différents
- plusieurs signes QR
- produits cadeaux à court terme
- pièces de mariage personnalisées
- signalétique d'entreprise locale
sans créer une sérigraphie ou une plaque d'impression traditionnelle distincte pour chaque motif.
Sur quels types de bois pouvez-vous imprimer en UV ?
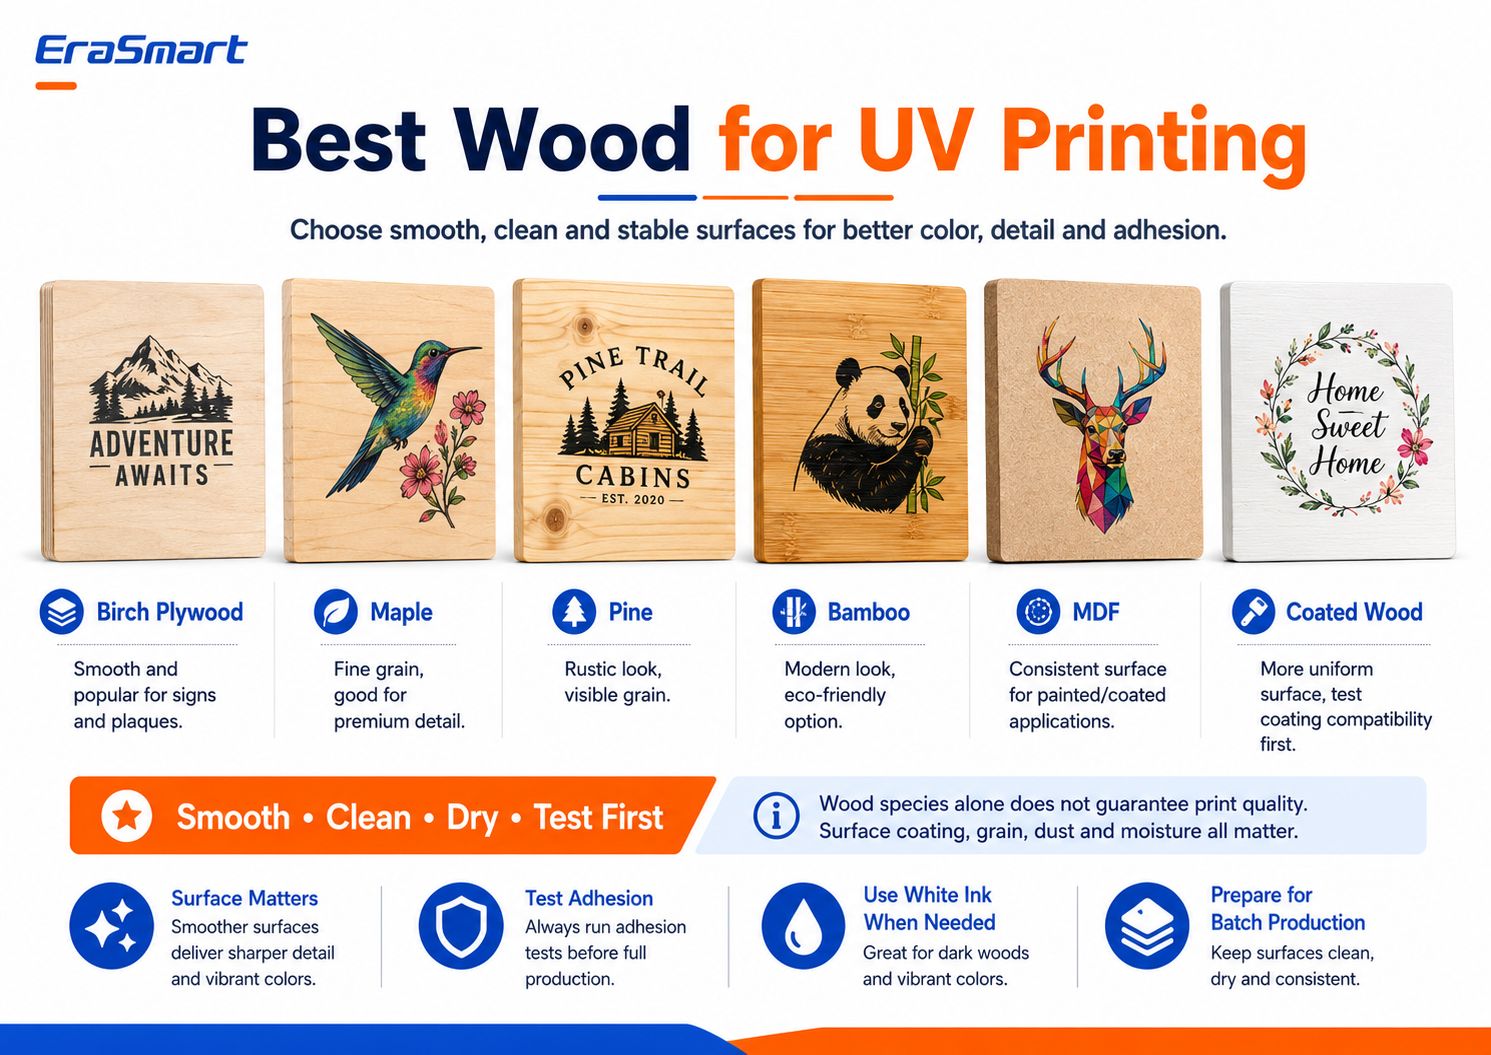
Les imprimantes UV peuvent fonctionner avec de nombreux substrats en bois et à base de bois, mais l'essence de bois à elle seule ne détermine pas la qualité d'impression.
L’état de la surface est tout aussi important.
Les matériaux courants comprennent :
- contreplaqué de bouleau
- érable
- pin
- bambou
- Mdf
- bois enduit
- bois peint
- bois scellé
- panneaux de bois dur préparés
Contreplaqué de bouleau
Le contreplaqué de bouleau est populaire pour :
- panneaux
- plaques
- pièces décoratives
- Cadeaux personnalisés
Une surface lisse en contreplaqué peut fournir de bons détails et un positionnement prévisible.
Cependant, la qualité du contreplaqué varie. Vérifiez la déformation, les défauts de surface et la consistance du placage.
Érable
L'érable a un grain relativement fin et peut bien fonctionner pour les produits où les petits détails comptent.
Il peut convenir pour :
- plaques premium
- produits photo
- petits signes
- cadeaux de marque
Pin
Le pin offre un aspect plus rustique.
Le grain et les nœuds visibles peuvent faire partie du design, en particulier lors d'une impression sans sous-couche entièrement blanche.
Cependant, le pin plus rugueux peut nécessiter un ponçage et une préparation supplémentaires.
Bambou
Les produits en bambou sont populaires pour :
- cadeaux
- décor
- accessoires de cuisine
- plaques
- produits de marque
Étant donné que les produits finis en bambou peuvent avoir des revêtements de surface différents, testez le produit exact avant la production.
Mdf
Le MDF offre une surface fabriquée plus uniforme que le grain du bois naturel.
Cela peut être utile pour :
- panneaux peints
- signalisation
- décor
- afficher les produits
Le MDF brut est poreux, son état de surface et tout processus de revêtement ou de scellement doivent donc être évalués avant la production.
Bois enduit
Le bois enduit ou peint peut offrir une apparence plus uniforme.
Cependant, un revêtement introduit une autre variable :
L’encre UV adhère-t-elle correctement à ce revêtement ?
Un revêtement brillant, une cire, une laque, une peinture, un scellant ou une finition à faible énergie de surface peut affecter l'adhérence.
Testez toujours le matériau fini réel.
La règle la plus importante : lisse, propre, sec et stable
Lorsque vous choisissez du bois pour l’impression UV, recherchez quatre caractéristiques :
Lisse
Une surface plus lisse prend généralement en charge un texte plus net, des lignes plus nettes et des détails d'image plus cohérents.
Nettoyer
La poussière issue du ponçage ou de la manipulation peut interférer avec l'impression et l'adhésion.
Sec
L'humidité peut affecter la surface et la stabilité du produit à long terme.
Écurie
La carte doit être suffisamment plate pour un dégagement sûr et constant de la tête d'impression.
Cela compte bien plus que la simple sélection d’une espèce dans une liste.
Pour un aperçu plus large des substrats compatibles UV, voir EraSmartGuide des matériaux pour imprimante UV.
Bois brut vs bois enduit
Le bois brut et enduit crée différentes opportunités.
Impression sur bois brut
Le bois brut préserve le caractère naturel du matériau.
Ceci est utile lorsque le grain fait intentionnellement partie du design.
Les avantages incluent :
- aspect naturel
- effet rustique
- texture du bois visible
- variation de produit unique
Les défis peuvent inclure :
- une plus grande porosité
- grain irrégulier
- poussière
- fibres superficielles
- absorption variable
- adhérence incohérente
Le bois brut bénéficie généralement d’un ponçage et d’un nettoyage soigneux.
Impression sur bois enduit ou scellé
Le bois enduit peut fournir une surface visuelle plus uniforme.
Avantages possibles :
- finition plus lisse
- apparence plus cohérente
- grain moins visible
- couleur plus prévisible dans certains cas
Mais le revêtement lui-même doit être compatible avec l'encre UV.
Les problèmes potentiels incluent :
- faible adhérence
- scratch
- peeling
- encre posée sur une surface incompatible
C'est pourquoi l'approche la plus sûre est :
n’approuvez jamais la production d’un matériau en bois sur la seule base de son nom. Testez le produit vierge ou fini exact.
Comment préparer le bois avant l'impression UV
La préparation de la surface est l’une des parties les plus importantes de l’ensemble du processus.
Étape 1 : Inspecter le tableau
Vérifier:
- platitude
- rayures
- bosses
- noeuds
- fibres lâches
- revêtements
- gauchissement
- humidité
- huiles ou cire
Ne commencez pas à imprimer avant de savoir sur quelle surface vous travaillez.
Étape 2 : poncer si nécessaire
Si le carton est rugueux, un léger ponçage peut aider à créer une surface d’impression plus uniforme.
L’objectif n’est pas toujours de supprimer le caractère naturel du bois.
L’objectif est d’éliminer :
- fibres lâches
- points forts difficiles
- éclats
- défauts de surface indésirables
Un ponçage fin est généralement plus approprié pour la préparation de l'impression que de laisser une surface rugueuse et inachevée.
Étape 3 : Retirez toute la poussière de ponçage
Cette étape est facile à sous-estimer.
La poussière de bois peut interférer avec :
- placement de l'encre
- netteté des bords
- adhésion
- apparition finale
Utilisez une méthode de nettoyage non pelucheuse appropriée et assurez-vous que la surface est propre avant d’imprimer.
Étape 4 : Éliminer l'huile et la contamination
Certains produits finis en bois peuvent contenir :
- huile
- cire
- composés de polissage
- empreintes digitales
- résidu de fabrication
Ceux-ci peuvent réduire l’adhérence de l’encre.
Étape 5 : Vérifiez les revêtements existants
Si le produit est peint, scellé, laqué ou enduit, effectuez un test d'adhérence.
Ne présumez pas que chaque produit en bois peint ou scellé est automatiquement imprimable aux UV.
Étape 6 : Test avant la production
Imprimez un petit échantillon en utilisant le même :
- bois
- traitement de surface
- type d'œuvre d'art
- stratégie d'encre blanche
- paramètres de durcissement
que vous comptez utiliser pour la commande client finale.
Si nécessaire pour un substrat spécifique, un apprêt ou un prétraitement approprié peut améliorer l'adhérence.
N'utilisez pas d'apprêt automatiquement sur chaque morceau de bois.
Utilisez-le lorsque les tests montrent que le matériau l'exige.
Préparer l'illustration pour l'impression sur bois
Une bonne impression sur bois commence avant que le matériau n'atteigne l'imprimante.
Vérifier:
- dimensions du produit final
- résolution d'œuvres d'art
- logos
- taille du texte
- qualité d'image
- couche d'encre blanche
- couche de vernis
- zones transparentes
- saigner
- marges sûres
Oeuvre raster
Pour des photographies et des illustrations détaillées, autour300 DPI à la taille d'impression finaleest un point de départ pratique pour les produits à vue rapprochée.
Illustration vectorielle
Les fichiers vectoriels sont préférables pour :
- logos
- Codes QR
- texte
- icônes
- dessin au trait
- graphiques de marque
car ils restent nets une fois redimensionnés.
Conception pour le bois, pas seulement pour l'écran
Un dessin préparé sur une toile d'ordinateur blanche peut être complètement différent lorsqu'il est imprimé sur du bois naturel.
C’est pourquoi la décision de l’encre blanche est si importante.
Encre blanche ou grain de bois naturel : lequel choisir ?
C’est l’une des décisions créatives les plus importantes en matière d’impression UV sur bois.
Il existe trois approches pratiques.
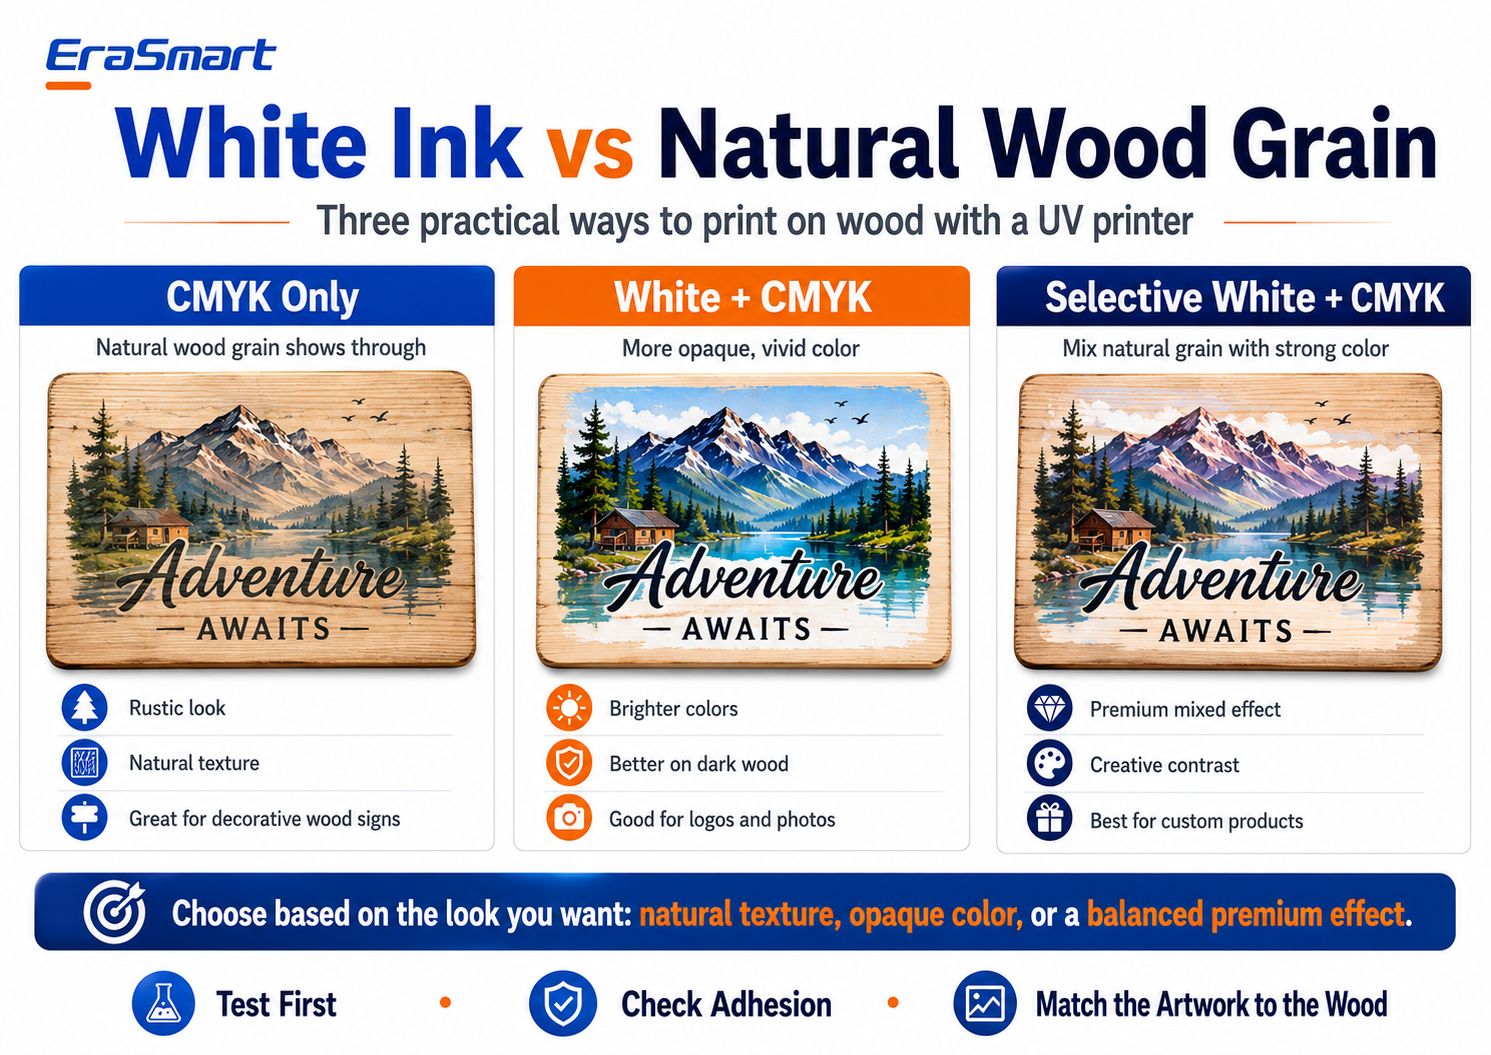
Option 1 : CMJN uniquement
Avec l'impression CMJN uniquement, le bois naturel reste visible à travers les parties plus claires de l'œuvre.
Cela peut créer un :
- aspect rustique
- aspect vintage
- texture naturelle
- sensation artisanale
Cela fonctionne particulièrement bien pour les designs créés intentionnellement pour un fond en bois.
Les produits appropriés incluent :
- panneaux de cabine
- plaques décoratives
- café signs
- cadeaux rustiques
- décoration naturelle
La limitation importante est la prévisibilité des couleurs.
Parce que le substrat est brun ou beige plutôt que blanc, la couleur finale interagira avec le bois.
Les zones claires peuvent apparaître plus sombres ou plus transparentes qu’à l’écran.
Option 2 : Blanc + CMJN
Une sous-couche blanche crée une base plus opaque sous l’illustration en couleur.
Ceci est utile lorsque vous avez besoin de :
- couleur plus forte
- des photos plus lumineuses
- logos plus clairs
- des couleurs de marque plus cohérentes
- meilleure visibilité sur bois foncé
Les applications typiques incluent :
- photographies
- logos d'entreprise
- illustrations colorées
- image de marque du produit
- illustration détaillée
Blanc + CMJN réduit l'influence de la couleur naturelle du bois.
Option 3 : Blanc sélectif + CMJN
Le blanc sélectif est souvent l’option la plus intéressante pour les produits en bois haut de gamme.
Au lieu d'imprimer du blanc sous toute l'image, utilisez du blanc uniquement là où l'opacité est nécessaire.
Par exemple:
- blanc sous le paysage coloré
- pas de blanc derrière les zones boisées en arrière-plan
- blanc sous le logo de l'entreprise
- grain naturel autour des éléments décoratifs
Cela crée une combinaison de :
bois naturel + couleur contrôlée
et peut donner au produit fini une apparence plus intentionnellement conçue.
Quel mode d’encre blanche devriez-vous utiliser ?
Une règle de décision simple :
Vous voulez une texture naturelle maximale ?
Utilisez uniquement CMJN.
Vous voulez des couleurs plus prévisibles et plus vives ?
Utilisez Blanc + CMJN.
Envie d'un effet mixte premium ?
Utilisez Blanc sélectif + CMJN.
La meilleure option dépend de l’illustration et du positionnement du produit.
Comment imprimer UV sur du bois étape par étape
Une fois le matériel et les illustrations préparés, créez un processus de production reproductible.
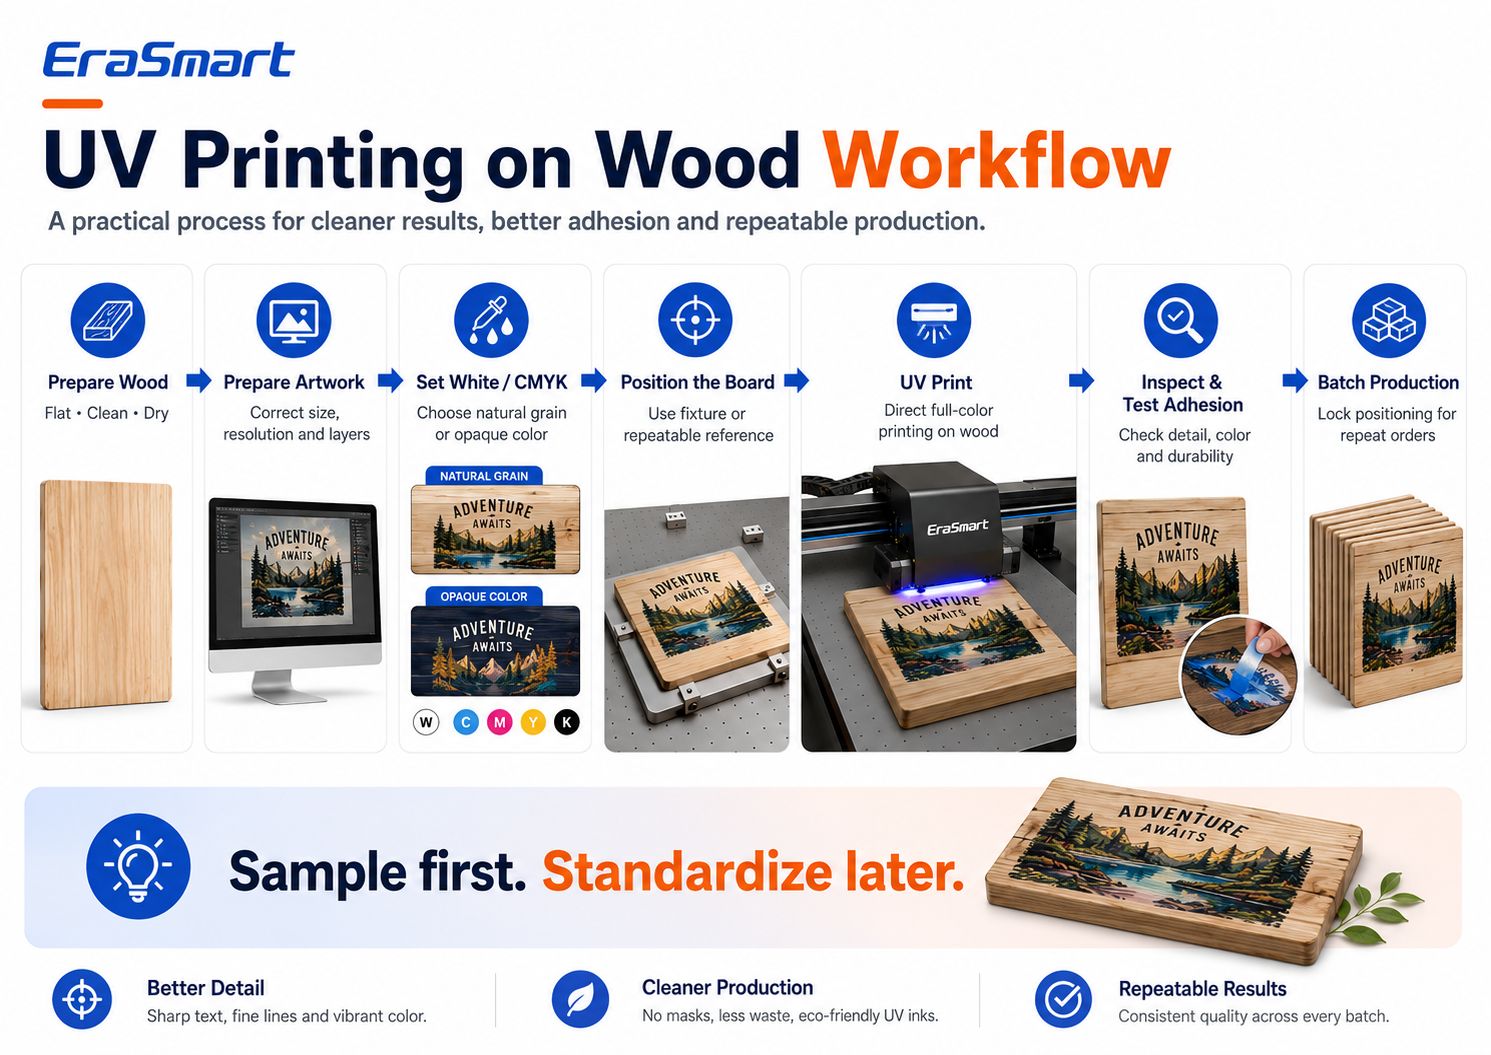
Étape 1 : Préparez le bois
Assurez-vous que le tableau est :
- faire le ménage
- sec
- plat
- exempt de poussière
- adapté aux tests
Étape 2 : préparer l'illustration
Ensemble:
- dimensions finales
- résolution d'image
- position d'impression
- Calques CMJN
- couches d'encre blanche
- couches de vernis si besoin
Étape 3 : Choisissez votre stratégie d’encre blanche
Départager:
- CMJN uniquement
- Blanc + CMJN
- Blanc sélectif + CMJN
avant d'envoyer le travail à l'imprimante.
Étape 4 : Positionner le tableau
Placez le bois en toute sécurité sur la plateforme d'impression.
Pour les produits répétés, pensez à utiliser :
- marques de positionnement
- références de bord
- luminaires
- gabarits
- modèles
Cela réduit les erreurs d’alignement.
Étape 5 : définir la hauteur d'impression
Un dégagement correct de la tête d’impression est essentiel.
Une surface fortement déformée ou positionnée trop haut peut créer :
- problèmes de qualité d'impression
- distance de jet incorrecte
- risque potentiel lié à la tête d'impression
N'utilisez pas l'imprimante pour compenser un bois fortement déformé.
Utiliser des produits stables et suffisamment plats.
Étape 6 : Imprimer un échantillon
Ne démarrez pas immédiatement un lot de 100 pièces.
Imprimez d’abord un échantillon.
Vérifier:
- couleur
- détail
- alignement à l'encre blanche
- position d'impression
- adhésion
- résistance aux rayures
- aspect général
Étape 7 : tester l'adhérence
Après durcissement, testez si la couche d'encre est adaptée à l'application prévue.
Le test exact dépend du produit.
Une plaque décorative d’intérieur a des exigences différentes de celles d’un objet qui sera manipulé fréquemment.
Étape 8 : Verrouiller la position
Une fois l’échantillon approuvé :
- enregistrer la configuration RIP
- enregistrer la position X/Y
- standardiser le luminaire
- documenter la taille du tableau
Étape 9 : Démarrer la production par lots
Désormais, plusieurs pièces peuvent être produites avec un flux de travail plus reproductible.
Étape 10 : CQ final
Vérifiez chaque lot pour :
- alignement
- défauts de buse
- rayures
- défauts de la planche
- illustration incorrecte
- variation de couleur
- problèmes d'adhésion
Ceci est particulièrement important pour les tâches personnalisées.
Échantillonnez d’abord. Standardisez plus tard.
L’une des plus grandes différences entre l’impression amateur et la production professionnelle est la standardisation.
Pour un seul panneau en bois, un positionnement manuel peut être acceptable.
Pour 50 QR de café identiques, l’objectif doit être :
même matériau + même luminaire + même préréglage RIP + même position + même QC
Cela réduit :
- temps d'installation
- fautes d'impression
- blancs gaspillés
- plaintes des clients
Comment positionner le bois pour les commandes répétées
Si vous imprimez régulièrement le même flan de bois, créez un système de positionnement reproductible.
Les approches possibles comprennent :
- arrêts de coin
- gabarits physiques
- modèles imprimés
- règles de positionnement
- luminaires dédiés
L’objectif est d’éviter de deviner manuellement l’emplacement de chaque produit.
Par exemple, si un client commande 30 panneaux de menu en bois :
- utiliser les mêmes dimensions de planche
- fixer la planche à la même position de référence
- verrouiller les coordonnées RIP
- modifier uniquement les données de l'illustration si nécessaire
- inspecter à intervalles définis
Cela transforme l’impression sur bois personnalisée en un flux de production plutôt qu’en une expérience artisanale.
Impression UV directe vs UV DTF sur bois
EraSmart propose à la fois des flux de travail UV à plat et UV DTF, mais il ne s'agit pas du même processus.
Impression UV directe
Choisissez une imprimante UV directe lorsque :
- la surface du bois est plate
- l'objet s'adapte au lit d'impression
- vous souhaitez une impression directe sur le produit
- vous avez besoin d'un positionnement précis
- vous produisez des plaques, des panneaux, des pancartes ou des cadeaux
- vous souhaitez des effets blanc et vernis directement sur le produit
UVDTF
UV DTF peut être utile lorsque :
- le produit fini est difficile à placer dans un plateau
- la zone d'impression est peu pratique
- vous souhaitez d'abord créer le graphique et l'appliquer plus tard
- vous décorez certains objets finis
Cependant, l’adhérence UV DTF sur le bois dépend encore fortement de la surface.
Un autocollant qui adhère bien au bois lisse scellé peut ne pas se comporter de la même manière sur :
- pin brut poussiéreux
- bois très texturé
- bois huilé
- surfaces cirées
Alors testez avant la production commerciale.
Problèmes courants lors de l'impression sur bois
Problème 1 : les couleurs semblent ternes
Raisons possibles :
- pas de sous-couche blanche
- bois sombre
- grain naturel fort
- oeuvre conçue pour un fond blanc
Solution
Test Blanc + CMJN ou blanc sélectif.
Ajustez également les illustrations en tenant compte du fond de bois réel.
Problème 2 : l'adhérence de l'encre est faible
Causes possibles :
- poussière
- huile
- cire
- revêtement incompatible
- humidité
- mauvaise préparation de la surface
Solution
Nettoyez le support exact et effectuez un test d'adhérence.
Si nécessaire, évaluez un prétraitement compatible approprié pour ce matériau.
Problème 3 : un petit texte semble grossier
Causes possibles :
- grain grossier
- fibres lâches
- oeuvre en basse résolution
- distance incorrecte de la tête d'impression
Solution
Utilisez du bois plus lisse, améliorez la préparation de la surface, utilisez du texte vectoriel et vérifiez la hauteur d'impression.
Problème 4 : changements de position d'impression entre les produits
Cause possible :
Positionnement manuel sans référence répétable.
Solution
Utilisez un luminaire ou un modèle de positionnement.
Problème 5 : la planche est déformée
La déformation peut créer une distance incohérente entre la tête d'impression et la surface.
Solution
Utilisez des planches stables et suffisamment plates.
Une plate-forme à vide peut aider à sécuriser des matériaux plats appropriés, mais il ne faut pas s'attendre à ce qu'elle corrige une déformation importante.
Problème 6 : Le grain du bois domine l’œuvre d’art
Il s'agit souvent d'un problème de conception plutôt que d'un problème d'imprimante.
Solution
Utilisez une sous-couche blanche lorsqu'une opacité plus forte est requise.
Ou repensez intentionnellement l’œuvre d’art autour du grain naturel.
Avez-vous besoin d’un revêtement protecteur après l’impression UV ?
Tous les produits en bois ne nécessitent pas une finition transparente supplémentaire.
La décision dépend :
- utilisation intérieure ou extérieure
- fréquence de traitement
- abrasion
- exposition à l'humidité
- les attentes des clients
- essence de bois
- finition imprimée
Pour les produits décoratifs d’intérieur, l’impression durcie aux UV peut déjà donner l’apparence souhaitée.
Pour les produits qui subiront une usure plus importante ou une exposition environnementale spécifique, une finition supplémentaire peut être évaluée.
Testez toujours tout revêtement post-impression car il peut changer :
- brillant
- aspect de la couleur
- texture
- adhésion
- effet vernis
Une imprimante UV EraSmart pratique pour l’impression sur bois
Pour les produits en bois de petite et moyenne taille, un plateau UV de classe A3 est un format de production pratique.
Une option est laImprimante UV A3 à jet d'encre numérique EraSmart — Dual XP600.
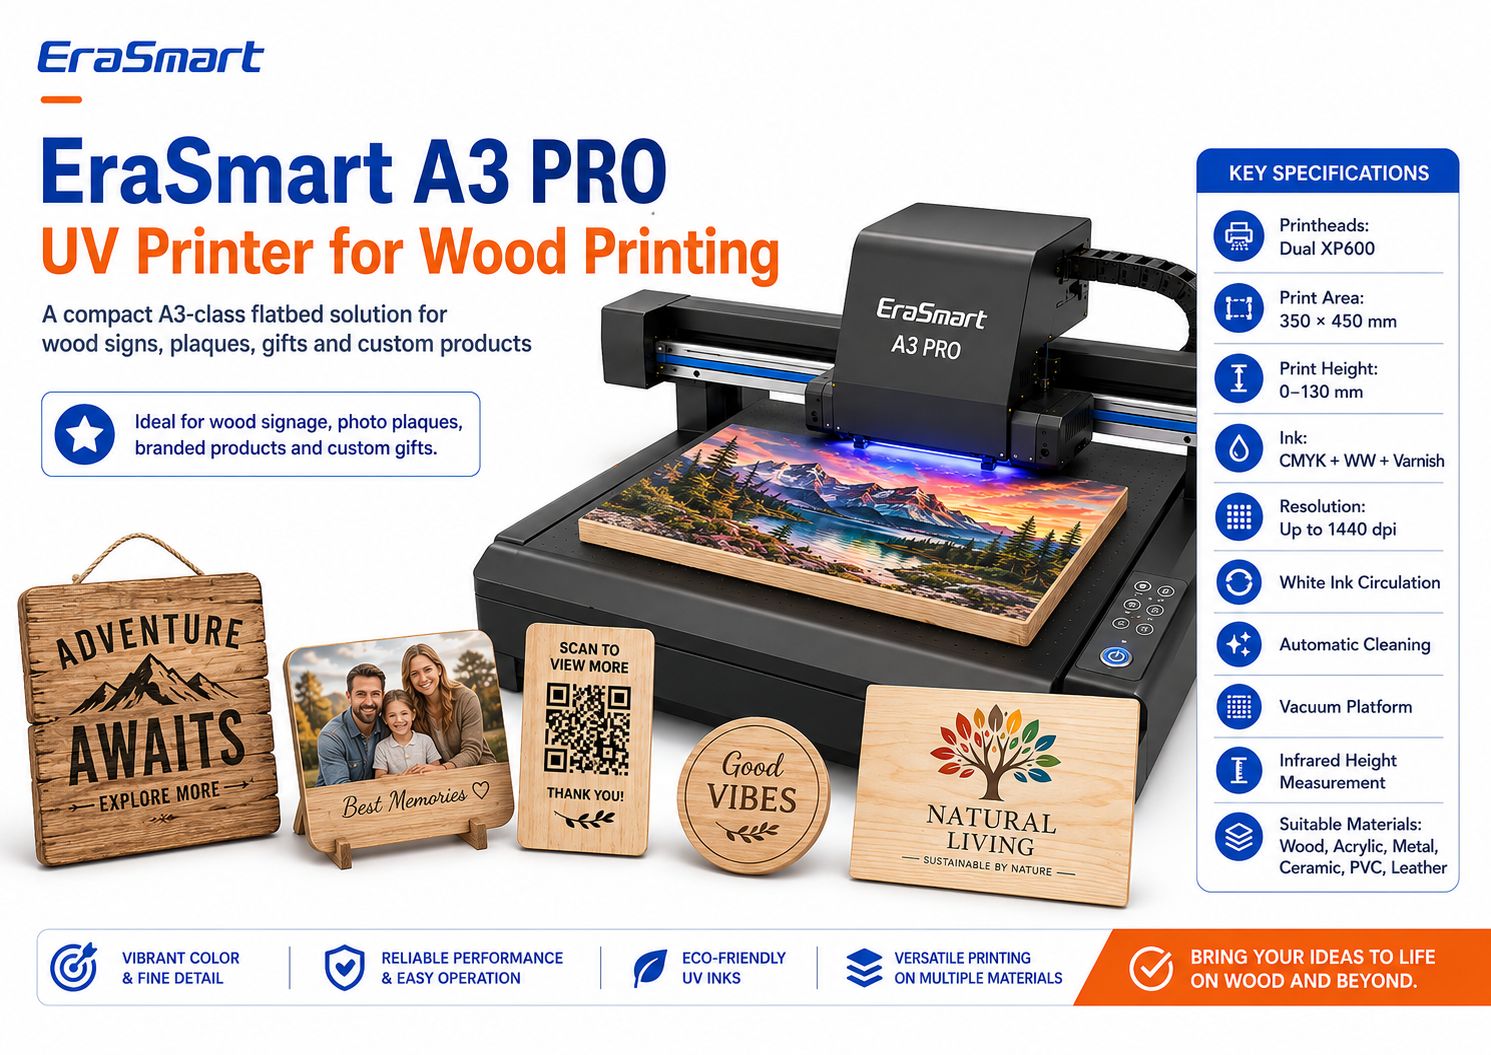
Spécifications clés de l'EraSmart A3 PRO
| spécification | EraSmart A3 PRO |
|---|---|
| Têtes d'impression | Double XP600 |
| Zone d'impression | 350 × 450 mm |
| Hauteur d'impression | 0–130mm |
| Configuration de l'encre | CMJN + WW + Vernis |
| Résolution | Jusqu'à 1 440 ppp |
| Circulation d'encre blanche | Oui |
| Nettoyage automatique | Oui |
| Plateforme à vide | Oui |
| Mesure de la hauteur | Infrarouge |
| Logiciel RIP | Riin / PrivateRip |
L'imprimante prend en charge les matériaux suivants :
- bois
- acrylique
- métal
- céramique
- PVC
- TPU
- cuir
- carte KT
Pour les applications sur le bois, la combinaison deencre blanche, capacité de vernissage, plate-forme à vide et mesure de hauteur infrarougeest particulièrement utile pour la personnalisation de produits plats en petits lots.
Quels produits en bois conviennent à un flux de travail de classe A3 ?
Une zone d'impression de 350 × 450 mm peut accueillir de nombreux produits personnalisés plus petits, en fonction des dimensions finales.
Les exemples incluent :
- plaques photo
- Signes QR
- petits panneaux de menu
- Cadeaux personnalisés
- dessous de verre
- coffrets cadeaux de marque
- récompenses en bois
- panneaux décoratifs
- signalisation pour petites entreprises
- pièces de mariage
Pour les panneaux de bois plus grands, la signalisation ou plusieurs pièces par lot, une plate-forme plus grande peut être plus logique.
EraSmart propose également leImprimante UV A2avec une zone de travail plus grande pour les entreprises dont les dimensions des produits nécessitent plus d'espace.
Choisissez la taille de l'imprimante en fonction de vos produits, pas simplement parce qu'une machine plus grande semble plus professionnelle.
Produits en bois que vous pouvez imprimer avec une imprimante UV
Le bois est précieux car il peut servir plusieurs marchés commerciaux à la fois.
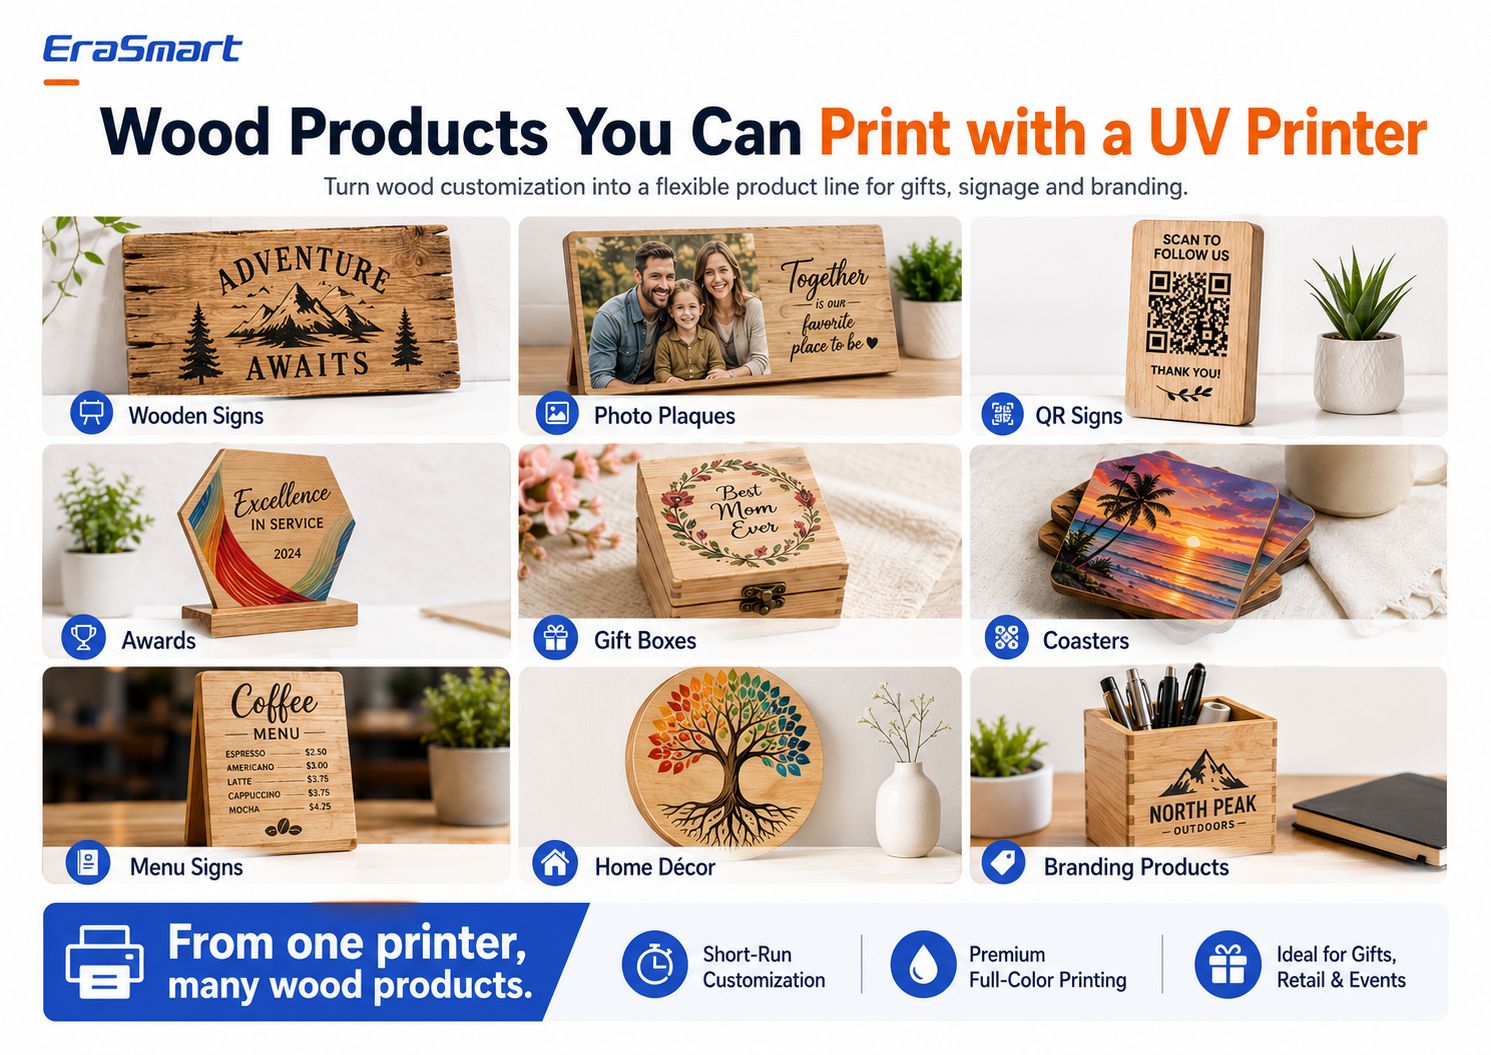
1. Panneaux en bois
Exemples :
- panneaux de cabine
- signes de nom de famille
- signes de mariage
- café signs
- enseignes de magasin
- panneaux directionnels
- citations décoratives
2. Plaques photos
L'impression UV en couleur peut transformer les photos en :
- cadeaux de famille
- pièces d'anniversaire
- plaques commémoratives
- cadeaux de mariage
- portraits d'animaux
- souvenirs de voyage
L’encre blanche est souvent utile derrière les œuvres photographiques.
3. Signes de code QR
Les petites entreprises utilisent de plus en plus les écrans QR pour :
- menus
- paiements
- avis
- Accès Wi-Fi
- réseaux sociaux
- pages de réservation
Imprimez et scannez physiquement le code QR avant la livraison.
Ne vous fiez pas uniquement à l’aperçu numérique.
4. Récompenses en bois
Créer:
- récompenses d'entreprise
- pièces de reconnaissance des employés
- récompenses sportives
- plaques de club
- certificats de marque
5. Coffrets cadeaux
Les caisses en bois peuvent être personnalisées avec :
- noms
- logos
- graphiques floraux
- dates de mariage
- image de marque d'entreprise
La géométrie exacte de la boîte doit s’adapter en toute sécurité aux dimensions et aux dégagements pris en charge par l’imprimante.
6. Sous-verres
Les sous-verres conviennent pour :
- conceptions touristiques
- collections d'art
- cafés
- cadeaux de mariage
- marchandises de marque
Pour les produits exposés à l'humidité ou à des abrasions répétées, tester le produit fini selon son utilisation réelle.
7. Panneaux de menu
Les menus en bois peuvent fonctionner pour :
- cafés
- restaurants
- barres
- camions de restauration
- mariages
- événements
8. Home Décor
Exemples :
- art botanique
- noms de famille
- décor de chambre d'enfant
- panneaux paysagers
- signes de citation
- décor de vacances
9. Produits de marque
Les entreprises peuvent commander :
- contre-signes
- plaques à logo
- Cadeaux promotionnels
- pièces d'exposition
- retail décor
- produits de bureau de marque
Les commandes B2B peuvent être particulièrement utiles car les clients peuvent réorganiser le même modèle avec un texte mis à jour ou des noms de personnel différents.
Comment une conception en bois peut devenir plusieurs produits
Une entreprise de personnalisation intelligente peut réutiliser des œuvres d’art.
Par exemple, une illustration de montagne peut devenir :
- panneau de cabine
- ensemble de montagnes russes
- fond de cadre photo
- coffret cadeau
- souvenir plaque
- Signe QR
- article de bureau de marque
Il n’est pas nécessaire de recréer le même design pour chaque produit.
Adaptez plutôt :
- dimensions
- recadrer
- texte
- masque à l'encre blanche
- modèle de produit
Cela augmente la valeur de chaque fichier d’illustration.
Idées commerciales pour l’impression UV sur bois
Boutique de cadeaux personnalisés
Vendre:
- plaques photo
- signes de famille
- cadeaux de mariage
- produits pour animaux de compagnie
- coffrets personnalisés
Boutique d'enseignes locale
Offre:
- café signs
- menus
- Affichages QR
- plaques de bureau
- logos d'entreprise
Etsy ou vendeur en ligne
Créer:
- signes rustiques
- décor saisonnier
- Cadeaux personnalisés
- ensembles de montagnes russes
- produits de mariage
Entreprise de tourisme et de souvenirs
Imprimer:
- oeuvre d'art de destination
- cartes locales
- graphiques emblématiques
- souvenir plaques
- collections de sous-verres
Entreprise de mariage et d'événements
Produire:
- signes de bienvenue
- pièces de table
- faveurs
- petites plaques
- souvenirs
Fournisseur de cadeaux d'entreprise
Offre:
- récompenses
- boîtes de marque
- plaques de bureau
- cadeaux de reconnaissance
- marchandise avec logo
Comment fixer le prix de l'impression sur bois personnalisée
Ne calculez pas le prix en utilisant uniquement de l’encre et du bois.
Inclure:
- bois vierge
- préparation des surfaces
- encre
- encre blanche
- vernis
- éprouvettes
- échecs d'impression
- configuration des illustrations
- personnalisation
- temps machine
- travail
- finition
- conditionnement
- frais de plateforme
- matériel d'expédition
- entretien
- profit
La personnalisation crée généralement plus de valeur car les clients n’achètent pas une planche de bois générique.
Ils achètent un produit fini personnalisé.
Erreurs courantes à éviter
Erreur 1 : supposer que tous les bois s'impriment de la même manière
Ce n’est pas le cas.
Testez le matériau exact.
Erreur 2 : imprimer sur du bois poussiéreux
La poussière de ponçage peut réduire la qualité et l’adhérence.
Erreur 3 : ignorer l'encre blanche
L'encre blanche est l'un des outils créatifs les plus importants pour contrôler la couleur du bois naturel.
Erreur 4 : imprimer la commande complète sans échantillon
Approuvez toujours un échantillon physique en premier.
Erreur 5 : Utiliser du bois gravement déformé
La planéité est importante pour un dégagement constant des têtes d'impression.
Erreur 6 : ignorer les revêtements de surface existants
La cire, l'huile, la laque, la peinture et d'autres revêtements peuvent affecter l'adhérence.
Erreur 7 : Utiliser la même illustration pour le papier blanc et le bois
Conception pour le substrat réel.
Erreur 8 : repositionner manuellement chaque produit
Créez un appareil reproductible pour la production par lots.
Liste de contrôle pour l'impression professionnelle sur bois
Avant l'impression :
Matériel
- essence de bois confirmée
- surface propre
- planche sèche
- suffisamment plat
- revêtement identifié
- test d'adhérence prévu
Oeuvre
- dimensions finales correctes
- image haute résolution
- texte/logo vectoriel si possible
- masque à l'encre blanche préparé
- couche de vernis préparée si besoin
Imprimante
- vérification des buses terminée
- hauteur d'impression correcte
- configuration de vide ou de positionnement prête
- Préréglage RIP sélectionné
Échantillon
- couleur vérifiée
- détail vérifié
- encre blanche vérifiée
- adhérence vérifiée
- poste approuvé
Production
- luminaire verrouillé
- version artistique confirmée
- quantités de lots vérifiées
- CQ périodique effectué
Finition
- rayures vérifiées
- bords vérifiés
- emballage préparé
- quantité finale vérifiée
Réponse finale : Comment imprimer sur du bois ?
Pour l'impression directe professionnelle sur des produits en bois appropriés, l'impression UV offre un flux de travail flexible pour les illustrations en couleur, l'encre blanche, les effets de vernis, la personnalisation et la production en petits lots.
Le processus est :
préparer le bois → préparer l'illustration → choisir la stratégie d'encre blanche → positionner le produit → définir la hauteur d'impression → imprimer un échantillon → tester l'adhérence → standardiser la position → commencer la production par lots
Le facteur le plus important n’est pas la résolution maximale de l’imprimante.
C'estcontrôle des surfaces.
Un produit en bois propre, lisse et stable avec une configuration d'impression testée produira généralement des résultats plus prévisibles qu'une machine coûteuse imprimant sur une surface inadaptée, poussiéreuse, huileuse ou très déformée.
L’encre blanche est le deuxième facteur majeur.
Utiliser:
- CMJN uniquementquand vous voulez un grain de bois naturel
- Blanc + CMJNquand on veut une opacité plus forte
- Blanc sélectif + CMJNlorsque vous souhaitez combiner le caractère naturel d'une matière avec des couleurs vives
Pour les entreprises produisant des plaques en bois, des panneaux, des cadeaux, des présentoirs QR, des sous-verres, des récompenses, des boîtes et d'autres produits plats personnalisés, leImprimante UV EraSmart A3 PROfournit une plate-forme de classe A3 de 350 × 450 mm avec deux têtes d'impression XP600, de l'encre blanche, une capacité de vernis, une circulation d'encre blanche, un nettoyage automatique, une plate-forme sous vide et une mesure de hauteur infrarouge.
Le but n’est pas simplement d’imprimer sur bois.
L'objectif est de créer un flux de travail capable de produire lemême qualité encore et encore.
FAQ
Une imprimante UV peut-elle imprimer directement sur du bois ?
Oui. Les imprimantes UV à plat peuvent imprimer directement sur de nombreuses surfaces en bois appropriées. Le bois doit être propre, stable, suffisamment plat et testé pour son adhérence avant la production commerciale.
Dois-je poncer le bois avant l’impression UV ?
Pas toujours. Le bois lisse préparé peut déjà convenir. Les surfaces rugueuses, les fibres lâches ou les finitions irrégulières peuvent bénéficier d'un ponçage. Retirez toujours la poussière de ponçage avant d’imprimer.
Quel est le meilleur bois pour l’impression UV ?
Le bois lisse, propre et stable produit généralement les résultats les plus prévisibles. Le contreplaqué de bouleau, l'érable, le pin préparé, le bambou, le MDF et le bois enduit peuvent tous être utilisés en fonction de l'état de la surface et de la finition requise.
Peut-on imprimer en UV sur du bois brut ?
Oui, mais le bois brut peut être plus poreux et texturé. Le résultat dépend du grain, de la douceur de la surface, de l’humidité, de la poussière et de l’œuvre d’art.
Ai-je besoin d’encre blanche pour imprimer sur du bois ?
Pas toujours.
Utilisez CMJN uniquement lorsque vous souhaitez que le grain naturel transparaît.
Utilisez le blanc sous CMJN lorsque vous avez besoin de couleurs plus opaques, vibrantes ou prévisibles.
L’impression UV peut-elle reproduire des photos sur bois ?
Oui. Pour les produits photographiques, utilisez des illustrations de haute qualité et envisagez une sous-couche blanche si vous souhaitez que les couleurs de l'image restent plus fortes et moins influencées par le ton du bois.
Puis-je imprimer des codes QR sur du bois ?
Oui, mais les codes QR doivent rester suffisamment grands, nets et contrastés. Testez toujours le code imprimé fini avec plusieurs téléphones avant la livraison.
Est-ce que chaque produit en bois a besoin d’un apprêt ?
Les exigences en matière d’apprêt dépendent de la surface exacte du bois, du revêtement, de l’encre et des exigences d’adhérence. Testez d'abord plutôt que d'appliquer l'apprêt automatiquement.
Une imprimante UV peut-elle imprimer des caisses en bois ?
Potentiellement, si le produit respecte les dimensions, la hauteur, le poids et l’espace libre de sécurité de la tête d’impression pris en charge par l’imprimante. La zone imprimable doit également être suffisamment plate.
Quelle imprimante EraSmart convient à l'impression sur bois ?
Pour les produits en bois plats de petite et moyenne taille, leImprimante UV A3 à jet d'encre numérique EraSmart — Dual XP600est une option appropriée. Pour les morceaux de bois plus gros, consultez leImprimante UV EraSmartgamme et sélectionnez une zone d’impression en fonction des dimensions réelles de votre produit.
Vous souhaitez créer une entreprise d’impression sur bois personnalisée ?
Dites à EraSmart :
- quels produits en bois vous souhaitez imprimer
- les dimensions de votre produit
- essence de bois
- si la surface est brute, peinte ou enduite
- production mensuelle attendue
- si vous avez besoin d'encre blanche
- si vous avez besoin d'effets de vernis
- votre espace de travail
- vos futurs projets de produits
Notre équipe peut vous aider à comparer les bonsImprimante UV EraSmartet flux de production pour les panneaux en bois, les plaques photo, les cadeaux personnalisés, les produits de marque, les panneaux QR, les sous-verres, les boîtes et autres applications en bois personnalisées.
Préparez la surface. Contrôlez l'encre blanche. Testez l'échantillon. Ensuite, faites évoluer le flux de travail.
Peut-être que tu as aussi

Copyright 2020 © Erasmart. | Plan du site