Fabricante de impressoras de jato de tinta pequeno de tamanho pequeno

Como imprimir em madeira: um guia prático para impressão UV, preparação e produtos personalizados
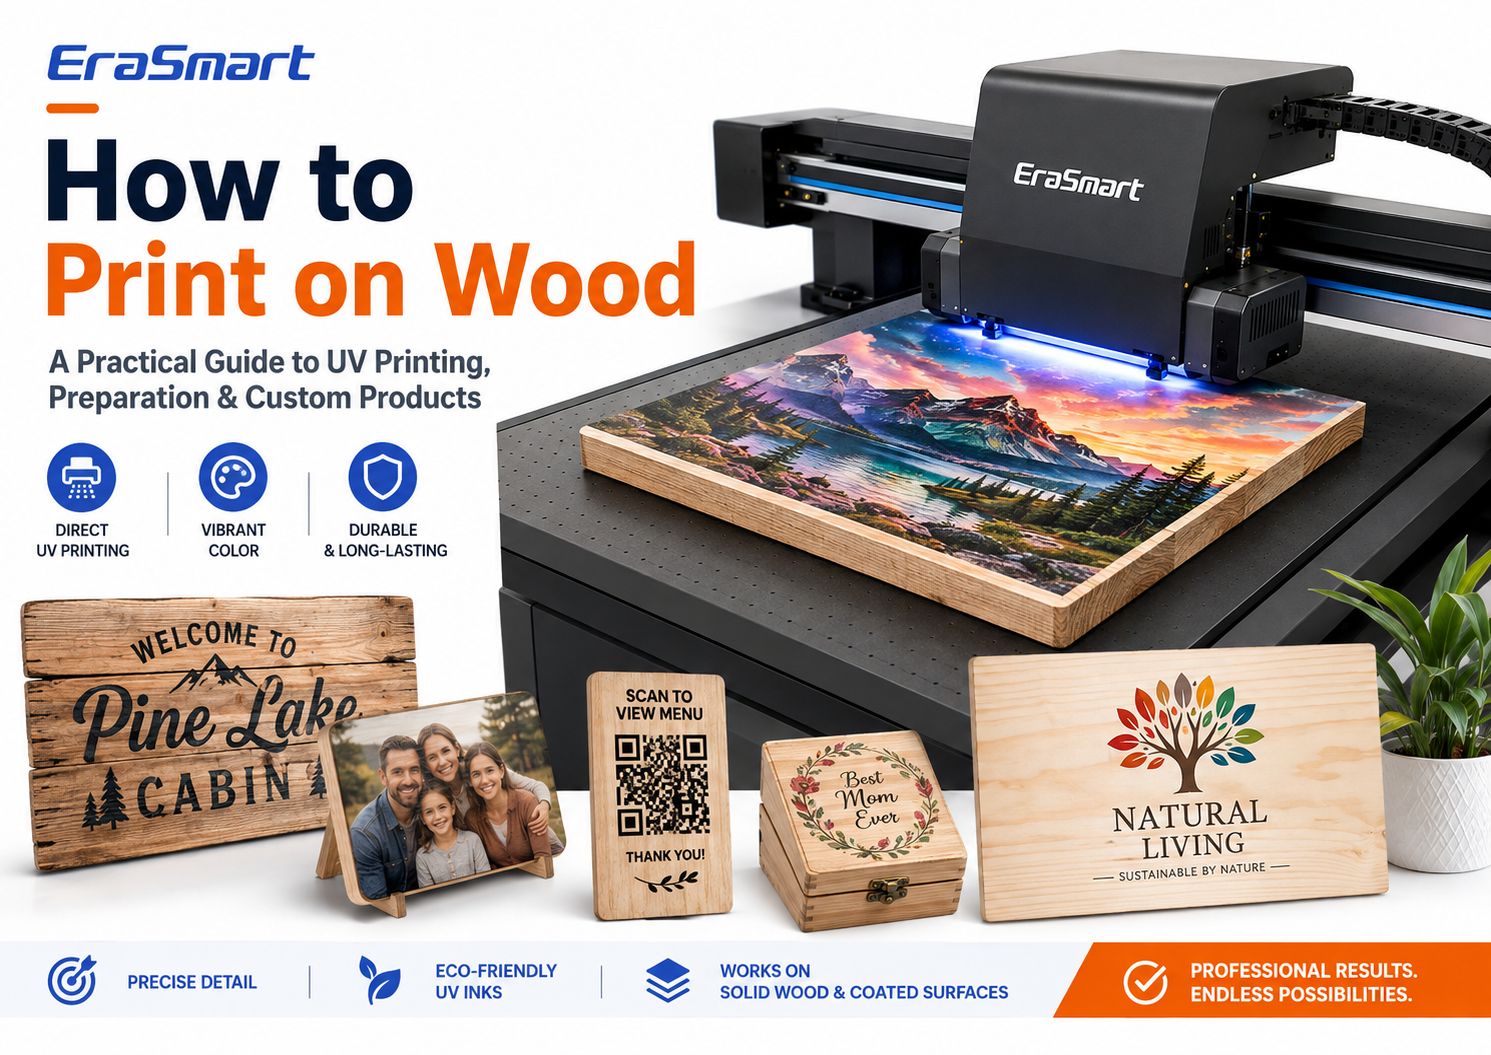
Sim, você pode imprimir diretamente na madeira.
Para personalização profissional em cores, a impressão plana UV é um dos métodos mais práticos porque a impressora pode colocar CMYK, tinta branca e verniz opcional diretamente em superfícies de madeira adequadas, sem papel de transferência.
Isso possibilita a produção de letreiros de madeira, placas fotográficas, displays de códigos QR, prêmios, caixas para presentes, porta-copos, cardápios, decoração para casa, produtos de marca e brindes personalizados em lotes pequenos ou médios.
Mas a impressão em madeira bem sucedida não é simplesmente uma questão de colocar uma placa de madeira numa impressora UV e premir Imprimir.
A madeira é um material natural. Grão, porosidade, poeira, umidade, revestimentos de superfície, planicidade, óleos, ceras e textura podem afetar a qualidade de impressão e a adesão da tinta.
Um painel liso de compensado de bétula pode se comportar de maneira muito diferente do pinho áspero. Uma placa de bambu cru pode ter um comportamento diferente de um produto de bambu lacado. Mesmo duas peças em bruto de madeira visualmente semelhantes podem produzir resultados diferentes se os seus revestimentos forem diferentes.
A abordagem profissional é, portanto:
prepare a superfície → teste o material → escolha a estratégia correta de tinta branca → imprima uma amostra → verifique a adesão → padronize o fluxo de trabalho
Este guia explica as principais formas de imprimir em madeira, como funciona a impressão UV direta, quais superfícies de madeira são mais fáceis de imprimir, como preparar o material, quando usar tinta branca, como criar um fluxo de trabalho de produção repetível e quais produtos você pode construir com umImpressora UV EraSmart.
Resposta rápida: Qual a melhor forma de imprimir em madeira?
Não existe um método melhor para cada produto de madeira.
O método certo depende de:
- se a madeira é crua ou revestida
- se você precisa de cores
- se você precisa de tinta branca
- quantidade do pedido
- forma de superfície
- complexidade do projeto
- acabamento necessário
- velocidade de produção
- se o produto é um produto artesanal ou comercial DIY
Para personalização comercial colorida em produtos planos de madeira,a impressão UV direta é uma das opções mais flexíveis.
Ele permite que a arte seja impressa diretamente na superfície e é especialmente útil quando você precisa:
- gráficos coloridos
- fotografias
- logotipos
- tinta branca
- produção de pequenos lotes
- nomes personalizados
- projetos variáveis
- modelos de produtos repetidos
No entanto, outros métodos ainda têm seus próprios usos.
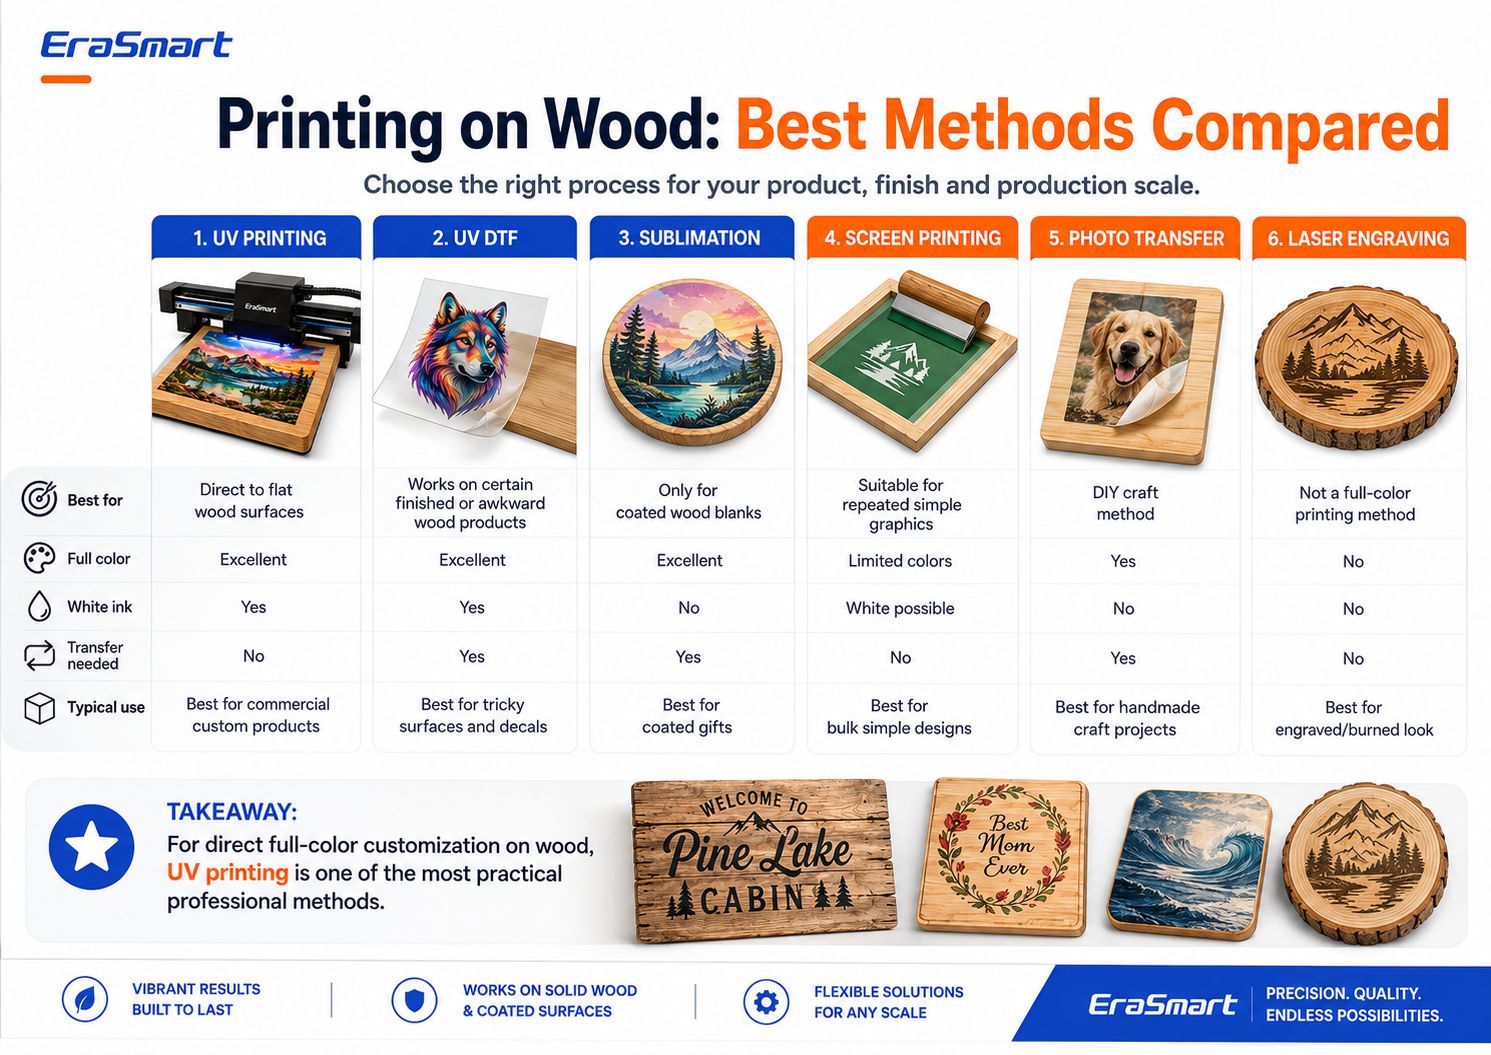
| Método | Cores | Tinta Branca | Transferência necessária | Melhor uso |
|---|---|---|---|---|
| Impressão UV | Excelente | Sim | Não | Personalização comercial direta de madeira |
| DTF UV | Excelente | Sim | Sim | Produtos acabados ou de difícil posicionamento |
| Sublimação | Excelente | Não | Sim | Blanks de madeira revestidos por sublimação |
| Serigrafia | Limitado pela configuração | Possível | Não | Gráficos simples repetidos |
| Transferência de fotos | Sim | Não | Sim | Projetos de artesanato DIY |
| Gravação a Laser | Sem cores completas | Não | Não | Efeito madeira queimada ou gravada |
O ponto chave é queimpressão em madeiranão é um único processo.
Escolha o método de acordo com o produto acabado que deseja vender.
Por que a impressão UV funciona bem em madeira
Uma impressora UV usa tinta que é curada pela luz UV durante o processo de impressão.
Em vez de depender de papel de transferência, a impressora injeta tinta diretamente na superfície de madeira.
Para produtos de madeira adequados, isto cria diversas vantagens.
Impressão direta na superfície
A arte é impressa diretamente no quadro.
Isto pode reduzir as etapas de produção em comparação com fluxos de trabalho que exigem:
- papel de transferência
- adesivo separado
- transferência de calor
- transferência manual de fotos
Arte colorida
A impressão UV é adequada para designs como:
- fotografias
- ilustrações coloridas
- logotipos
- paisagens
- gráficos de casamento
- padrões decorativos
- Códigos QR
- nomes personalizados
- marca do produto
Tinta Branca
A tinta branca é especialmente útil em madeira porque o substrato natural não é branco.
Você pode usar tinta branca para criar uma opacidade mais forte e cores mais previsíveis.
Efeitos de verniz
Em configurações de impressora UV compatíveis, o verniz pode ser adicionado seletivamente para:
- brilho pontual
- detalhes em relevo
- destaques do logotipo
- acentos decorativos
- efeitos de superfície premium
Personalização de pequenos lotes
A impressão digital facilita a produção:
- uma placa fotográfica
- dez nomes diferentes
- vários sinais QR
- produtos para presentes de curto prazo
- peças de casamento personalizadas
- sinalização comercial local
sem criar uma tela ou placa de impressão tradicional separada para cada design.
Em que tipos de madeira você pode imprimir UV?
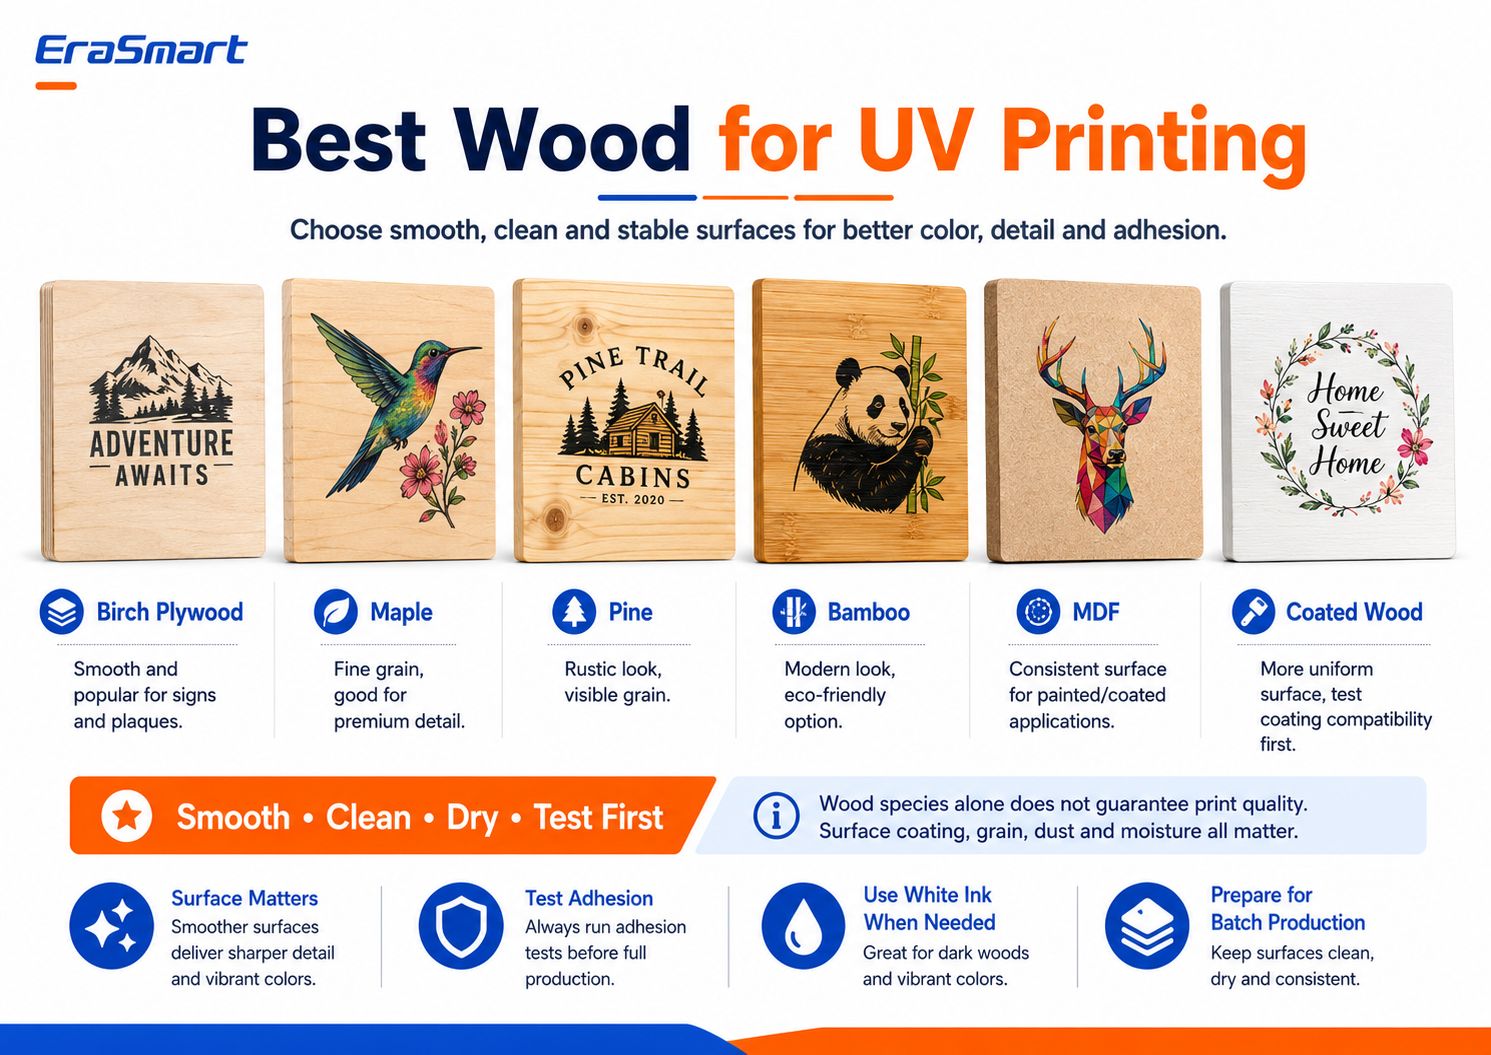
As impressoras UV podem funcionar com muitos substratos de madeira e à base de madeira, mas a espécie de madeira por si só não determina a qualidade de impressão.
A condição da superfície é igualmente importante.
Os materiais comuns incluem:
- compensado de bétula
- bordo
- pinho
- bambu
- MDF
- madeira revestida
- madeira pintada
- madeira selada
- painéis de madeira preparados
Contraplacado de bétula
O compensado de bétula é popular para:
- sinais
- placas
- peças decorativas
- presentes personalizados
Uma superfície lisa de madeira compensada pode fornecer bons detalhes e posicionamento previsível.
No entanto, a qualidade do compensado varia. Verifique se há empenamentos, defeitos superficiais e consistência do folheado.
Bordo
O bordo tem uma granulação relativamente fina e pode funcionar bem para produtos onde pequenos detalhes são importantes.
Pode ser adequado para:
- placas premium
- produtos fotográficos
- pequenos sinais
- presentes de marca
Pinho
O pinho oferece um aspecto mais rústico.
A granulação e os nós visíveis podem se tornar parte do design, especialmente ao imprimir sem uma base totalmente branca.
No entanto, o pinho mais áspero pode necessitar de lixamento e preparação adicionais.
Bambu
Os produtos de bambu são populares para:
- presentes
- decoração
- acessórios de cozinha
- placas
- produtos de marca
Como os produtos acabados de bambu podem ter diferentes revestimentos de superfície, teste o produto exato antes da produção.
MDF
O MDF fornece uma superfície fabricada mais uniforme do que o grão da madeira natural.
Pode ser útil para:
- painéis pintados
- sinalização
- decoração
- exibir produtos
O MDF bruto é poroso, portanto sua condição superficial e qualquer processo de revestimento ou vedação devem ser avaliados antes da produção.
Madeira Revestida
Madeira revestida ou pintada pode oferecer uma aparência mais uniforme.
No entanto, um revestimento introduz outra variável:
A tinta UV irá aderir adequadamente a esse revestimento?
Um revestimento brilhante, cera, laca, tinta, selante ou acabamento de baixa energia superficial podem afetar a adesão.
Sempre teste o material acabado real.
A regra mais importante: suave, limpo, seco e estável
Ao escolher a madeira para impressão UV, procure quatro características:
Suave
Uma superfície mais suave geralmente suporta texto mais nítido, linhas mais limpas e detalhes de imagem mais consistentes.
Limpar
A poeira do lixamento ou do manuseio pode interferir na impressão e na adesão.
Seco
A umidade pode afetar a superfície e a estabilidade do produto a longo prazo.
Estável
A placa deve ficar plana o suficiente para permitir uma folga segura e consistente do cabeçote de impressão.
Isto é mais importante do que simplesmente selecionar uma espécie de uma lista.
Para uma visão mais ampla dos substratos compatíveis com UV, consulte o EraSmartGuia de materiais para impressora UV.
Madeira Bruta vs Madeira Revestida
Madeira bruta e revestida criam oportunidades diferentes.
Impressão em madeira crua
A madeira bruta preserva o caráter natural do material.
Isso é útil quando a granulação faz parte intencionalmente do design.
As vantagens incluem:
- aparência natural
- efeito rústico
- textura de madeira visível
- variação única do produto
Os desafios podem incluir:
- maior porosidade
- grão irregular
- pó
- fibras superficiais
- absorção variável
- adesão inconsistente
A madeira bruta geralmente se beneficia de um lixamento e limpeza cuidadosos.
Impressão em madeira revestida ou selada
A madeira revestida pode fornecer uma superfície visual mais uniforme.
Possíveis vantagens:
- acabamento mais suave
- aparência mais consistente
- grão menos visível
- cor mais previsível em alguns casos
Mas o próprio revestimento deve ser compatível com a tinta UV.
Os problemas potenciais incluem:
- adesão fraca
- coçando
- peeling
- tinta em uma superfície incompatível
É por isso que a abordagem mais segura é:
nunca aprove um material de madeira para produção com base apenas em seu nome. Teste o produto exato em branco ou acabado.
Como preparar a madeira antes da impressão UV
A preparação da superfície é uma das partes mais importantes de todo o processo.
Etapa 1: inspecionar o quadro
Verificar:
- planicidade
- arranhões
- amassados
- nós
- fibras soltas
- revestimentos
- deformação
- umidade
- óleos ou cera
Não comece a imprimir até saber com que superfície está trabalhando.
Etapa 2: lixe se necessário
Se a placa for áspera, um lixamento leve pode ajudar a criar uma superfície de impressão mais consistente.
O objetivo nem sempre é remover o caráter natural da madeira.
O objetivo é eliminar:
- fibras soltas
- pontos altos ásperos
- lascas
- defeitos superficiais indesejados
O lixamento fino geralmente é mais apropriado para a preparação da impressão do que deixar uma superfície áspera sem acabamento.
Etapa 3: Remova todo o pó de lixa
Esta etapa é fácil de subestimar.
O pó de madeira pode interferir com:
- colocação de tinta
- nitidez das bordas
- adesão
- aparição final
Use um método de limpeza apropriado sem fiapos e certifique-se de que a superfície esteja limpa antes de imprimir.
Passo 4: Remover Óleo e Contaminação
Alguns produtos acabados de madeira podem conter:
- óleo
- cera
- compostos de polimento
- impressões digitais
- resíduo de fabricação
Isso pode reduzir a adesão da tinta.
Etapa 5: verifique os revestimentos existentes
Se o produto for pintado, selado, envernizado ou revestido, faça um teste de aderência.
Não presuma que todo produto de madeira pintado ou selado pode ser automaticamente impresso em UV.
Etapa 6: teste antes da produção
Imprima uma pequena amostra usando o mesmo:
- madeira
- tratamento de superfície
- tipo de arte
- estratégia de tinta branca
- configurações de cura
que você planeja usar para o pedido do cliente final.
Se necessário para um substrato específico, um primer ou pré-tratamento apropriado pode melhorar a adesão.
Não use primer automaticamente em todas as peças de madeira.
Use-o quando o teste mostrar que o material exige isso.
Prepare a arte para impressão em madeira
Uma boa impressão em madeira começa antes que o material chegue à impressora.
Verificar:
- dimensões do produto final
- resolução de arte
- logotipos
- tamanho do texto
- qualidade de imagem
- camada de tinta branca
- camada de verniz
- áreas transparentes
- sangrar
- margens seguras
Arte rasterizada
Para fotografias e ilustrações detalhadas, cerca de300 DPI no tamanho final de impressãoé um ponto de partida prático para produtos de visão próxima.
Arte vetorial
Arquivos vetoriais são preferíveis para:
- logotipos
- Códigos QR
- texto
- ícones
- arte de linha
- gráficos de marca
porque eles permanecem nítidos quando redimensionados.
Projete para a madeira, não apenas para a tela
Um desenho preparado em uma tela branca de computador pode parecer completamente diferente quando impresso sobre madeira natural.
É por isso que a decisão sobre a tinta branca é tão importante.
Tinta branca versus grão de madeira natural: qual você deve escolher?
Esta é uma das decisões criativas mais importantes na impressão UV em madeira.
Existem três abordagens práticas.
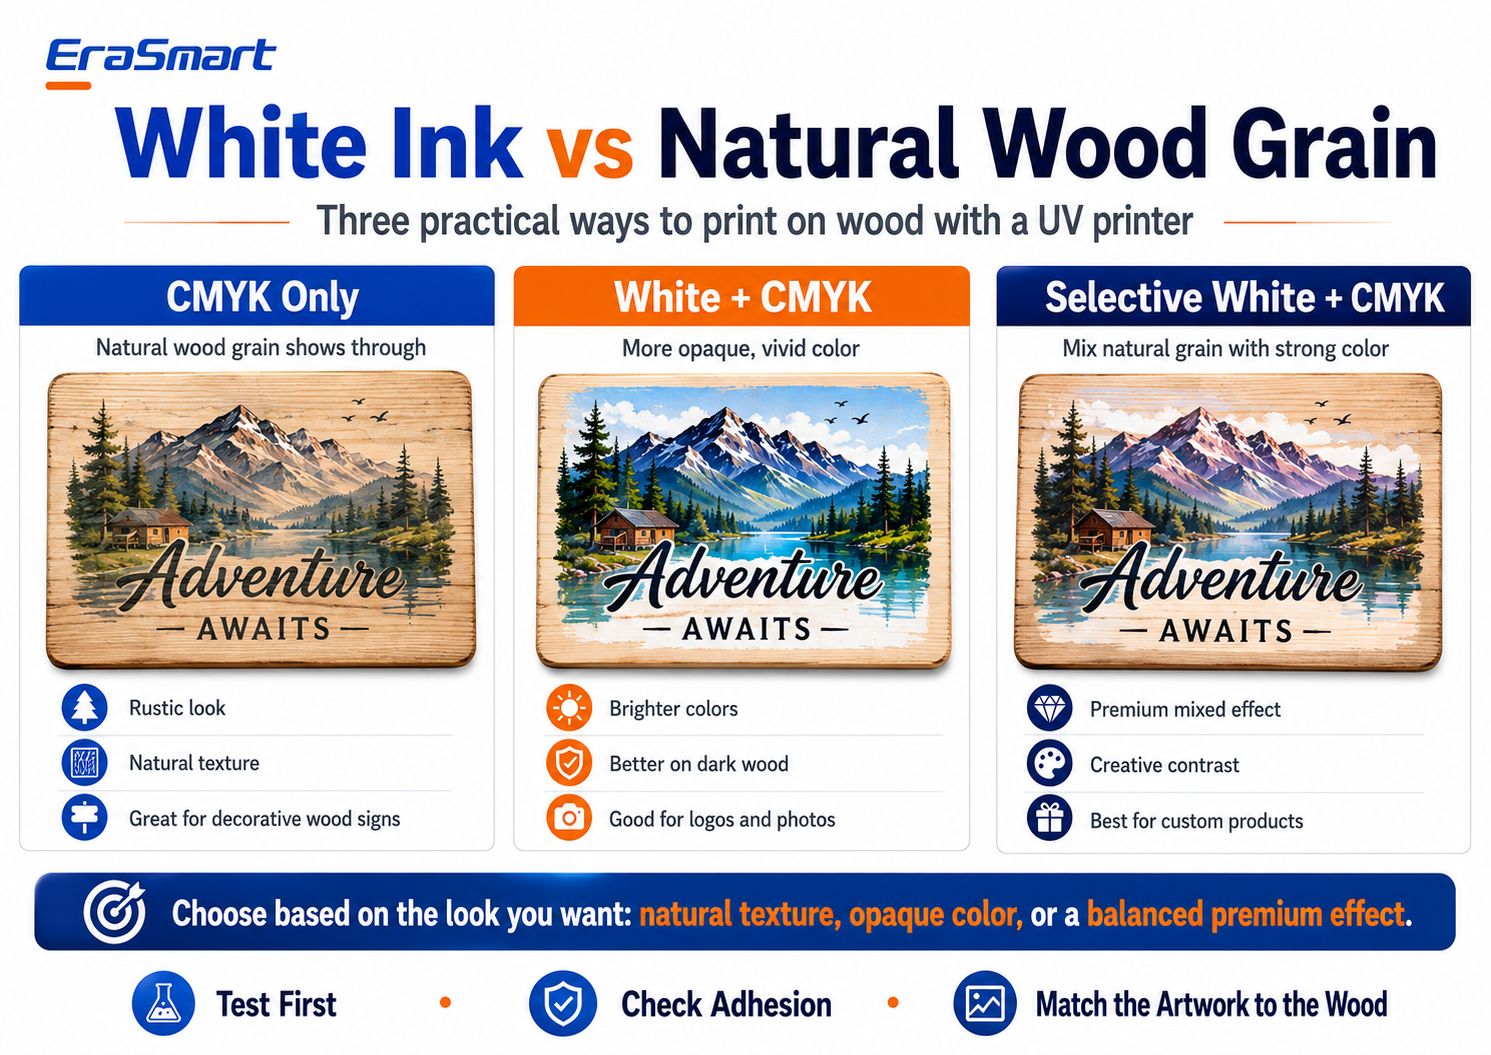
Opção 1: somente CMYK
Com a impressão somente CMYK, a madeira natural permanece visível através das partes mais claras da obra de arte.
Isso pode criar um:
- visual rústico
- aparência vintage
- textura natural
- sensação artesanal
Funciona especialmente bem para designs criados intencionalmente para um fundo de madeira.
Os produtos adequados incluem:
- sinais de cabine
- placas decorativas
- sinais de café
- presentes rústicos
- decoração natural para casa
A limitação importante é a previsibilidade das cores.
Como o substrato é marrom ou castanho em vez de branco, a cor final irá interagir com a madeira.
As áreas claras podem parecer mais escuras ou mais transparentes do que na tela.
Opção 2: Branco + CMYK
Uma base branca cria uma base mais opaca sob a arte colorida.
Isso é útil quando você precisa:
- cor mais forte
- fotos mais brilhantes
- logotipos mais claros
- cores de marca mais consistentes
- melhor visibilidade em madeira escura
As aplicações típicas incluem:
- fotografias
- logotipos de negócios
- ilustrações coloridas
- marca do produto
- arte detalhada
Branco + CMYK reduz a influência da cor natural da madeira.
Opção 3: Branco Seletivo + CMYK
O branco seletivo costuma ser a opção mais interessante para produtos de madeira premium.
Em vez de imprimir branco em toda a imagem, use branco somente onde a opacidade for necessária.
Por exemplo:
- branco sob a paisagem colorida
- sem branco atrás das áreas de madeira do fundo
- branco abaixo do logotipo da empresa
- grão natural em torno de elementos decorativos
Isso cria uma combinação de:
madeira natural + cor total controlada
e pode dar ao produto acabado uma aparência projetada de forma mais intencional.
Qual modo de tinta branca você deve usar?
Uma regra de decisão simples:
Quer textura natural máxima?
Use somente CMYK.
Quer cores mais previsíveis e vivas?
Use Branco + CMYK.
Quer um efeito misto premium?
Use Branco Seletivo + CMYK.
A melhor opção depende da arte e do posicionamento do produto.
Como imprimir UV em madeira passo a passo
Depois que o material e a arte estiverem preparados, crie um processo de produção repetível.
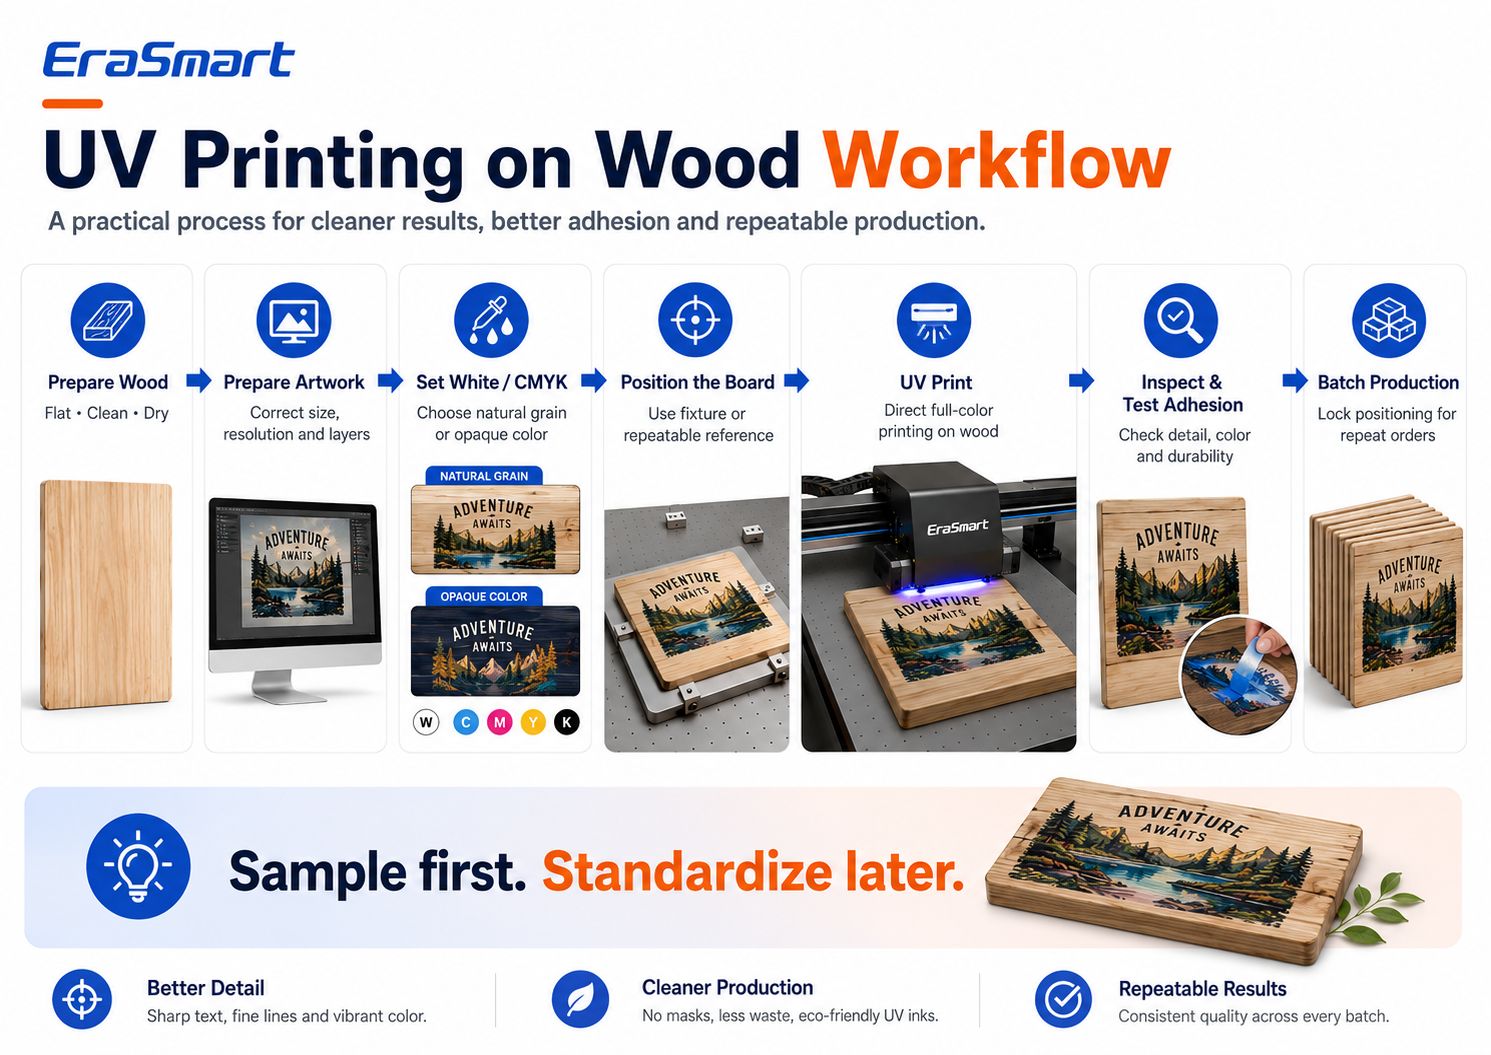
Passo 1: Prepare a Madeira
Certifique-se de que a placa esteja:
- limpar
- seco
- plano
- livre de poeira
- adequado para testes
Etapa 2: preparar a arte
Definir:
- dimensões finais
- resolução da imagem
- posição de impressão
- Camadas CMYK
- camadas de tinta branca
- camadas de verniz, se necessário
Etapa 3: Escolha sua estratégia de tinta branca
Decida entre:
- Somente CMYK
- Branco + CMYK
- Branco Seletivo + CMYK
antes de enviar o trabalho para a impressora.
Etapa 4: posicionar o quadro
Coloque a madeira com segurança na plataforma de impressão.
Para produtos repetidos, considere usar:
- marcas de posicionamento
- referências de borda
- jogos
- gabaritos
- modelos
Isso reduz erros de alinhamento.
Etapa 5: definir a altura de impressão
A folga correta do cabeçote de impressão é crítica.
Uma superfície muito deformada ou posicionada muito alta pode criar:
- problemas de qualidade de impressão
- distância de jato incorreta
- risco potencial do cabeçote de impressão
Não use a impressora para compensar madeira muito empenada.
Utilize produtos estáveis e suficientemente planos.
Etapa 6: imprimir uma amostra
Não inicie imediatamente um lote de 100 peças.
Imprima uma amostra primeiro.
Verificar:
- cor
- detalhe
- alinhamento de tinta branca
- posição de impressão
- adesão
- resistência a arranhões
- aparência geral
Etapa 7: teste de adesão
Após a cura, teste se a camada de tinta é adequada para a aplicação pretendida.
O teste exato depende do produto.
Uma placa decorativa para interior tem requisitos diferentes de um item que será manuseado com frequência.
Etapa 8: bloqueie a posição
Assim que a amostra for aprovada:
- salve a configuração RIP
- registre a posição X/Y
- padronizar o aparelho
- documentar o tamanho da placa
Etapa 9: iniciar a produção em lote
Agora, várias peças podem ser produzidas com um fluxo de trabalho mais repetível.
Etapa 10: CQ final
Verifique cada lote para:
- alinhamento
- defeitos do bico
- arranhões
- defeitos da placa
- arte incorreta
- variação de cor
- problemas de adesão
Isto é particularmente importante para trabalhos personalizados.
Amostra primeiro. Padronize mais tarde.
Uma das maiores diferenças entre a impressão amadora e a produção profissional é a padronização.
Para uma única placa de madeira, o posicionamento manual pode ser aceitável.
Para 50 sinais QR de café idênticos, o objetivo deve ser:
mesmo material + mesmo acessório + mesma predefinição RIP + mesma posição + mesmo QC
Isso reduz:
- tempo de configuração
- erros de impressão
- espaços em branco desperdiçados
- reclamações de clientes
Como posicionar madeira para pedidos repetidos
Se você imprime regularmente a mesma madeira em branco, crie um sistema de posicionamento repetível.
As abordagens possíveis incluem:
- paradas de esquina
- gabaritos físicos
- modelos impressos
- réguas de posicionamento
- luminárias dedicadas
O objetivo é evitar adivinhar manualmente a localização de cada produto.
Por exemplo, se um cliente encomendar 30 placas de menu de madeira:
- use as mesmas dimensões da placa
- fixe a placa na mesma posição de referência
- bloquear as coordenadas RIP
- altere apenas os dados da arte quando necessário
- inspecionar em intervalos definidos
Isso transforma a impressão em madeira personalizada em um fluxo de trabalho de produção, em vez de um experimento artesanal.
Impressão UV direta vs DTF UV em madeira
EraSmart oferece fluxos de trabalho de mesa UV e DTF UV, mas eles não são o mesmo processo.
Impressão UV direta
Escolha uma impressora UV direta quando:
- a superfície da madeira é plana
- o objeto cabe na mesa de impressão
- você deseja impressão direta no produto
- você precisa de um posicionamento preciso
- você está produzindo placas, painéis, placas ou presentes
- você deseja efeitos de branco e verniz diretamente no produto
DTF UV
UV DTF pode ser útil quando:
- o produto acabado é difícil de colocar em uma mesa
- a área de impressão é estranha
- você deseja fazer o gráfico primeiro e aplicá-lo depois
- você está decorando certos objetos acabados
No entanto, a adesão UV DTF à madeira ainda depende muito da superfície.
Um decalque que adere bem a madeira lisa selada pode não se comportar da mesma forma em:
- pinho cru empoeirado
- madeira fortemente texturizada
- madeira com acabamento em óleo
- superfícies enceradas
Portanto, teste antes da produção comercial.
Problemas comuns ao imprimir em madeira
Problema 1: as cores parecem opacas
Possíveis razões:
- sem base branca
- madeira escura
- grão natural forte
- arte projetada para um fundo branco
Solução
Teste Branco + CMYK ou branco seletivo.
Ajuste também a arte com o fundo de madeira real em mente.
Problema 2: A adesão da tinta é fraca
Possíveis causas:
- pó
- óleo
- cera
- revestimento incompatível
- umidade
- má preparação da superfície
Solução
Limpe o substrato exato e faça um teste de adesão.
Se necessário, avalie um pré-tratamento adequado e compatível para esse material.
Problema 3: Texto pequeno parece difícil
Possíveis causas:
- grão áspero
- fibras soltas
- arte em baixa resolução
- distância incorreta do cabeçote de impressão
Solução
Use madeira mais lisa, melhore a preparação da superfície, use texto vetorial e verifique a altura de impressão.
Problema 4: Mudanças de posição de impressão entre produtos
Possível causa:
Posicionamento manual sem referência repetível.
Solução
Use um modelo de fixação ou posicionamento.
Problema 5: A placa está distorcida
A deformação pode criar uma distância inconsistente entre o cabeçote de impressão e a superfície.
Solução
Use placas estáveis e suficientemente planas.
Uma plataforma de vácuo pode ajudar a proteger materiais planos adequados, mas não se deve esperar que corrija empenamentos graves.
Problema 6: O grão da madeira domina a obra de arte
Geralmente, isso é um problema de design e não de impressora.
Solução
Use uma base branca onde for necessária uma opacidade mais forte.
Ou redesenhe a arte intencionalmente em torno da granulação natural.
Você precisa de um revestimento protetor após a impressão UV?
Nem todo produto de madeira requer um acabamento transparente adicional.
A decisão depende de:
- uso interno vs externo
- frequência de manuseio
- abrasão
- exposição à umidade
- expectativas do cliente
- tipo de madeira
- acabamento impresso
Para produtos decorativos para interiores, a impressão curada por UV já pode fornecer a aparência desejada.
Para produtos que sofrerão maior desgaste ou exposição ambiental específica, um acabamento adicional poderá ser avaliado.
Sempre teste qualquer revestimento pós-impressão porque ele pode mudar:
- lustro
- aparência de cor
- textura
- adesão
- efeito verniz
Uma impressora UV EraSmart prática para impressão em madeira
Para produtos de madeira pequenos e médios, uma mesa UV classe A3 é um formato de produção prático.
Uma opção é aImpressora UV EraSmart Digital Inkjet A3 – Dual XP600.
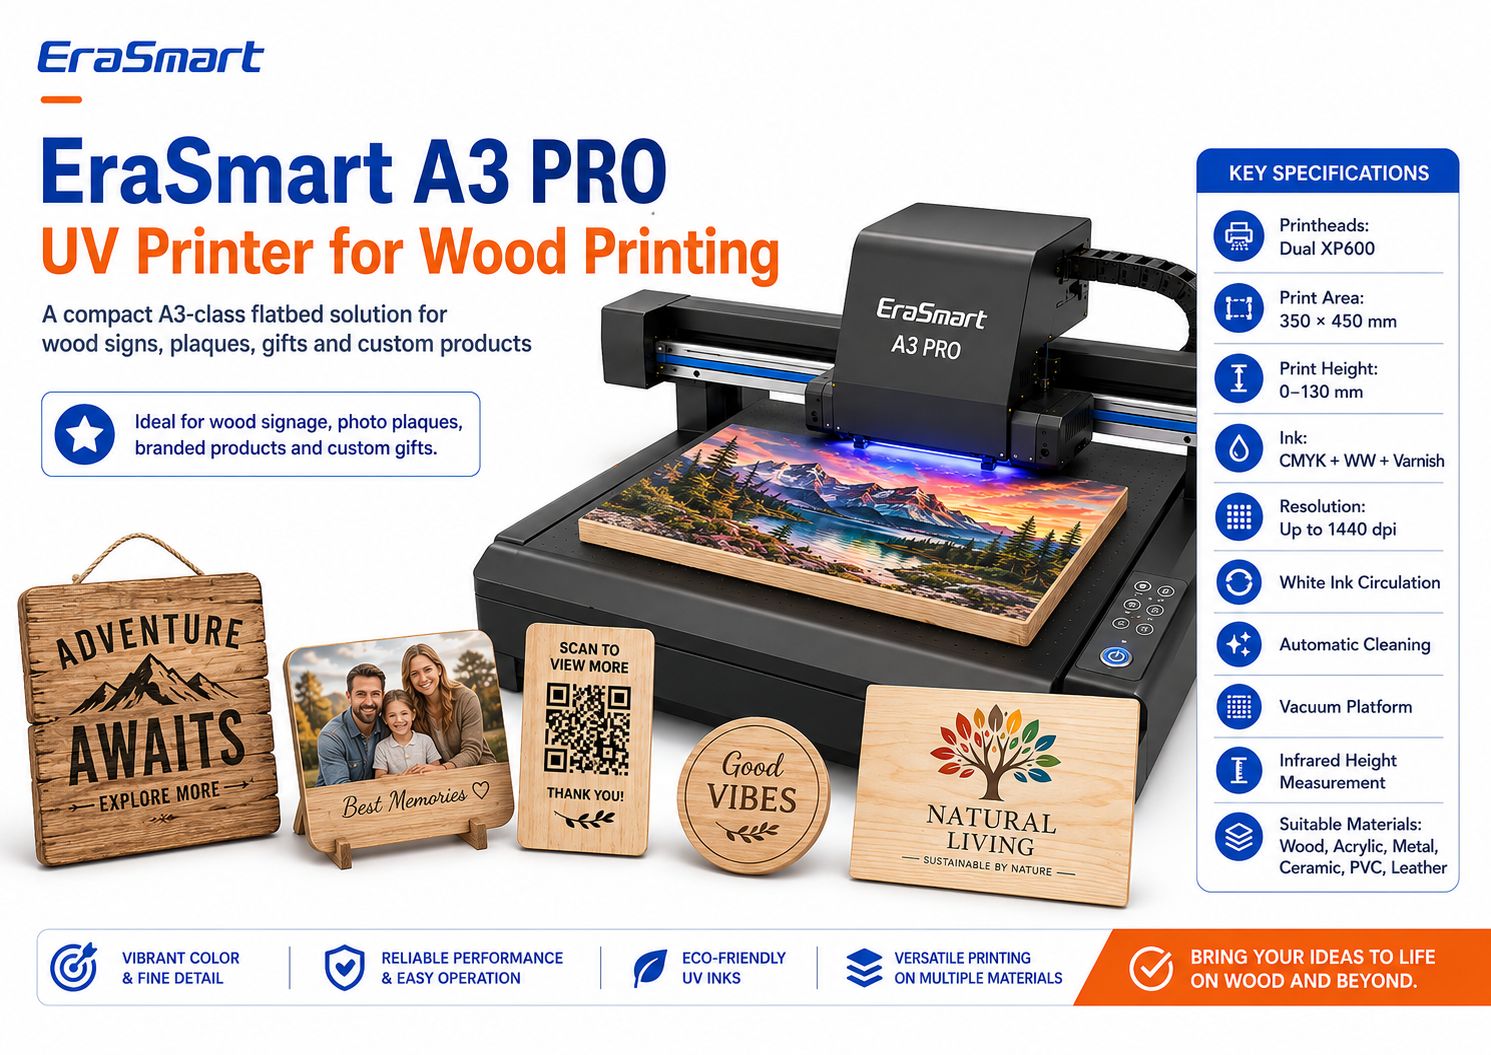
Especificações principais do EraSmart A3 PRO
| Especificação | EraSmart A3 PRO |
|---|---|
| Cabeças de impressão | XP600 duplo |
| Área de impressão | 350 × 450 milímetros |
| Altura de impressão | 0–130mm |
| Configuração de tinta | CMYK + WW + Verniz |
| Resolução | Até 1440 dpi |
| Circulação de tinta branca | Sim |
| Limpeza Automática | Sim |
| Plataforma de vácuo | Sim |
| Medição de Altura | Infravermelho |
| Software RIP | Riin / PrivateRip |
A impressora suporta materiais como:
- madeira
- acrílico
- metal
- cerâmica
- PVC
- TPU
- couro
- Placa KT
Para aplicações em madeira, a combinação detinta branca, capacidade de verniz, plataforma de vácuo e medição de altura por infravermelhoé particularmente útil para personalização de produtos planos em pequenos lotes.
Quais produtos de madeira se adaptam a um fluxo de trabalho de classe A3?
Uma área de impressão de 350 × 450 mm pode acomodar muitos produtos personalizados menores, dependendo das dimensões finais.
Os exemplos incluem:
- placas fotográficas
- Sinais QR
- pequenos sinais de menu
- presentes personalizados
- porta-copos
- caixas de presente de marca
- prêmios de madeira
- painéis decorativos
- sinalização para pequenas empresas
- peças de casamento
Para painéis de madeira maiores, sinalização ou múltiplas peças por lote, uma plataforma maior pode fazer mais sentido.
EraSmart também oferece oImpressora A2 UVcom uma área de trabalho maior para empresas cujas dimensões dos produtos exigem mais espaço.
Escolha o tamanho da impressora de acordo com seus produtos, não apenas porque uma máquina maior parece mais profissional.
Produtos de madeira que você pode imprimir com uma impressora UV
A madeira é valiosa porque pode servir vários mercados empresariais ao mesmo tempo.
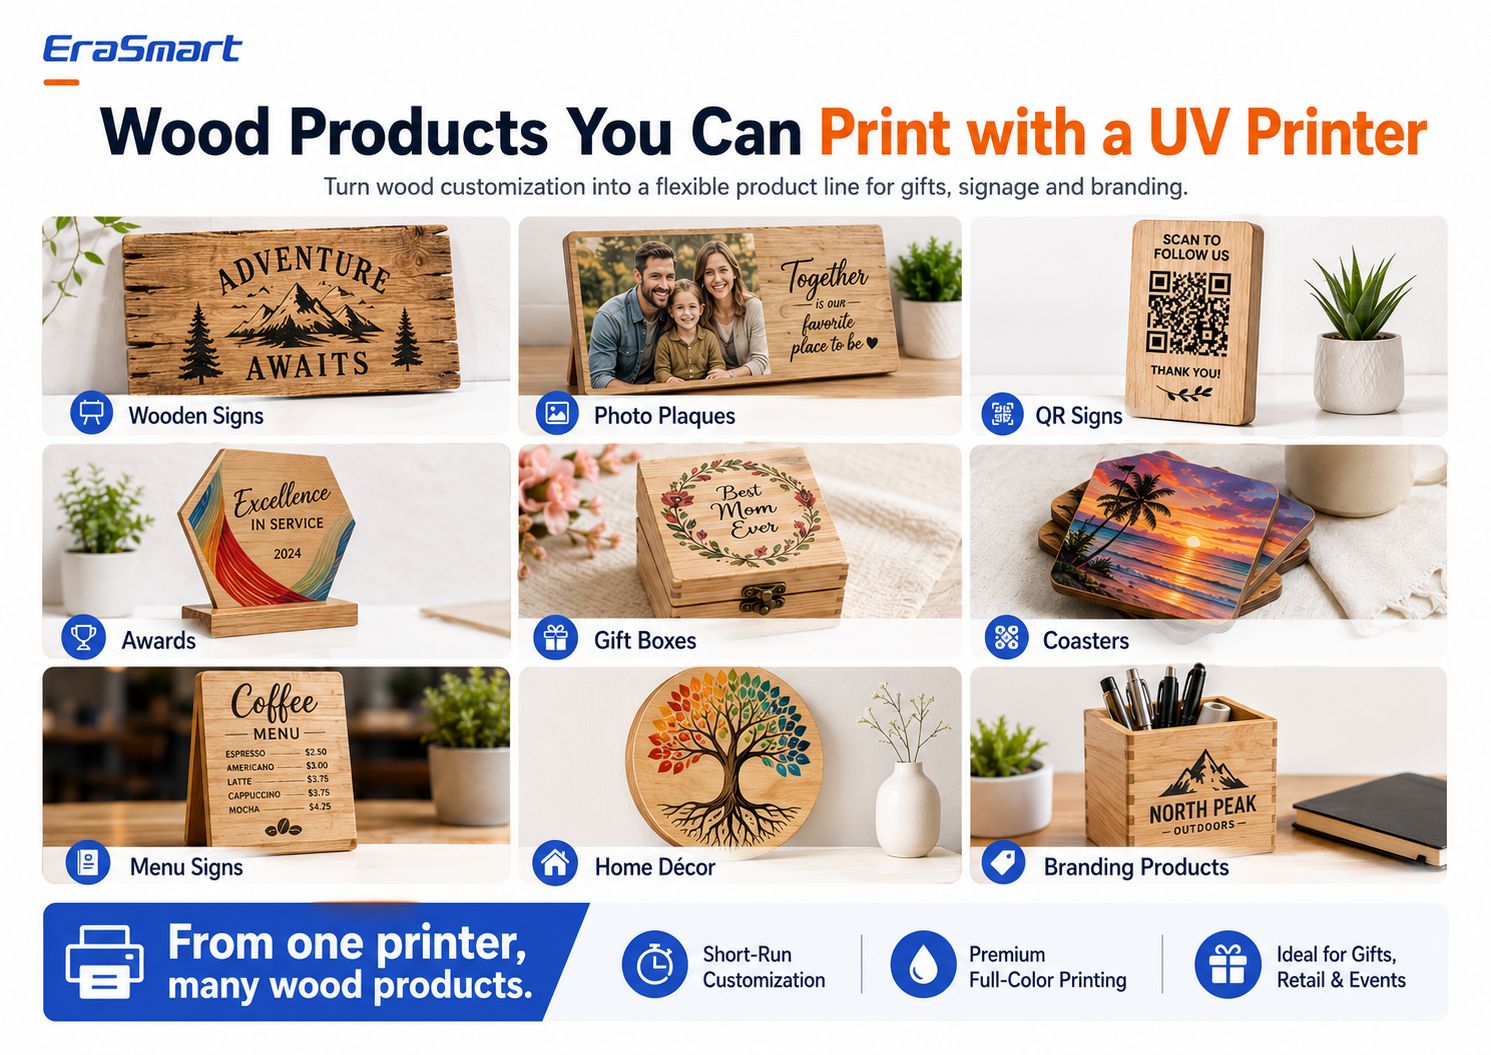
1. Placas de madeira
Exemplos:
- sinais de cabine
- sinais de nome de família
- sinais de casamento
- sinais de café
- sinais de loja
- sinais direcionais
- citações decorativas
2. Placas fotográficas
A impressão UV colorida pode transformar fotos em:
- presentes de família
- peças de aniversário
- placas memoriais
- presentes de casamento
- retratos de animais de estimação
- memórias de viagem
A tinta branca costuma ser útil em obras de arte fotográficas.
3. Sinais de código QR
As pequenas empresas usam cada vez mais displays QR para:
- cardápios
- pagamentos
- comentários
- Acesso Wi-Fi
- mídia social
- páginas de reserva
Imprima e digitalize fisicamente o código QR antes da entrega.
Não confie apenas na visualização digital.
4. Prêmios de madeira
Criar:
- prêmios da empresa
- peças de reconhecimento de funcionários
- prêmios esportivos
- placas de clube
- certificados de marca
5. Caixas de presente
As caixas de madeira podem ser personalizadas com:
- nomes
- logotipos
- gráficos florais
- datas de casamento
- marca corporativa
A geometria exata da caixa deve caber com segurança nas dimensões e espaço suportados pela impressora.
6. Porta-copos
As montanhas-russas são adequadas para:
- projetos de turismo
- coleções de arte
- cafés
- presentes de casamento
- mercadoria de marca
Para produtos expostos à umidade ou abrasão repetida, teste o produto acabado de acordo com seu uso real.
7. Sinais de menu
Menus de madeira podem funcionar para:
- cafés
- restaurantes
- bares
- caminhões de alimentos
- casamentos
- eventos
8. Decoração da casa
Exemplos:
- arte botânica
- nomes de família
- decoração de berçário
- painéis paisagísticos
- sinais de citação
- decoração de férias
9. Produtos de marca
As empresas podem solicitar:
- contra-sinais
- placas de logotipo
- brindes promocionais
- peças de exibição
- decoração de varejo
- produtos de mesa de marca
Os pedidos B2B podem ser especialmente valiosos porque os clientes podem reordenar o mesmo modelo com texto atualizado ou nomes de funcionários diferentes.
Como um design de madeira pode se tornar vários produtos
Uma empresa de personalização inteligente pode reutilizar obras de arte.
Por exemplo, uma ilustração de montanha pode se tornar:
- sinal de cabine
- conjunto de montanha-russa
- fundo de moldura de foto
- caixa de presente
- placa de lembrança
- Sinal QR
- item de mesa de marca
O mesmo design não precisa ser recriado para todos os produtos.
Em vez disso, adapte:
- dimensões
- cortar
- texto
- máscara de tinta branca
- modelo de produto
Isso aumenta o valor de cada arquivo de arte.
Ideias de negócios para impressão UV em madeira
Loja de presentes personalizados
Vender:
- placas fotográficas
- sinais de família
- presentes de casamento
- produtos para animais de estimação
- caixas personalizadas
Loja de sinalização local
Oferecer:
- sinais de café
- cardápios
- Exibições QR
- placas de mesa
- logotipos de negócios
Etsy ou vendedor online
Criar:
- sinais rústicos
- decoração sazonal
- presentes personalizados
- conjuntos de montanha-russa
- produtos de casamento
Turismo e Negócios de Souvenirs
Imprimir:
- arte de destino
- mapas locais
- gráficos de referência
- placas de lembrança
- coleções de montanhas-russas
Negócios de casamento e eventos
Produzir:
- sinais de boas-vindas
- peças de mesa
- favores
- pequenas placas
- lembranças
Fornecedor de brindes corporativos
Oferecer:
- prêmios
- caixas de marca
- placas de mesa
- presentes de reconhecimento
- mercadoria com logotipo
Como definir o preço da impressão em madeira personalizada
Não calcule o preço usando apenas tinta e madeira.
Incluir:
- madeira em branco
- preparação de superfície
- tinta
- tinta branca
- verniz
- peças de teste
- impressões falhadas
- configuração de arte
- personalização
- tempo de máquina
- trabalho
- acabamento
- embalagem
- taxas de plataforma
- materiais de envio
- manutenção
- lucro
A personalização geralmente cria mais valor porque os clientes não compram uma placa de madeira genérica.
Eles estão comprando um produto personalizado acabado.
Erros comuns a evitar
Erro 1: presumir que toda a madeira imprime da mesma forma
Isso não acontece.
Teste o material exato.
Erro 2: Imprimir em madeira empoeirada
O pó de lixamento pode reduzir a qualidade e a aderência.
Erro 3: ignorar a tinta branca
A tinta branca é uma das ferramentas criativas mais importantes para controlar a cor da madeira natural.
Erro 4: imprimir o pedido completo sem amostra
Sempre aprove primeiro uma amostra física.
Erro 5: usar madeira severamente empenada
O nivelamento é importante para uma folga consistente do cabeçote de impressão.
Erro 6: Ignorar os revestimentos de superfície existentes
Cera, óleo, laca, tinta e outros revestimentos podem afetar a adesão.
Erro 7: usar a mesma arte para papel branco e madeira
Projete para o substrato real.
Erro 8: reposicionar manualmente cada produto
Construa um acessório repetível para produção em lote.
Lista de verificação profissional para impressão em madeira
Antes de imprimir:
Material
- tipo de madeira confirmado
- superfície limpa
- tábua seca
- suficientemente plano
- revestimento identificado
- teste de adesão planejado
Arte
- dimensões finais corretas
- imagem de alta resolução
- texto/logotipo vetorial sempre que possível
- máscara de tinta branca preparada
- camada de verniz preparada se necessário
Impressora
- verificação dos bicos concluída
- altura de impressão correta
- configuração de vácuo ou posicionamento pronta
- Predefinição RIP selecionada
Amostra
- cor verificada
- detalhe verificado
- tinta branca verificada
- adesão verificada
- posição aprovada
Produção
- aparelho bloqueado
- versão da arte confirmada
- quantidades de lote verificadas
- CQ periódico realizado
Acabamento
- arranhões verificados
- bordas verificadas
- embalagem preparada
- quantidade final verificada
Resposta final: Como você imprime em madeira?
Para impressão direta profissional em produtos de madeira adequados, a impressão UV fornece um fluxo de trabalho flexível para arte colorida, tinta branca, efeitos de verniz, personalização e produção de pequenos lotes.
O processo é:
preparar a madeira → preparar a arte → escolher a estratégia de tinta branca → posicionar o produto → definir a altura de impressão → imprimir uma amostra → testar a adesão → padronizar a posição → iniciar a produção em lote
O maior fator não é a resolução máxima da impressora.
Isso écontrole de superfície.
Um produto de madeira limpo, liso e estável com uma configuração de impressão testada geralmente produzirá resultados mais previsíveis do que uma máquina cara imprimindo em uma superfície inadequada, empoeirada, oleosa ou muito deformada.
A tinta branca é o segundo fator principal.
Usar:
- Somente CMYKquando você quer grão de madeira natural
- Branco + CMYKquando você deseja uma opacidade mais forte
- Branco Seletivo + CMYKquando você deseja combinar o caráter natural do material com cores vivas
Para empresas que produzem placas de madeira, letreiros, presentes, displays QR, porta-copos, prêmios, caixas e outros produtos planos personalizados, oImpressora UV EraSmart A3 PROfornece uma plataforma classe A3 de 350 × 450 mm com cabeçotes de impressão Dual XP600, tinta branca, capacidade de verniz, circulação de tinta branca, limpeza automática, plataforma de vácuo e medição de altura por infravermelho.
O objetivo não é simplesmente imprimir em madeira.
O objetivo é criar um fluxo de trabalho que possa produzir oa mesma qualidade repetidas vezes.
Perguntas frequentes
Uma impressora UV pode imprimir diretamente na madeira?
Sim. As impressoras planas UV podem imprimir diretamente em muitas superfícies de madeira adequadas. A madeira deve estar limpa, estável, suficientemente plana e testada quanto à aderência antes da produção comercial.
Preciso lixar a madeira antes da impressão UV?
Nem sempre. Madeira lisa preparada já pode ser adequada. Superfícies ásperas, fibras soltas ou acabamentos irregulares podem se beneficiar do lixamento. Sempre remova o pó da lixa antes de imprimir.
Qual é a melhor madeira para impressão UV?
Madeira lisa, limpa e estável geralmente produz os resultados mais previsíveis. Contraplacado de bétula, bordo, pinho preparado, bambu, MDF e madeira revestida podem ser usados dependendo da condição da superfície e do acabamento necessário.
Você pode imprimir UV em madeira crua?
Sim, mas a madeira bruta pode ser mais porosa e texturizada. O resultado depende da granulação, da suavidade da superfície, da umidade, da poeira e da arte.
Preciso de tinta branca para imprimir em madeira?
Nem sempre.
Use CMYK somente quando quiser que a granulação natural apareça.
Use branco sob CMYK quando precisar de cores mais opacas, vibrantes ou previsíveis.
A impressão UV pode reproduzir fotos em madeira?
Sim. Para produtos fotográficos, use arte de alta qualidade e considere uma base branca se quiser que as cores da imagem permaneçam mais fortes e menos influenciadas pelo tom da madeira.
Posso imprimir códigos QR em madeira?
Sim, mas os códigos QR devem permanecer suficientemente grandes, nítidos e com alto contraste. Sempre teste o código impresso finalizado com vários telefones antes da entrega.
Todo produto de madeira precisa de primer?
Os requisitos do primer dependem da superfície exata da madeira, do revestimento, da tinta e dos requisitos de adesão. Teste primeiro em vez de aplicar o primer automaticamente.
Uma impressora UV pode imprimir caixas de madeira?
Potencialmente, se o produto se enquadrar nas dimensões, altura, peso e espaço seguro do cabeçote de impressão suportados pela impressora. A área de impressão também deve ser suficientemente plana.
Qual impressora EraSmart é adequada para impressão em madeira?
Para produtos de madeira plana de pequeno e médio porte, oImpressora UV EraSmart Digital Inkjet A3 – Dual XP600é uma opção adequada. Para peças de madeira maiores, revise oImpressora UV EraSmartalcance e selecione uma área de impressão com base nas dimensões reais do produto.
Quer construir um negócio de impressão em madeira personalizada?
Diga ao EraSmart:
- quais produtos de madeira você deseja imprimir
- dimensões do seu produto
- tipo de madeira
- se a superfície é crua, pintada ou revestida
- produção mensal esperada
- se você precisa de tinta branca
- se você precisa de efeitos de verniz
- seu espaço de trabalho
- seus planos de produtos futuros
Nossa equipe pode ajudá-lo a comparar o produto certoImpressora UV EraSmarte fluxo de trabalho de produção para placas de madeira, placas fotográficas, presentes personalizados, produtos de marca, placas QR, porta-copos, caixas e outras aplicações de madeira personalizadas.
Prepare a superfície. Controle a tinta branca. Teste a amostra. Em seguida, dimensione o fluxo de trabalho.
Pode ser você também

Copyright 2020 © Erasmart. | Sitemap