Producător de imprimantă cu jet de cerneală cu dimensiuni mici

Cum să imprimați pe lemn: un ghid practic pentru imprimare UV, pregătire și produse personalizate
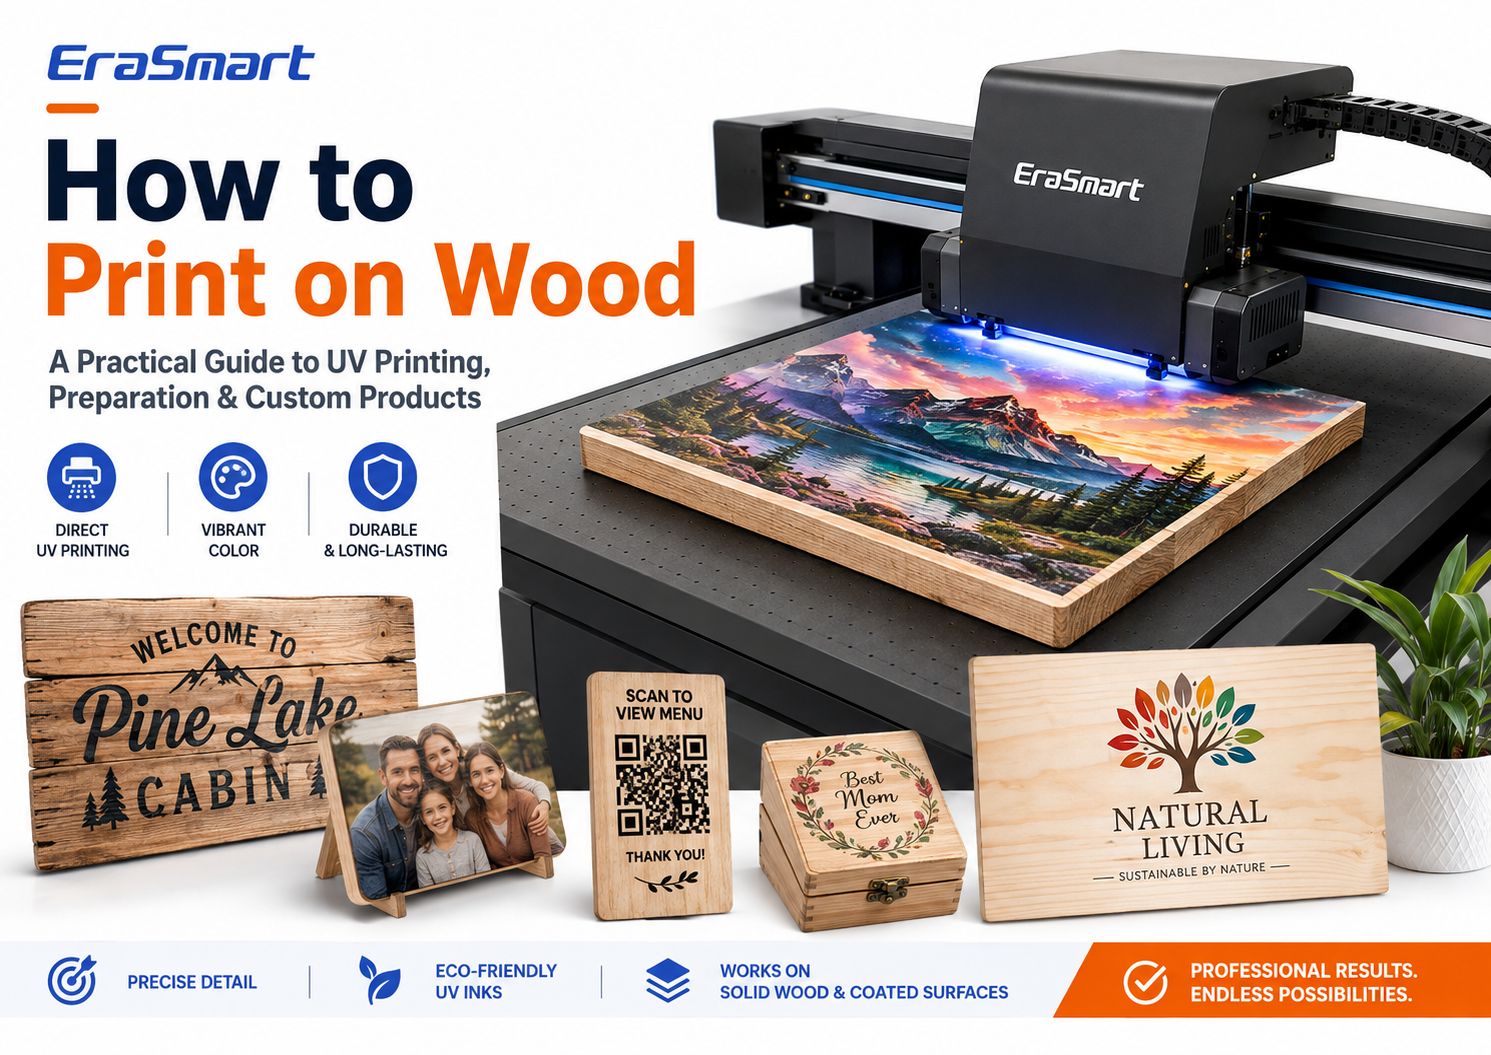
Da, puteți imprima direct pe lemn.
Pentru personalizarea profesională a culorilor, imprimarea UV plat este una dintre cele mai practice metode, deoarece imprimanta poate plasa CMYK, cerneală albă și lac opțional direct pe suprafețele din lemn adecvate, fără hârtie de transfer.
Acest lucru face posibilă producerea de semne din lemn, plăcuțe foto, afișaje cu coduri QR, premii, cutii cadou, coastere, panouri de meniu, decorațiuni pentru casă, produse de marcă și cadouri personalizate în loturi mici sau medii.
Dar imprimarea de succes a lemnului nu este doar o chestiune de a pune o placă de lemn pe o imprimantă UV și de a apăsa Print.
Lemnul este un material natural. Granulația, porozitatea, praful, umiditatea, acoperirile de suprafață, planeitatea, uleiurile, ceara și textura pot afecta calitatea imprimării și aderența cernelii.
Un panou de placaj neted de mesteacăn se poate comporta foarte diferit de pinul brut. O placă din bambus brut se poate comporta diferit față de un produs din bambus lăcuit. Chiar și două semifabricate din lemn similare vizual pot produce rezultate diferite dacă acoperirile lor sunt diferite.
Abordarea profesională este așadar:
pregătiți suprafața → testați materialul → alegeți strategia corectă de cerneală albă → imprimați o probă → verificați aderența → standardizați fluxul de lucru
Acest ghid explică principalele modalități de a imprima pe lemn, cum funcționează imprimarea UV directă, ce suprafețe din lemn sunt mai ușor de imprimat, cum să pregătiți materialul, când să utilizați cerneală albă, cum să creați un flux de producție repetabil și ce produse puteți construi cu unImprimantă UV EraSmart.
Răspuns rapid: Care este cel mai bun mod de a imprima pe lemn?
Nu există o singură metodă cea mai bună pentru fiecare produs din lemn.
Metoda corectă depinde de:
- indiferent dacă lemnul este brut sau acoperit
- dacă aveți nevoie de culoare plină
- dacă aveți nevoie de cerneală albă
- cantitatea comandată
- forma suprafeței
- complexitatea designului
- finisaj necesar
- viteza de productie
- indiferent dacă produsul este un produs artizanat sau comercial
Pentru personalizarea comercială plină de culoare pe produse plate din lemn,imprimarea UV directă este una dintre cele mai flexibile opțiuni.
Permite imprimarea operelor de artă direct pe suprafață și este utilă în special atunci când aveți nevoie de:
- grafică plină de culoare
- fotografii
- logos
- cerneală albă
- producție în loturi mici
- nume personalizate
- modele variabile
- șabloane repetate de produse
Cu toate acestea, alte metode au încă propriile lor utilizări.
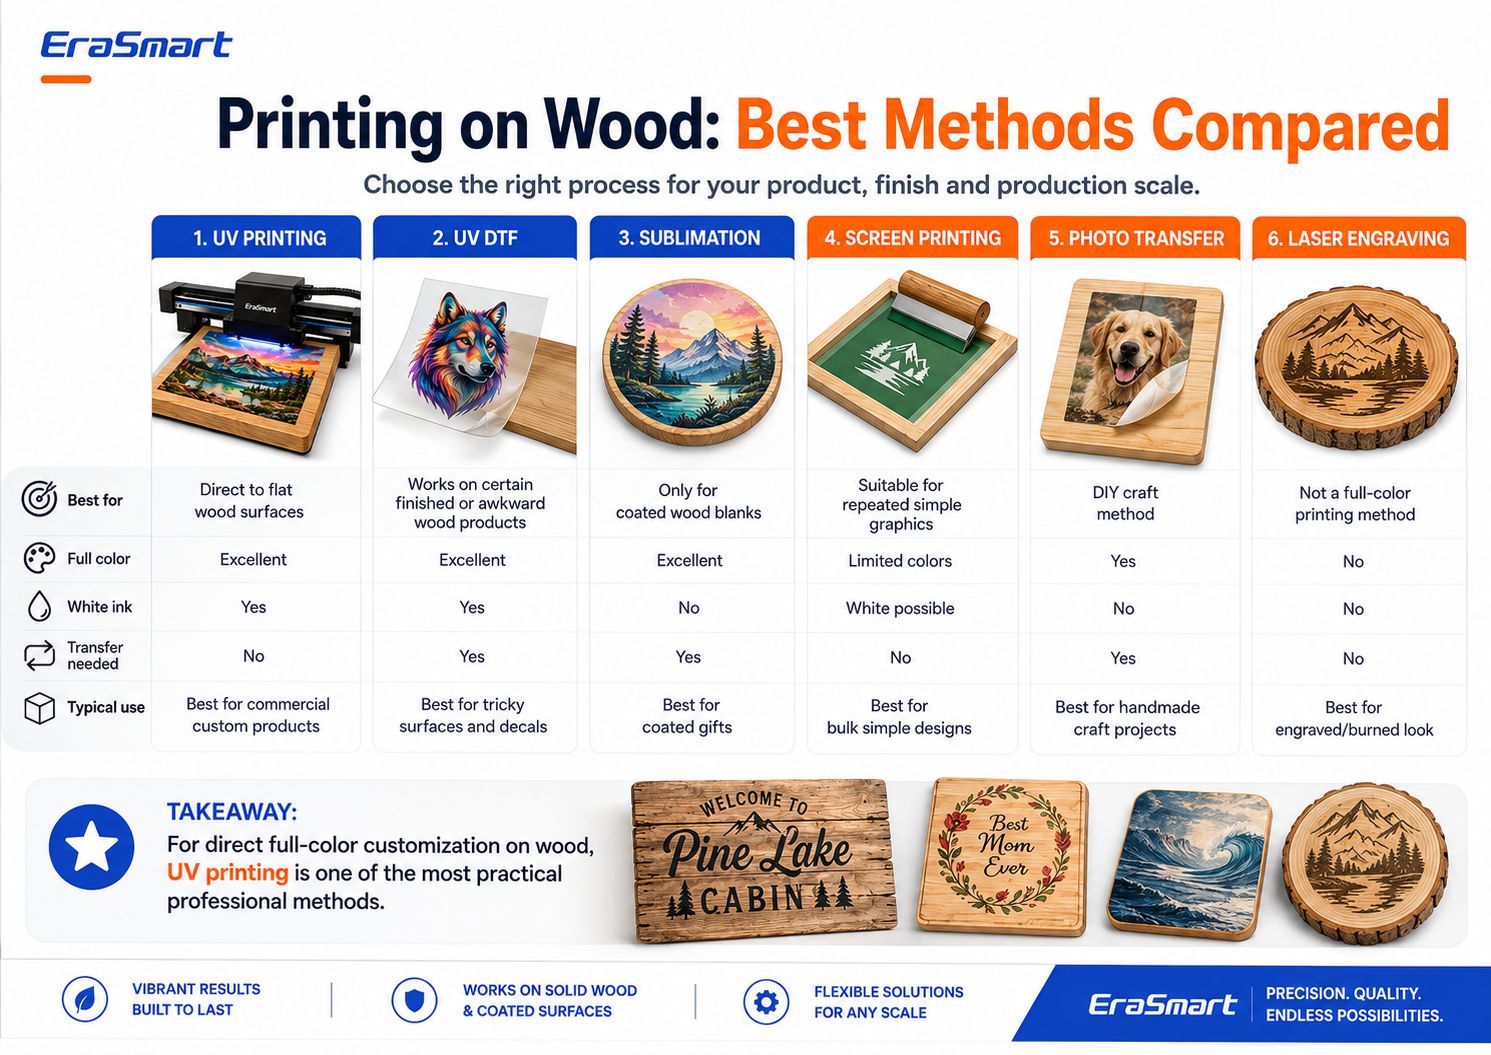
| Metodă | Full Color | Cerneală albă | Transfer necesar | Cea mai bună utilizare |
|---|---|---|---|---|
| Imprimare UV | Excelent | Da | Nu | Personalizare directă comercială a lemnului |
| UV DTF | Excelent | Da | Da | Produse finite sau greu de poziționat |
| Sublimare | Excelent | Nu | Da | Separatoare din lemn acoperite cu sublimare |
| Imprimare pe ecran | Limitat de configurare | Posibil | Nu | Grafică simplă repetă |
| Transfer foto | Da | Nu | Da | Proiecte de bricolaj |
| Gravura cu laser | Fără culoare completă | Nu | Nu | Efect de lemn ars sau gravat |
Punctul cheie este căimprimare pe lemnnu este un singur proces.
Alegeți metoda în funcție de produsul finit pe care doriți să îl vindeți.
De ce imprimarea UV funcționează bine pe lemn
O imprimantă UV utilizează cerneală care este întărită de lumina UV în timpul procesului de imprimare.
În loc să se bazeze pe hârtie de transfer, imprimanta jetează cerneală direct pe suprafața de lemn.
Pentru produsele din lemn potrivite, acest lucru creează mai multe avantaje.
Imprimare directă la suprafață
Opera de artă este tipărită direct pe tablă.
Acest lucru poate reduce etapele de producție în comparație cu fluxurile de lucru care necesită:
- hârtie de transfer
- adeziv separat
- transfer de căldură
- transfer manual de fotografii
Opere de artă pline de culoare
Imprimarea UV este potrivită pentru modele precum:
- fotografii
- ilustrații colorate
- logos
- peisaje
- grafica de nunta
- modele decorative
- coduri QR
- nume personalizate
- branding de produs
Cerneală albă
Cerneala albă este utilă în special pe lemn, deoarece substratul natural nu este alb.
Puteți folosi cerneala albă pentru a crea o opacitate mai puternică și culori mai previzibile.
Efecte de lac
La configurațiile compatibile cu imprimante UV, lacul poate fi adăugat selectiv pentru:
- luciu spot
- detalii ridicate
- evidențierea logo-ului
- accente decorative
- efecte de suprafață premium
Personalizare în loturi mici
Imprimarea digitală facilitează producerea:
- o placă foto
- zece nume diferite
- mai multe semne QR
- produse cadou pe termen scurt
- piese de nunta personalizate
- semnalizare comercială locală
fără a crea un ecran sau o placă de imprimare tradițională separată pentru fiecare design.
Pe ce tipuri de lemn puteți imprima UV?
Imprimantele UV pot lucra cu multe substraturi din lemn și pe bază de lemn, dar numai speciile de lemn nu determină calitatea imprimării.
Starea suprafeței este la fel de importantă.
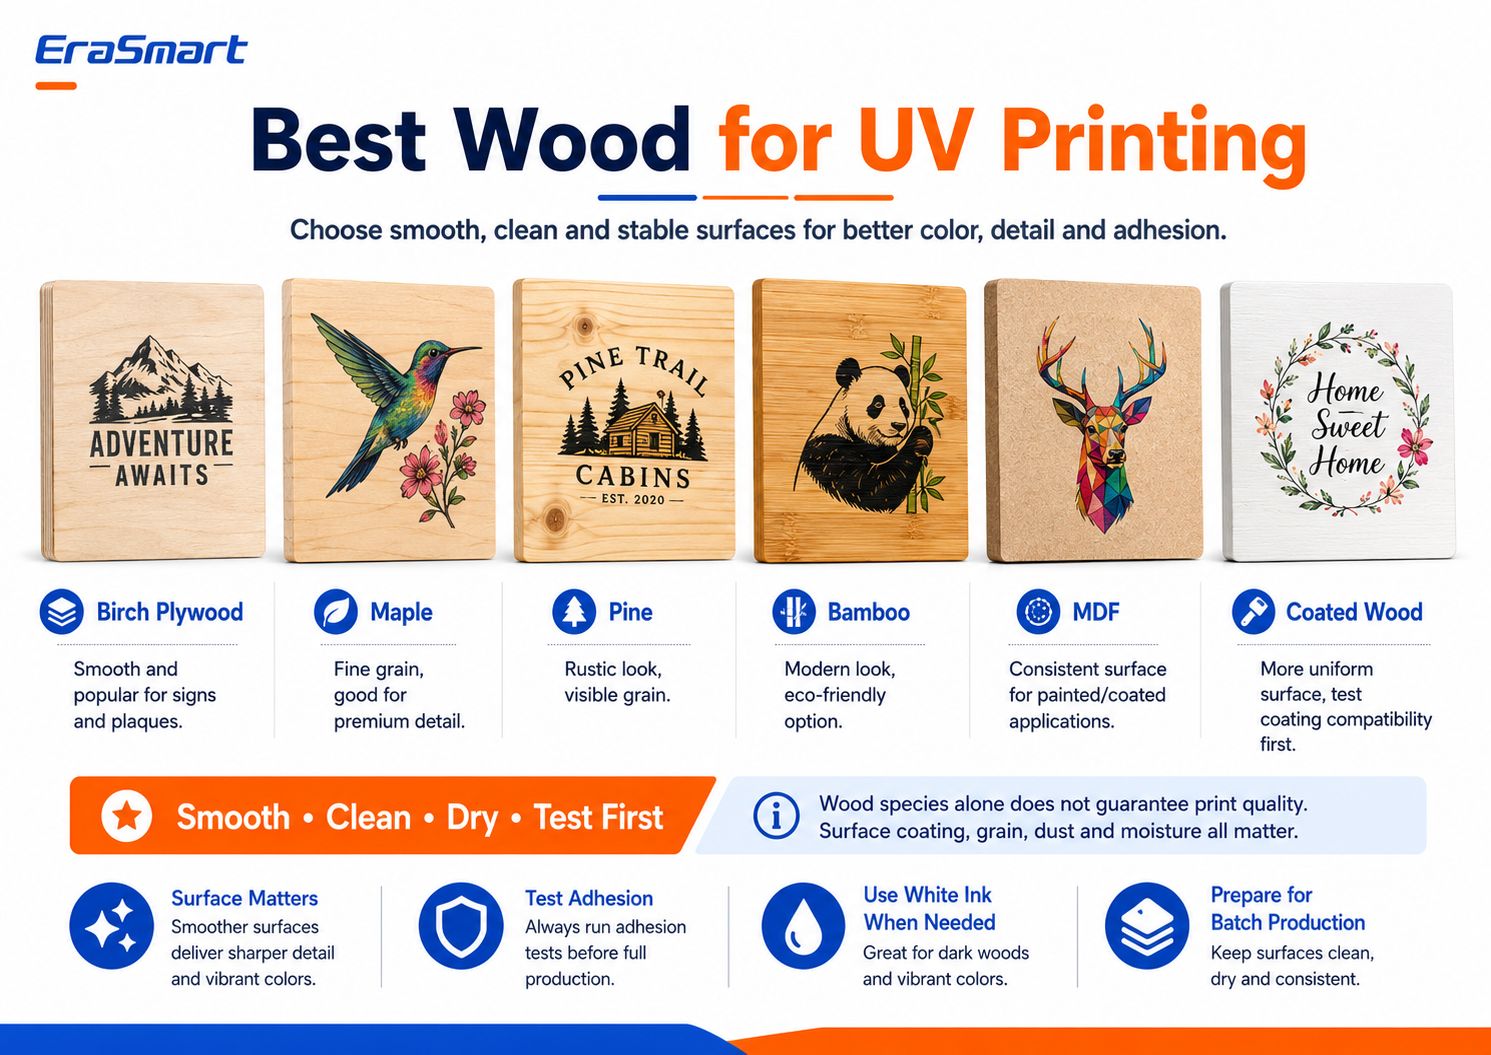
Materialele comune includ:
- placaj de mesteacan
- arţar
- pin
- bambus
- MDF
- lemn acoperit
- lemn vopsit
- lemn sigilat
- panouri din lemn de esență tare pregătite
Placaj de mesteacan
Placajul de mesteacăn este popular pentru:
- semne
- plăci
- piese decorative
- cadouri personalizate
O suprafață netedă a placajului poate oferi detalii bune și poziționare previzibilă.
Cu toate acestea, calitatea placajului variază. Verificați deformarea, defecte de suprafață și consistența furnirului.
Arţar
Arțarul are o granulație relativ fină și poate funcționa bine pentru produsele în care micile detalii contează.
Poate fi potrivit pentru:
- plăci premium
- produse foto
- semne mici
- cadouri de marcă
Pin
Pinul oferă un aspect mai rustic.
Granulele vizibile și nodurile pot deveni parte a designului, mai ales atunci când imprimați fără o bază albă completă.
Cu toate acestea, pinul mai aspru poate avea nevoie de șlefuire și pregătire suplimentară.
Bambus
Produsele din bambus sunt populare pentru:
- Cadouri
- decor
- accesorii de bucătărie
- plăci
- produse de marcă
Deoarece produsele finite din bambus pot avea diferite acoperiri de suprafață, testați produsul exact înainte de producție.
MDF
MDF oferă o suprafață fabricată mai uniformă decât granulația lemnului natural.
Poate fi util pentru:
- panouri pictate
- semnalizare
- decor
- expune produse
MDF brut este poros, astfel încât starea suprafeței sale și orice proces de acoperire sau de etanșare ar trebui evaluate înainte de producție.
Lemn acoperit
Lemnul acoperit sau vopsit poate oferi un aspect mai uniform.
Cu toate acestea, o acoperire introduce o altă variabilă:
Cerneala UV se va lega corect de acel strat?
O acoperire lucioasă, ceară, lac, vopsea, etanșant sau finisaj cu energie de suprafață scăzută pot afecta aderența.
Testați întotdeauna materialul real finit.
Cea mai importantă regulă: netedă, curată, uscată și stabilă
Când alegeți lemn pentru imprimarea UV, căutați patru caracteristici:
Netezi
O suprafață mai netedă acceptă în general text mai clar, linii mai curate și detalii mai consistente ale imaginii.
Curat
Praful de la șlefuire sau manipulare poate interfera cu imprimarea și aderența.
Uscat
Umiditatea poate afecta suprafața și stabilitatea pe termen lung a produsului.
Stabil
Placa trebuie să stea suficient de plată pentru un spațiu liber și constant pentru capul de imprimare.
Acest lucru contează mai mult decât simpla selectare a unei specii dintr-o listă.
Pentru o privire mai amplă asupra substraturilor compatibile cu UV, consultați EraSmartGhid de materiale pentru imprimante UV.
Lemn brut vs lemn acoperit
Lemnul brut și acoperit creează oportunități diferite.
Imprimare pe lemn brut
Lemnul brut păstrează caracterul material natural.
Acest lucru este util atunci când boabele fac parte în mod intenționat din design.
Avantajele includ:
- aspect natural
- efect rustic
- textura lemnului vizibil
- variație unică a produsului
Provocările pot include:
- porozitate mai mare
- bob neuniform
- praf
- fibre de suprafață
- absorbtie variabila
- aderenta inconsistenta
Lemnul brut beneficiază de obicei de șlefuire și curățare atentă.
Imprimare pe lemn acoperit sau sigilat
Lemnul acoperit poate oferi o suprafață vizuală mai uniformă.
Posibile avantaje:
- finisaj mai neted
- aspect mai consistent
- boabe mai puțin vizibile
- culoare mai previzibilă în unele cazuri
Dar acoperirea în sine trebuie să fie compatibilă cu cerneala UV.
Problemele potențiale includ:
- aderenta slaba
- zgârierea
- peeling
- cerneala asezata pe o suprafata incompatibila
Acesta este motivul pentru care cea mai sigură abordare este:
nu aproba niciodată un material lemnos pentru producție doar pe baza numelui său. Testați exact produsul blank sau finit.
Cum să pregătiți lemnul înainte de imprimarea UV
Pregătirea suprafeței este una dintre cele mai importante părți ale întregului proces.
Pasul 1: Inspectați placa
Verifica:
- planeitatea
- zgârieturi
- denivelări
- noduri
- fibre libere
- acoperiri
- colmatare
- umiditate
- uleiuri sau ceară
Nu începeți să imprimați până nu știți cu ce suprafață lucrați.
Pasul 2: șlefuiește dacă este necesar
Dacă placa este aspră, șlefuirea ușoară poate ajuta la crearea unei suprafețe de imprimare mai consistente.
Scopul nu este întotdeauna eliminarea caracterului natural al lemnului.
Scopul este eliminarea:
- fibre libere
- puncte înalte aspre
- aşchii
- defecte de suprafață nedorite
Slefuirea fină este de obicei mai potrivită pentru pregătirea tipăririi decât lăsarea unei suprafețe aspre nefinisate.
Pasul 3: Îndepărtați tot praful de șlefuit
Acest pas este ușor de subestimat.
Praful de lemn poate interfera cu:
- plasarea cernelii
- claritatea marginilor
- adeziune
- aspectul final
Utilizați o metodă adecvată de curățare fără scame și asigurați-vă că suprafața este curată înainte de imprimare.
Pasul 4: Îndepărtați uleiul și contaminarea
Unele produse din lemn finite pot conține:
- ulei
- ceară
- compuși de lustruire
- amprentele digitale
- reziduuri de fabricație
Acestea pot reduce aderența cernelii.
Pasul 5: Verificați acoperirile existente
Dacă produsul este vopsit, sigilat, lăcuit sau acoperit, efectuați un test de aderență.
Nu presupuneți că fiecare produs din lemn vopsit sau sigilat este imprimabil automat cu UV.
Pasul 6: Testați înainte de producție
Imprimați o mostră mică folosind aceeași:
- lemn
- tratarea suprafeței
- tipul operei de artă
- strategia cernelii albe
- setări de întărire
pe care intenționați să le utilizați pentru comanda finală a clientului.
Dacă este necesar pentru un anumit substrat, un grund adecvat sau un pretratament poate îmbunătăți aderența.
Nu utilizați grund automat pe fiecare bucată de lemn.
Utilizați-l atunci când testarea arată că materialul o necesită.
Pregătiți opera de artă pentru imprimarea pe lemn
O imprimare bună pe lemn începe înainte ca materialul să ajungă la imprimantă.
Verifica:
- dimensiunile produsului final
- rezoluția operei de artă
- logos
- dimensiunea textului
- calitatea imaginii
- strat de cerneală albă
- strat de lac
- zone transparente
- sângera
- marje sigure
Opera de artă raster
Pentru fotografii și ilustrații detaliate, în jur300 DPI la dimensiunea finală de imprimareeste un punct de plecare practic pentru produsele de aproape.
Opera de artă vectorială
Fișierele vectoriale sunt de preferat pentru:
- logos
- coduri QR
- text
- icoane
- artă în linie
- grafica de brand
deoarece rămân ascuțite când sunt redimensionate.
Design pentru lemn, nu doar ecran
Un design pregătit pe o pânză albă de computer poate arăta complet diferit atunci când este imprimat pe lemn natural.
Acesta este motivul pentru care decizia de cerneală albă contează atât de mult.
Cerneală albă versus granulație naturală a lemnului: pe ce ar trebui să alegi?
Aceasta este una dintre cele mai importante decizii creative în imprimarea UV pe lemn.
Există trei abordări practice.
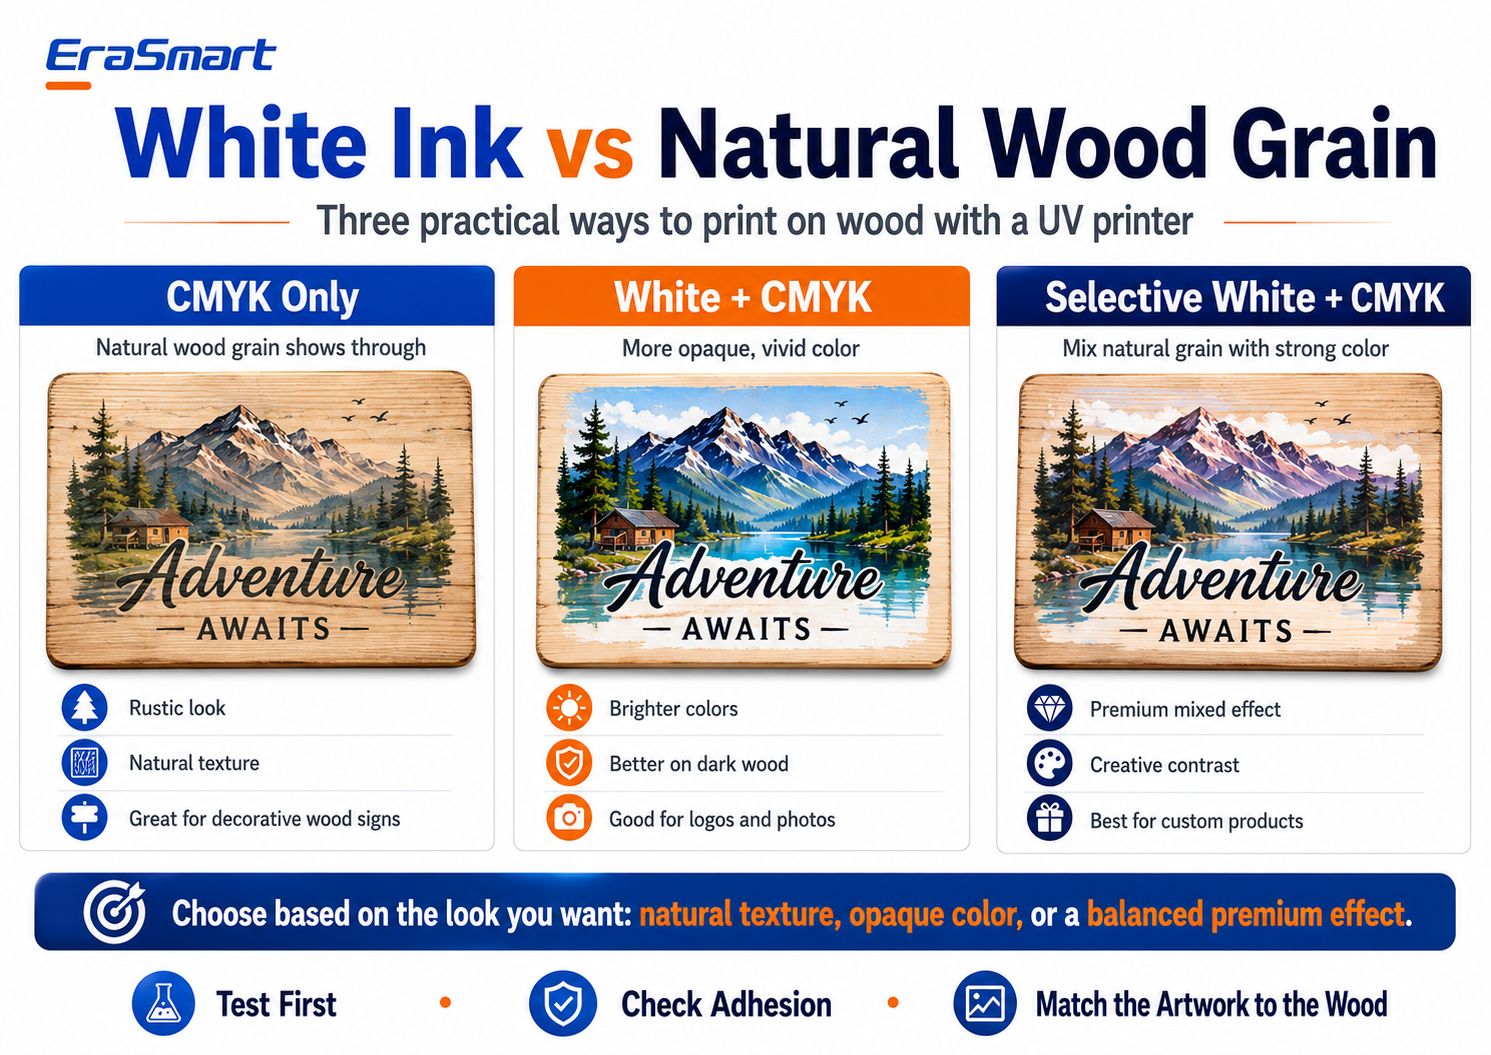
Opțiunea 1: Numai CMYK
Cu imprimarea numai CMYK, lemnul natural rămâne vizibil prin părțile mai ușoare ale lucrării de artă.
Aceasta poate crea un:
- aspect rustic
- aspect vintage
- textura naturala
- senzație lucrată manual
Funcționează bine în special pentru modelele create intenționat pentru un fundal de lemn.
Produsele potrivite includ:
- semne de cabină
- plăci decorative
- semne de cafenea
- cadouri rustice
- decor natural al casei
Limitarea importantă este predictibilitatea culorii.
Deoarece substratul este maro sau cafeniu mai degrabă decât alb, culoarea finală va interacționa cu lemnul.
Zonele luminoase pot apărea mai întunecate sau mai transparente decât pe ecran.
Opțiunea 2: Alb + CMYK
O bază de bază albă creează o fundație mai opacă sub ilustrația colorată.
Acest lucru este util atunci când aveți nevoie de:
- culoare mai puternică
- fotografii mai luminoase
- logo-uri mai clare
- culori de brand mai consistente
- vizibilitate mai bună pe lemn de culoare închisă
Aplicațiile tipice includ:
- fotografii
- logo-uri de afaceri
- ilustrații colorate
- branding de produs
- opera de artă detaliată
Alb + CMYK reduce influența culorii naturale a lemnului.
Opțiunea 3: Alb selectiv + CMYK
Albul selectiv este adesea cea mai interesantă opțiune pentru produsele din lemn premium.
În loc să imprimați alb sub întreaga imagine, utilizați alb numai acolo unde este nevoie de opacitate.
De exemplu:
- alb sub peisajul colorat
- fără alb în spatele zonelor de lemn de fundal
- alb sub sigla companiei
- cereale naturale în jurul elementelor decorative
Aceasta creează o combinație de:
lemn natural + culoare controlată
și poate da produsului finit un aspect mai proiectat intenționat.
Ce mod de cerneală albă ar trebui să utilizați?
O simplă regulă de decizie:
Vrei o textură naturală maximă?
Utilizați numai CMYK.
Vrei culori mai previzibile, vii?
Utilizați alb + CMYK.
Vrei un efect mixt premium?
Utilizați alb selectiv + CMYK.
Cea mai bună opțiune depinde de opera de artă și de poziționarea produsului.
Cum să imprimați UV pe lemn pas cu pas
Odată ce materialul și opera de artă sunt pregătite, construiți un proces de producție repetabil.
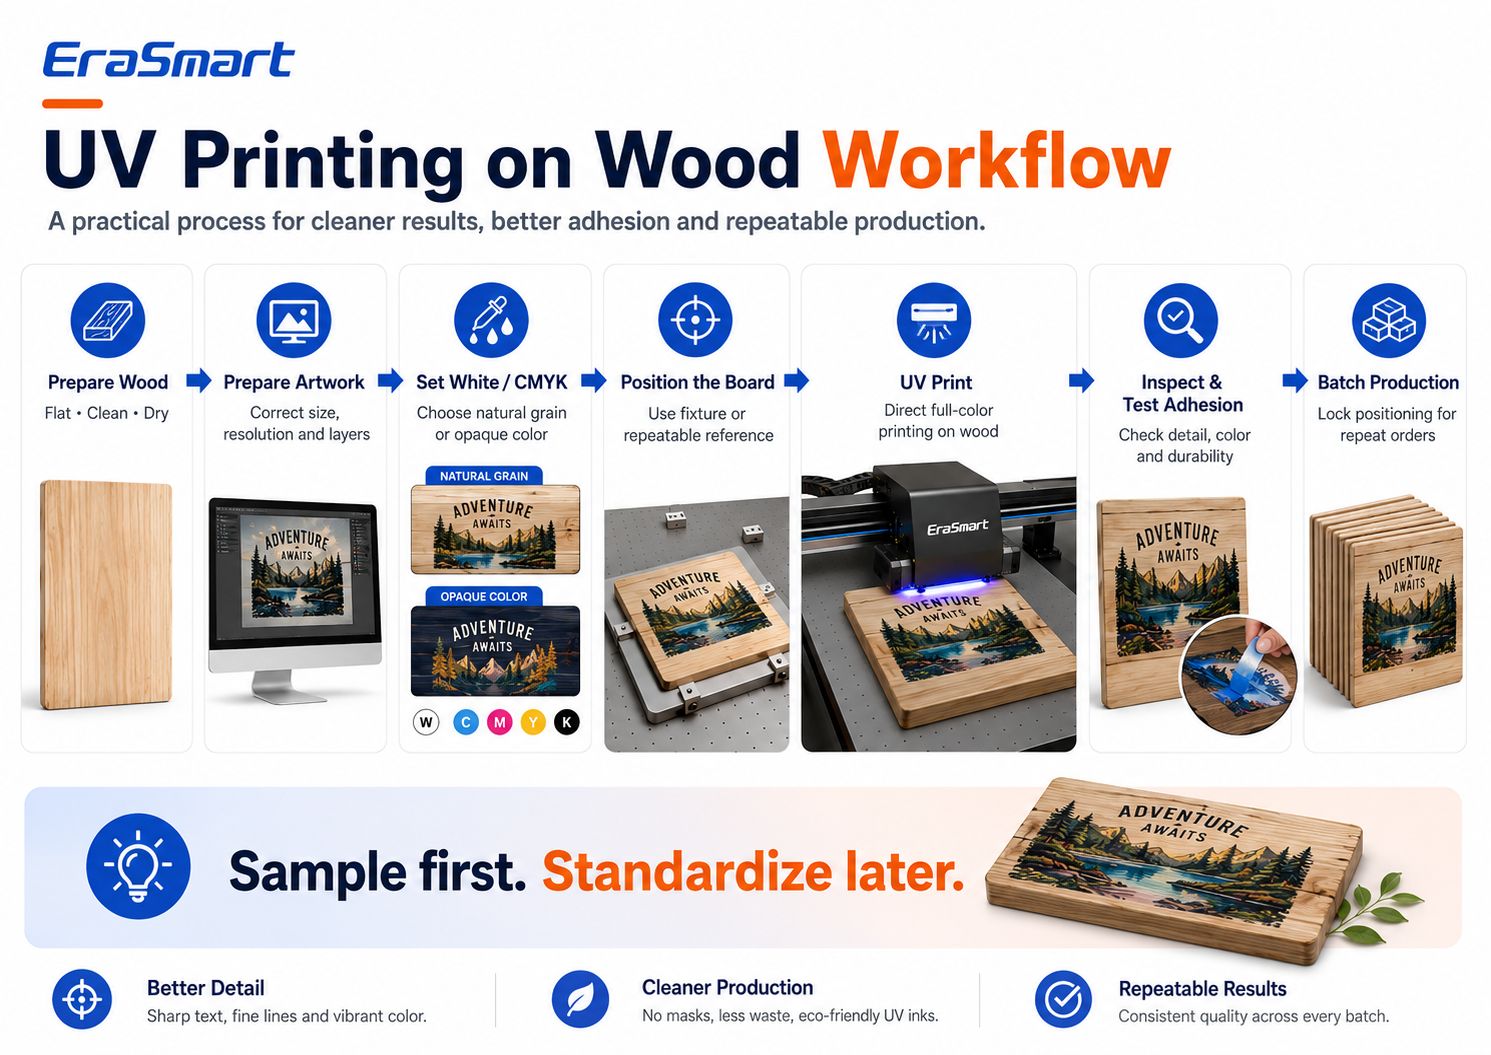
Pasul 1: Pregătiți lemnul
Asigurați-vă că placa este:
- curat
- uscat
- plat
- lipsit de praf
- potrivite pentru testare
Pasul 2: Pregătiți opera de artă
Set:
- dimensiunile finale
- rezoluția imaginii
- poziţia de imprimare
- Straturi CMYK
- straturi de cerneală albă
- straturi de lac dacă este necesar
Pasul 3: Alegeți strategia de cerneală albă
Decideți între:
- Numai CMYK
- Alb + CMYK
- Alb selectiv + CMYK
înainte de a trimite lucrarea la imprimantă.
Pasul 4: Poziționați placa
Așezați lemnul în siguranță pe platforma de imprimare.
Pentru produsele repetate, luați în considerare utilizarea:
- semnele de poziţionare
- referințe de margine
- corpuri de fixare
- jiguri
- șabloane
Acest lucru reduce erorile de aliniere.
Pasul 5: Setați înălțimea de imprimare
Distanța corectă a capului de imprimare este esențială.
O suprafață care este prost deformată sau poziționată prea sus poate crea:
- probleme de calitate a imprimării
- distanță incorectă de jet
- risc potenţial pentru capul de imprimare
Nu folosiți imprimanta pentru a compensa lemnul deformat grav.
Utilizați produse stabile, suficient de plate.
Pasul 6: Imprimați o mostră
Nu începeți imediat un lot de 100 de bucăți.
Imprimați mai întâi o mostră.
Verifica:
- culoare
- detaliu
- alinierea cernelii albe
- poziţia de imprimare
- adeziune
- rezistenta la zgarieturi
- aspectul general
Pasul 7: Testați aderența
După întărire, testați dacă stratul de cerneală este potrivit pentru aplicarea dorită.
Testul exact depinde de produs.
O placă decorativă de interior are cerințe diferite față de un articol care va fi manipulat frecvent.
Pasul 8: Blocați poziția
Odată ce proba este aprobată:
- salvați configurația RIP
- înregistrați poziția X/Y
- standardizați dispozitivul
- documentați dimensiunea plăcii
Pasul 9: Începeți producția în lot
Acum pot fi produse mai multe piese cu un flux de lucru mai repetabil.
Pasul 10: QC final
Verificați fiecare lot pentru:
- aliniere
- defecte ale duzei
- zgârieturi
- defecte de placa
- opera de artă incorectă
- variație de culoare
- probleme de aderență
Acest lucru este deosebit de important pentru locuri de muncă personalizate.
Mai întâi eșantionul. Standardizați mai târziu.
Una dintre cele mai mari diferențe dintre tipărirea hobby și producția profesională este standardizarea.
Pentru un singur semn din lemn, poziționarea manuală poate fi acceptabilă.
Pentru 50 de semne QR de cafenea identice, obiectivul ar trebui să fie:
același material + același dispozitiv + același RIP presetat + aceeași poziție + același QC
Aceasta reduce:
- timpul de configurare
- greșeli de tipărire
- spate irosite
- reclamatiile clientilor
Cum să poziționați lemnul pentru comenzi repetate
Dacă imprimați în mod regulat același semifabricat de lemn, creați un sistem de poziționare repetabil.
Abordările posibile includ:
- se opreste la colt
- jiguri fizice
- șabloane tipărite
- rigle de pozitionare
- dispozitive dedicate
Scopul este de a evita ghicirea manuală a locației fiecărui produs.
De exemplu, dacă un client comandă 30 de semne de meniu din lemn:
- utilizați aceleași dimensiuni ale plăcii
- fixați placa în aceeași poziție de referință
- blocați coordonatele RIP
- modificați numai datele operei de artă acolo unde este necesar
- inspectați la intervale definite
Acest lucru transformă imprimarea personalizată în lemn într-un flux de lucru de producție, mai degrabă decât într-un experiment artizanal.
Imprimare UV directă vs UV DTF pe lemn
EraSmart oferă atât fluxuri de lucru UV flatbed, cât și UV DTF, dar nu sunt același proces.
Imprimare UV directă
Alegeți o imprimantă UV directă atunci când:
- suprafața lemnului este plană
- obiectul se potrivește patului de imprimare
- doriți imprimare directă pe produs
- aveți nevoie de o poziționare precisă
- produceți plăci, panouri, semne sau cadouri
- vrei efecte de alb si lac direct pe produs
UV DTF
UV DTF poate fi util atunci când:
- produsul finit este dificil de așezat într-un strat plat
- zona de imprimare este incomodă
- vrei să faci mai întâi graficul și să îl aplici mai târziu
- decorați anumite obiecte finite
Cu toate acestea, aderența UV DTF pe lemn depinde încă în mare măsură de suprafață.
Un decal care se lipește bine de lemnul neted sigilat poate să nu se comporte la fel pe:
- pin crud prăfuit
- lemn puternic texturat
- cherestea finisată cu ulei
- suprafete cerate
Deci testați înainte de producția comercială.
Probleme frecvente la imprimarea pe lemn
Problema 1: Culorile arată tern
Motive posibile:
- fără bază albă
- lemn închis la culoare
- boabe naturale puternice
- opera de artă concepută pentru un fundal alb
Soluţie
Testați alb + CMYK sau alb selectiv.
De asemenea, ajustați opera de artă ținând cont de fundalul real din lemn.
Problema 2: Aderența cernelii este slabă
Cauze posibile:
- praf
- ulei
- ceară
- acoperire incompatibilă
- umiditate
- pregătire slabă a suprafeței
Soluţie
Curățați exact substratul și efectuați un test de aderență.
Dacă este necesar, evaluați un pretratare compatibil adecvat pentru acel material.
Problema 3: Textul mic pare dur
Cauze posibile:
- boabe aspre
- fibre libere
- lucrări de artă cu rezoluție scăzută
- distanță incorectă a capului de imprimare
Soluţie
Utilizați lemn mai neted, îmbunătățiți pregătirea suprafeței, utilizați text vectorial și verificați înălțimea de imprimare.
Problema 4: Poziția de imprimare se modifică între produse
Cauza posibila:
Poziționare manuală fără o referință repetabilă.
Soluţie
Utilizați un dispozitiv de fixare sau un șablon de poziționare.
Problema 5: Placa este deformată
Deformarea poate crea o distanță inconsecventă între capul de imprimare și suprafață.
Soluţie
Utilizați scânduri stabile, suficient de plane.
O platformă de vid poate ajuta la asigurarea materialelor plate adecvate, dar nu trebuie să se aștepte să corecteze deformarea severă.
Problema 6: Granulația lemnului învinge opera de artă
Aceasta este adesea o problemă de design, mai degrabă decât o problemă de imprimantă.
Soluţie
Folosiți o bază albă unde este necesară o opacitate mai puternică.
Sau reproiectează opera de artă în mod intenționat în jurul granulului natural.
Aveți nevoie de un strat de protecție după imprimarea UV?
Nu orice produs din lemn necesită un finisaj suplimentar transparent.
Decizia depinde de:
- utilizare în interior vs exterior
- frecvența de manipulare
- abraziune
- expunerea la umiditate
- așteptările clienților
- tip de lemn
- finisaj imprimat
Pentru produsele decorative de interior, imprimarea întărită cu UV poate oferi deja aspectul dorit.
Pentru produsele care vor suferi o uzură mai intensă sau o expunere specifică a mediului, poate fi evaluată finisarea suplimentară.
Testați întotdeauna orice acoperire după imprimare, deoarece se poate schimba:
- luciu
- aspectul culorii
- textură
- adeziune
- efect de lac
O imprimantă UV EraSmart practică pentru imprimarea pe lemn
Pentru produsele din lemn de dimensiuni mici și mijlocii, un plat UV de clasa A3 este un format de producție practic.
O opțiune esteImprimantă UV EraSmart Digital Inkjet A3 — Dual XP600.
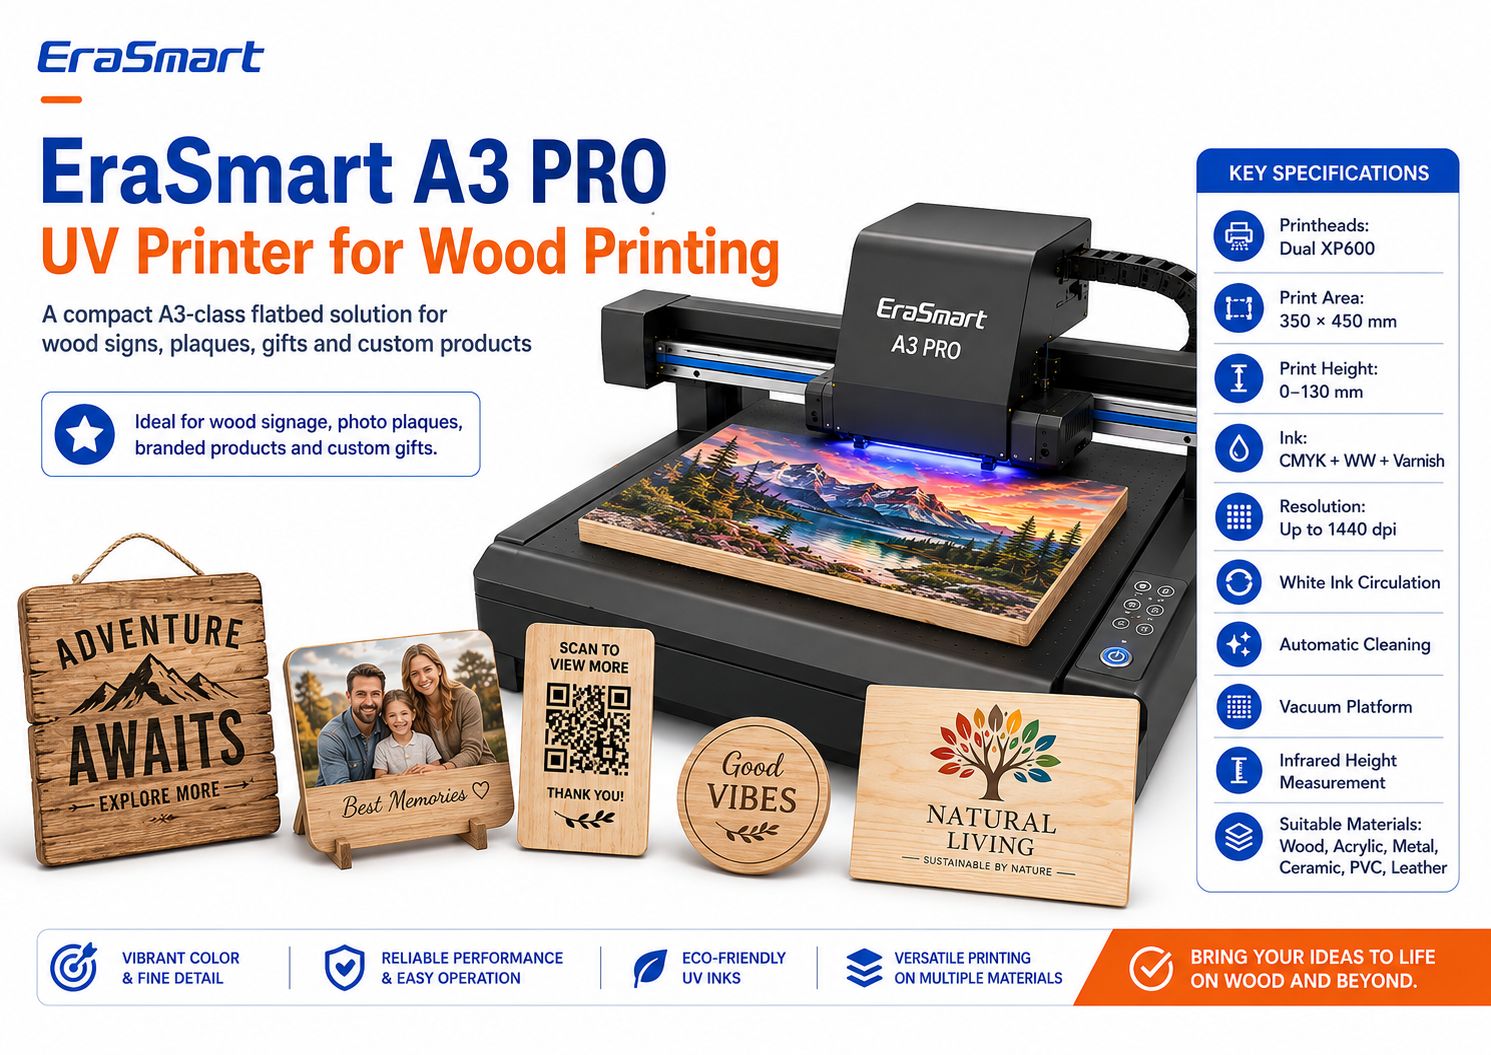
Specificații cheie EraSmart A3 PRO
| Specificații | EraSmart A3 PRO |
|---|---|
| Capete de imprimare | Dual XP600 |
| Zona de imprimare | 350 × 450 mm |
| Înălțime de imprimare | 0-130 mm |
| Configurarea cernelii | CMYK + WW + Lac |
| Rezoluţie | Până la 1440 dpi |
| Circulația de cerneală albă | Da |
| Curățare automată | Da |
| Platforma de vid | Da |
| Măsurarea înălțimii | Infraroşu |
| Software RIP | Riin / PrivateRip |
Imprimanta acceptă materiale, inclusiv:
- lemn
- acril
- metal
- ceramică
- PVC
- TPU
- piele
- Placa KT
Pentru aplicații în lemn, combinația decerneală albă, capacitate de lac, platformă de vid și măsurare a înălțimii în infraroșueste deosebit de util pentru personalizarea produselor plate în loturi mici.
Ce produse din lemn se potrivesc unui flux de lucru de clasa A3?
O zonă de imprimare de 350 × 450 mm poate găzdui multe produse personalizate mai mici, în funcție de dimensiunile finale.
Exemplele includ:
- plăci foto
- Semne QR
- semne mici de meniu
- cadouri personalizate
- coasterele
- cutii cadou de marcă
- premii din lemn
- panouri decorative
- semnalizare pentru întreprinderi mici
- piese de nunta
Pentru panouri mai mari din lemn, semnalizare sau mai multe piese per lot, o platformă mai mare poate avea mai mult sens.
EraSmart oferă șiA2 imprimantă UVcu o suprafata de lucru mai mare pentru afaceri ale caror dimensiuni de produs necesita mai mult spatiu.
Alegeți dimensiunea imprimantei în funcție de produsele dvs., nu doar pentru că o mașină mai mare sună mai profesionist.
Produse din lemn pe care le puteți imprima cu o imprimantă UV
Lemnul este valoros deoarece poate deservi mai multe piețe de afaceri simultan.
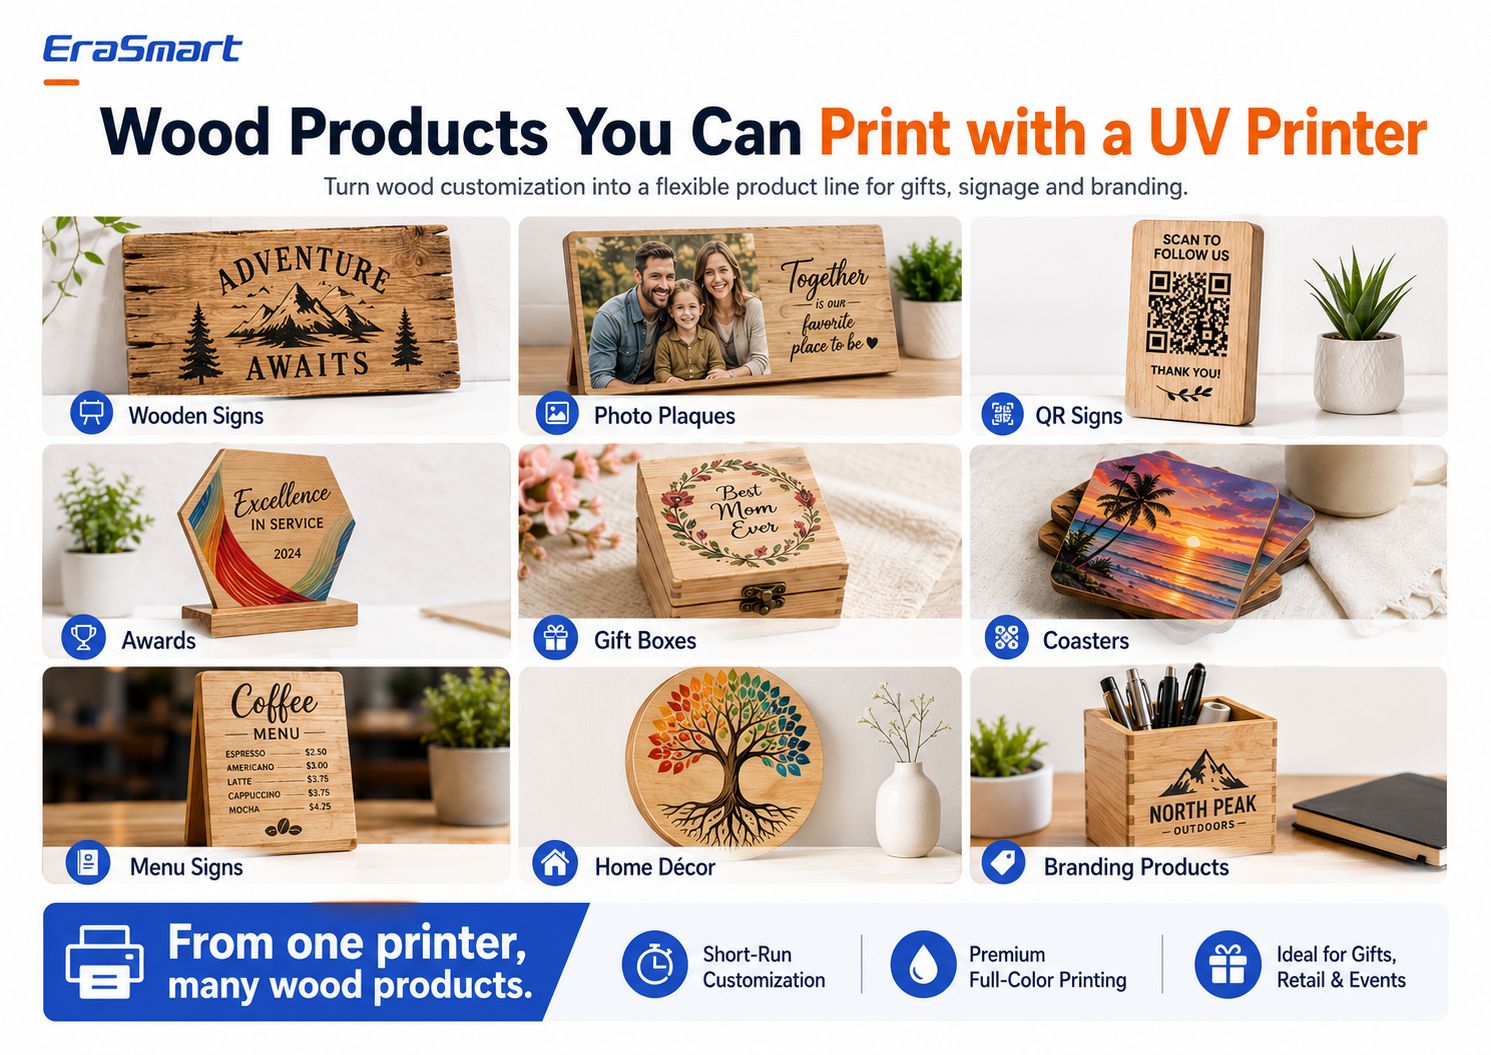
1. Semnele din lemn
Exemple:
- semne de cabină
- semne de nume de familie
- semne de nunta
- semne de cafenea
- semne de magazin
- semne de direcție
- citate decorative
2. Placi foto
Imprimarea UV color poate transforma fotografiile în:
- cadouri de familie
- piese aniversare
- plăci comemorative
- cadouri de nunta
- portrete de animale de companie
- amintiri de călătorie
Cerneala albă este adesea utilă în spatele lucrărilor de artă fotografică.
3. Semne de cod QR
Întreprinderile mici folosesc din ce în ce mai mult afișajele QR pentru:
- meniuri
- plăți
- recenzii
- Acces la Wi-Fi
- social media
- pagini de rezervare
Imprimați și scanați fizic codul QR înainte de livrare.
Nu vă bazați doar pe previzualizarea digitală.
4. Premii din lemn
Crea:
- premiile companiei
- piese de recunoaștere a angajaților
- premii sportive
- plăcuțe de club
- certificate de marcă
5. Cutii cadou
Cutiile din lemn pot fi personalizate cu:
- nume
- logos
- grafică florală
- datele nunții
- branding corporativ
Geometria exactă a cutiei trebuie să se încadreze în siguranță în dimensiunile și spațiul liber acceptat de imprimante.
6. Coasters
Coasterele sunt potrivite pentru:
- desene turistice
- colecții de artă
- cafenele
- cadouri de nunta
- marfă de marcă
Pentru produsele expuse la umiditate sau la abraziune repetată, testați produsul finit conform utilizării sale reale.
7. Semne de meniu
Meniurile din lemn pot funcționa pentru:
- cafenele
- restaurante
- bare
- camioane cu alimente
- nunti
- evenimentelor
8. Decorul casei
Exemple:
- arta botanica
- nume de familie
- decor creșă
- panouri peisagistice
- semne citate
- decor de vacanță
9. Produse de branding
Companiile pot comanda:
- contra semne
- plăcuțe cu logo
- cadouri promotionale
- piese expuse
- decor de vânzare cu amănuntul
- produse de birou de marcă
Comenzile B2B pot fi deosebit de valoroase deoarece clienții pot reordona același șablon cu text actualizat sau nume diferite de personal.
Cum un design din lemn poate deveni mai multe produse
O afacere de personalizare inteligentă poate reutiliza operele de artă.
De exemplu, o ilustrație de munte poate deveni:
- semn de cabină
- set de coaster
- fundal cu rama foto
- cutie cadou
- placă suvenir
- semn QR
- articol de birou de marcă
Același design nu trebuie să fie recreat pentru fiecare produs.
În schimb, adaptează:
- dimensiuni
- recolta
- text
- mască de cerneală albă
- șablon de produs
Aceasta crește valoarea fiecărui fișier de artă.
Idei de afaceri pentru imprimarea lemnului UV
Magazin de cadouri personalizat
Vinde:
- plăci foto
- semne de familie
- cadouri de nunta
- produse pentru animale de companie
- cutii personalizate
Magazin local de semne
Oferi:
- semne de cafenea
- meniuri
- Afișează QR
- plăci de birou
- logo-uri de afaceri
Vânzător Etsy sau online
Crea:
- semne rustice
- decor sezonier
- cadouri personalizate
- seturi de coaster
- produse de nunta
Turism și afaceri de suveniruri
Imprimare:
- opera de artă destinație
- hărți locale
- grafică de reper
- plăcuțe de suvenir
- colecții de coaster
Afaceri de nunți și evenimente
Legume şi fructe:
- semne de bun venit
- piese de masă
- favoruri
- plăci mici
- amintiri
Furnizor de cadouri corporative
Oferi:
- premii
- cutii de marcă
- plăci de birou
- cadouri de recunoaștere
- marfa cu logo
Cum să prețuiți imprimarea personalizată din lemn
Nu calculați prețul folosind doar cerneală și lemn.
Include:
- blank de lemn
- pregătirea suprafeței
- cerneală
- cerneală albă
- lac
- piese de încercare
- printuri eșuate
- configurarea operei de artă
- personalizare
- timpul mașinii
- muncă
- finisare
- ambalaj
- taxele platformei
- materiale de transport
- întreţinere
- profit
Personalizarea creează de obicei mai multă valoare deoarece clienții nu cumpără o placă de lemn generică.
Ei cumpără un produs finit personalizat.
Greșeli frecvente de evitat
Greșeala 1: Presupunând că toate imprimările din lemn sunt la fel
Nu.
Testați exact materialul.
Greșeala 2: Imprimarea pe lemn praf
Praful de șlefuit poate reduce calitatea și aderența.
Greșeala 3: Ignorarea cernelii albe
Cerneala albă este unul dintre cele mai importante instrumente creative pentru controlul culorii pe lemn natural.
Greșeala 4: Imprimarea comenzii complete fără un eșantion
Aprobați întotdeauna mai întâi o probă fizică.
Greșeala 5: Folosirea lemnului puternic deformat
Planeitatea contează pentru un spațiu liber constant al capului de imprimare.
Greșeala 6: Ignorarea acoperirilor de suprafață existente
Ceara, uleiul, lacul, vopseaua și alte acoperiri pot afecta aderența.
Greșeala 7: Folosirea aceleiași lucrări de artă pentru hârtie albă și lemn
Proiectare pentru substratul propriu-zis.
Greșeala 8: Repoziționarea manuală a fiecărui produs
Construiți un dispozitiv repetabil pentru producția în loturi.
Lista de verificare profesională pentru imprimarea lemnului
Înainte de imprimare:
Material
- tipul de lemn confirmat
- suprafata curata
- scândură uscată
- suficient de plat
- acoperire identificată
- test de aderență planificat
Operă de artă
- dimensiunile finale corecte
- imagine de înaltă rezoluție
- vector text/logo acolo unde este posibil
- masca de cerneala alba pregatita
- strat de lac pregătit dacă este necesar
Imprimantă
- verificarea duzei finalizată
- înălțimea de imprimare corectă
- Vacuum sau configurarea poziționării gata
- RIP presetarea selectată
Eşantion
- culoare verificată
- detaliu verificat
- cerneală albă verificată
- aderenta verificata
- poziție aprobată
Productie
- fixare blocată
- Versiunea grafică a fost confirmată
- cantitățile de lot verificate
- QC periodic efectuat
Finisare
- zgârieturi verificate
- marginile verificate
- ambalaj pregătit
- cantitatea finală verificată
Răspuns final: Cum imprimați pe lemn?
Pentru imprimarea directă profesională pe produse din lemn adecvate, imprimarea UV oferă un flux de lucru flexibil pentru lucrări de artă pline de culoare, cerneală albă, efecte de lac, personalizare și producție în loturi mici.
Procesul este:
pregătiți lemnul → pregătiți opera de artă → alegeți strategia de cerneală albă → poziționați produsul → setați înălțimea de imprimare → imprimați o probă → testați aderența → standardizați poziția → începeți producția în lot
Cel mai mare factor nu este rezoluția maximă a imprimantei.
Estecontrolul suprafeței.
Un produs din lemn curat, neted și stabil, cu o configurație de imprimare testată, va produce de obicei rezultate mai previzibile decât o mașină scumpă care imprimă pe o suprafață nepotrivită, prăfuită, uleioasă sau prost deformată.
Cerneala albă este al doilea factor major.
Utilizare:
- Numai CMYKcând vrei granulație naturală a lemnului
- Alb + CMYKcând vrei o opacitate mai puternică
- Alb selectiv + CMYKatunci când doriți să combinați caracterul material natural cu culoarea vie
Pentru companiile care produc plăci din lemn, semne, cadouri, afișaje QR, coastere, premii, cutii și alte produse plate personalizate,Imprimantă UV EraSmart A3 PROoferă o platformă de clasă A3 de 350 × 450 mm cu capete de imprimare Dual XP600, cerneală albă, capacitate de lac, circulație de cerneală albă, curățare automată, platformă de aspirare și măsurare a înălțimii în infraroșu.
Scopul nu este doar imprimarea pe lemn.
Scopul este de a crea un flux de lucru care poate produceaceeași calitate din nou și din nou.
FAQ
O imprimantă UV poate imprima direct pe lemn?
Da. Imprimantele UV plat pot imprima direct pe multe suprafețe adecvate din lemn. Lemnul trebuie să fie curat, stabil, suficient de plat și testat pentru aderență înainte de producția comercială.
Trebuie să șlefuiesc lemnul înainte de imprimarea UV?
Nu întotdeauna. Lemnul neted preparat poate fi deja potrivit. Suprafețele aspre, fibrele libere sau finisajele neregulate pot beneficia de șlefuire. Îndepărtați întotdeauna praful de șlefuit înainte de imprimare.
Care este cel mai bun lemn pentru imprimarea UV?
Lemnul neted, curat, stabil produce în general cele mai previzibile rezultate. Placaj de mesteacăn, arțar, pin preparat, bambus, MDF și lemn acoperit pot fi toate utilizate în funcție de starea suprafeței și de finisajul necesar.
Puteți imprima UV pe lemn brut?
Da, dar lemnul brut poate fi mai poros și mai texturat. Rezultatul depinde de granulație, netezimea suprafeței, umiditate, praf și opera de artă.
Am nevoie de cerneală albă când imprimez pe lemn?
Nu întotdeauna.
Folosiți CMYK numai atunci când doriți ca granulația naturală să fie vizibilă.
Utilizați albul sub CMYK atunci când aveți nevoie de culori mai opace, vibrante sau previzibile.
Imprimarea UV poate reproduce fotografiile pe lemn?
Da. Pentru produsele fotografice, utilizați lucrări de artă de înaltă calitate și luați în considerare o bază albă dacă doriți ca culorile imaginii să rămână mai puternice și mai puțin influențate de tonul lemnului.
Pot imprima coduri QR pe lemn?
Da, dar codurile QR trebuie să rămână suficient de mari, clare și contrastante. Testați întotdeauna codul imprimat finit cu mai multe telefoane înainte de livrare.
Fiecare produs din lemn are nevoie de grund?
Nu. Cerințele de grund depind de suprafața exactă a lemnului, de acoperire, de cerneală și de cerințele de aderență. Testați mai întâi, în loc să aplicați grundul automat.
O imprimantă UV poate imprima cutii de lemn?
Posibil, dacă produsul se încadrează în dimensiunile acceptate de imprimantă, înălțimea, greutatea și spațiul liber pentru capul de imprimare. Zona imprimabilă trebuie să fie, de asemenea, suficient de plată.
Ce imprimantă EraSmart este potrivită pentru imprimarea pe lemn?
Pentru produsele din lemn plate mici și mijlocii, theImprimantă UV EraSmart Digital Inkjet A3 — Dual XP600este o opțiune potrivită. Pentru piese de lemn mai mari, consultațiImprimantă UV EraSmartinterval și selectați o zonă de imprimare pe baza dimensiunilor reale ale produsului.
Doriți să construiți o afacere personalizată de tipărire pe lemn?
Spune-i lui EraSmart:
- ce produse din lemn doriți să imprimați
- dimensiunile produsului dvs
- tip de lemn
- indiferent dacă suprafața este brută, vopsită sau acoperită
- producția lunară estimată
- dacă aveți nevoie de cerneală albă
- fie că ai nevoie de efecte de lac
- spațiul tău de lucru
- planurile dvs. de produse viitoare
Echipa noastră vă poate ajuta să comparați corectImprimantă UV EraSmartși fluxul de lucru de producție pentru semne din lemn, plăci foto, cadouri personalizate, produse de marcă, semne QR, coastere, cutii și alte aplicații personalizate din lemn.
Pregătiți suprafața. Controlați cerneala albă. Testați proba. Apoi scalați fluxul de lucru.
Poate fi tu ca și tu

Copyright 2020 © Erasmart. | Sitemap