Small Size Flatbed Inkjet Printer Manufacturer

UV Printing on Glass: Surface Preparation, White Ink, Adhesion & Applications
UV printing can produce full-color graphics, white ink and decorative varnish effects directly on many suitable glass surfaces.
For custom printing businesses, common applications include:
- glass signs
- awards
- photo panels
- QR code displays
- decorative plaques
- wedding and event pieces
- retail displays
- branded glass products
Glass also offers something that opaque materials cannot: transparency.
By controlling CMYK, white ink and the side of the glass you print on, you can create everything from translucent graphics to fully opaque images and reverse-printed designs viewed through the glass.
But glass also presents a major production challenge:
adhesion.
Unlike paper or porous wood, glass is smooth and non-porous. Ink cures on the surface rather than soaking into the material. Fingerprints, oil, dust, factory coatings and incorrect pretreatment can therefore affect adhesion significantly.
The professional workflow is:
Identify the glass → Clean → Prepare White/CMYK Layers → Print a Sample → Test Adhesion → Standardize the Setup → Begin Production
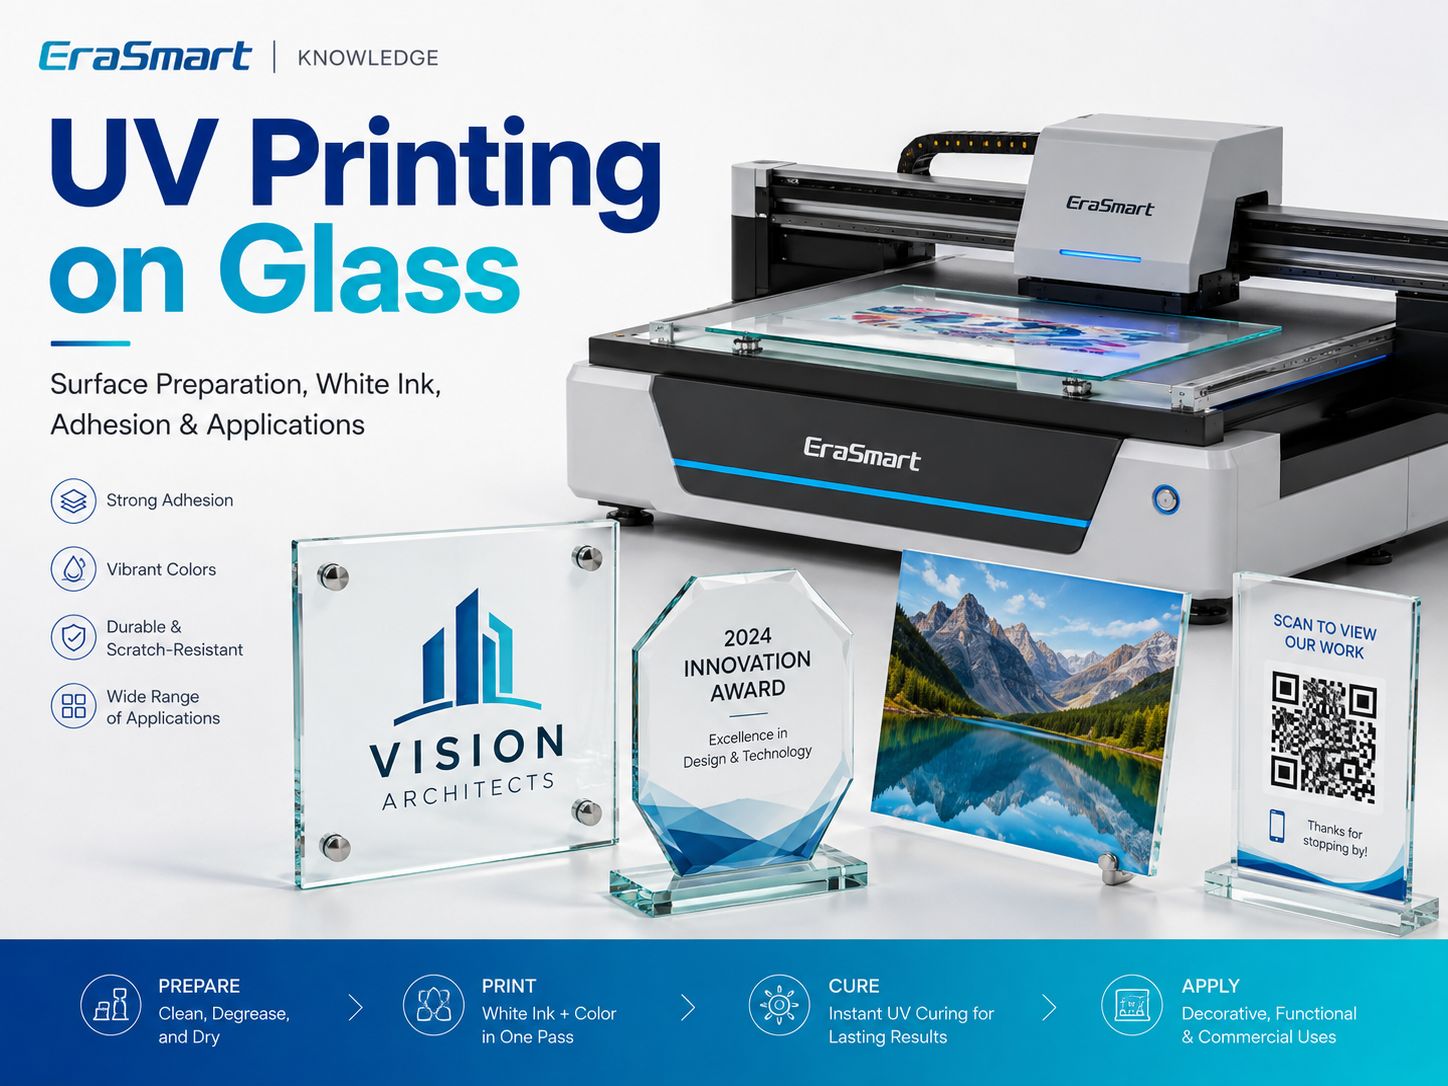
EraSmart currently classifies glass as a material that is suitable for UV printing after testing, with surface cleanliness and adhesion identified as the main considerations.
Quick Answer: Can You UV Print on Glass?
Yes.
A UV flatbed printer can print directly onto many suitable glass products, especially flat panels, plaques, awards and display pieces.
However, successful production depends on the exact glass and surface treatment.
| Question | Practical Answer |
|---|---|
| Can a UV printer print directly on glass? | Yes, after testing |
| Main challenge | Adhesion |
| White ink | Often important on transparent glass |
| Primer | Depends on the glass and application |
| Heat press | No |
| Direct printing | Yes |
| Best flatbed products | Flat glass panels, plaques, awards and signs |
| Bottles / curved glass | Consider UV DTF or an appropriate rotary workflow |
| Main preparation | Clean, degrease, test, then standardize |
Do not assume that two pieces of glass that look identical will behave exactly the same.
Surface coatings and treatments matter.
How Does UV Printing on Glass Work?
UV printing is a direct digital printing process.
The basic workflow is:
- Prepare the artwork.
- Import the design into RIP software.
- Create CMYK, white and varnish layers where needed.
- Position the glass on the printer bed.
- Set the correct print height.
- Jet UV-curable ink onto the surface.
- UV light cures the ink during printing.
- Inspect and test the finished sample.
Unlike conventional inks that rely mainly on absorption or evaporation, UV ink cures through a light-triggered polymerization process.
For a deeper explanation, see What Is UV Ink?.
If you want to understand how CMYK, white ink and varnish work together, read the UV Ink Guide: CMYK, White and Varnish.
What Types of Glass Can You UV Print?
The word “glass” covers many different products and surface conditions.
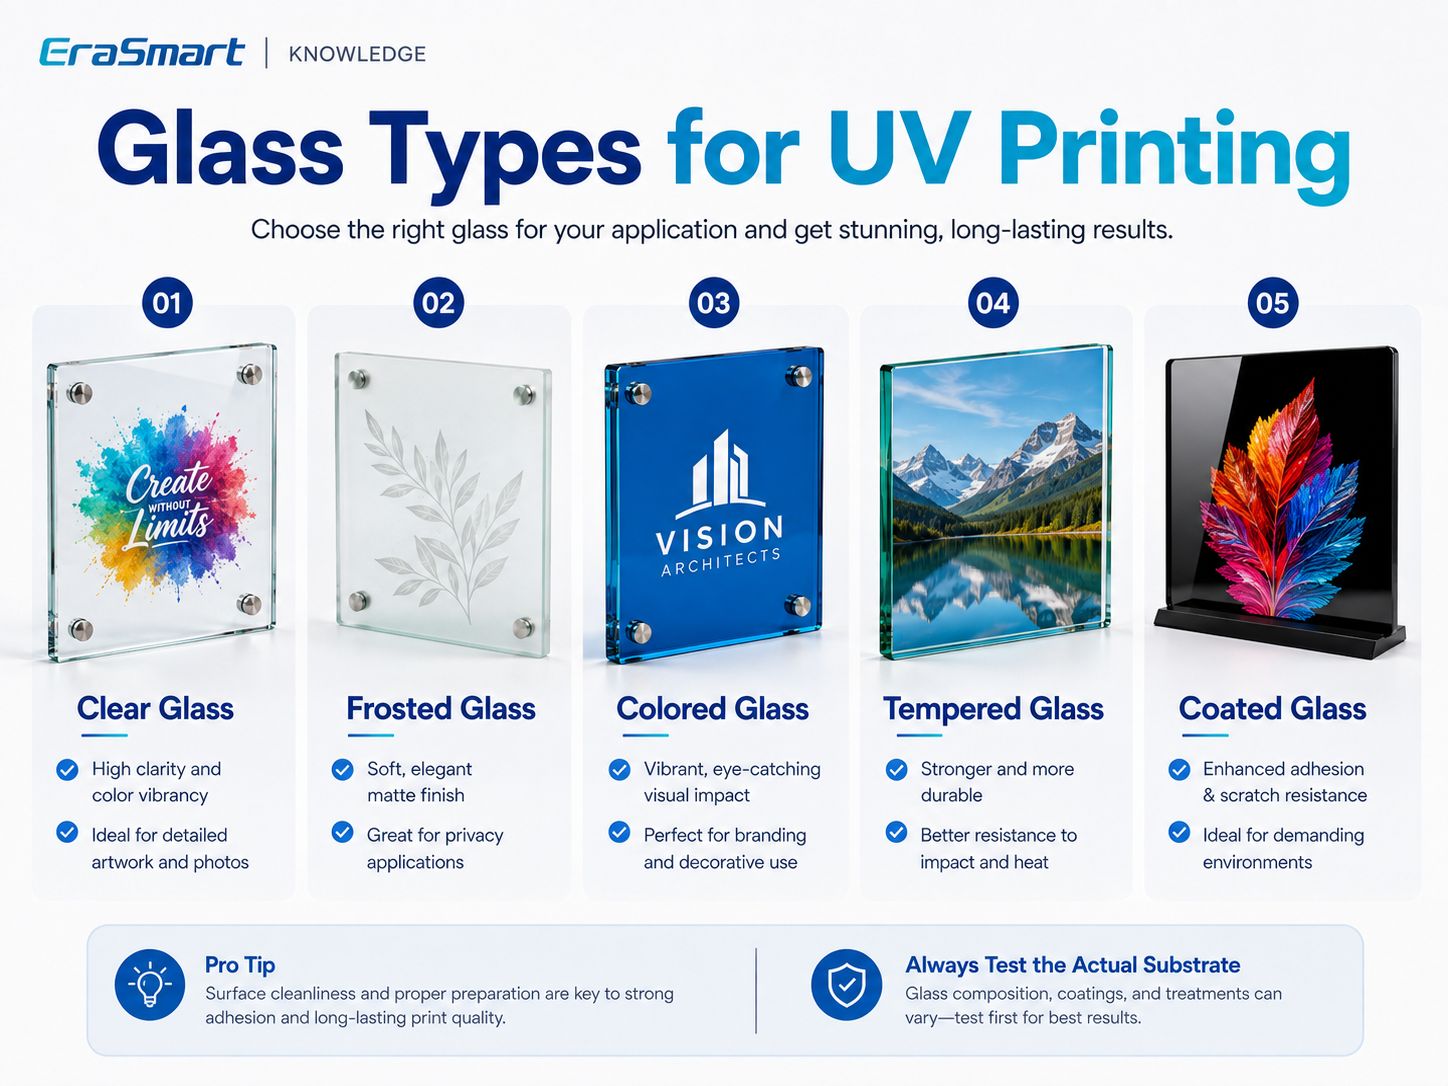
Common categories include:
- clear glass
- frosted glass
- colored glass
- tempered glass
- coated glass
Clear Glass
Clear glass is one of the most interesting UV printing substrates because the transparent background can become part of the design.
It is suitable for products such as:
- signs
- awards
- plaques
- photo displays
- wedding décor
- retail displays
The main design question is:
How much transparency do you want to keep?
That determines whether you use:
- CMYK only
- White + CMYK
- selective white
Frosted Glass
Frosted glass creates a softer, more diffused appearance.
It is attractive for:
- office signage
- premium awards
- wedding products
- decorative displays
- privacy-oriented branding
However, the term “frosted” can refer to different manufacturing processes or surface treatments.
The exact blank should still be tested.
Colored Glass
Colored glass changes the visual appearance of printed CMYK.
A dark blue or green substrate will influence the printed color unless a white underbase is used.
White ink therefore becomes especially useful when you need:
- accurate branding
- bright graphics
- readable text
- strong contrast
Tempered Glass
Tempered glass can be used for appropriate UV printing applications, but the exact surface should be evaluated before production.
Tempered glass products may also have:
- coatings
- anti-fingerprint treatments
- protective layers
- specialty finishes
These can affect adhesion.
Do not assume that “tempered” automatically means the surface behaves like untreated clear glass.
Coated Glass
Coated glass deserves special attention.
If glass has a surface coating, UV ink is effectively interacting with that coating.
The question becomes:
Is the coating compatible with the UV ink and the required durability?
A coating may improve printability in one product and reduce adhesion in another.
Always test.
Why Is Glass More Difficult to Print Than Wood?
Wood and glass behave very differently.
Wood
Wood may have:
- pores
- grain
- fibers
- surface absorption
Glass
Glass is generally:
- smooth
- non-porous
- transparent
- prone to fingerprints
- sensitive to surface contamination
That means a UV print can look excellent while still having insufficient adhesion for the intended use.
With glass, appearance alone is not enough.
You need to test the finished product.
How to Prepare Glass Before UV Printing
Surface preparation is one of the most important steps in professional glass printing.
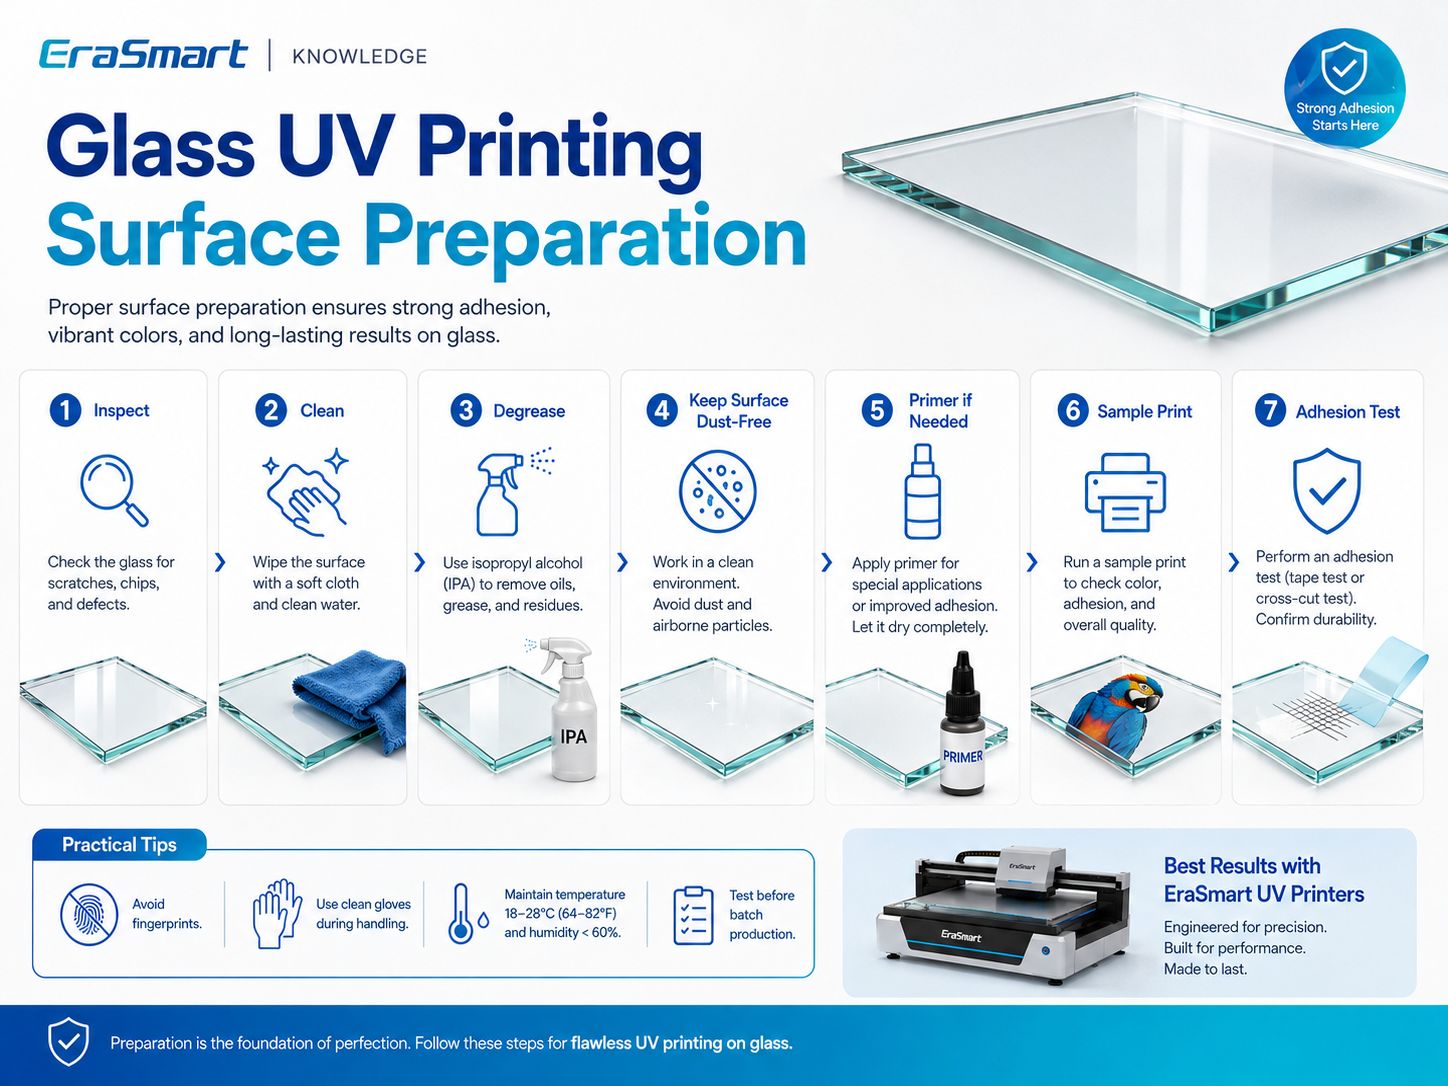
Step 1: Inspect the Glass
Check for:
- scratches
- chips
- cracks
- protective film
- coatings
- fingerprints
- oil
- packaging residue
- dust
Do not print a defective blank and expect printing to hide the problem.
Step 2: Clean the Surface
Remove visible contamination using a cleaning method compatible with the glass and any coating.
The printable area should be:
- clean
- dry
- free from dust
- free from grease
Step 3: Degrease
Fingerprints are especially common on glass.
After cleaning, avoid touching the printable surface directly.
Use suitable clean handling practices when possible.
Step 4: Let the Surface Dry Completely
Do not print over residual cleaning fluid or moisture.
Step 5: Evaluate Primer or Adhesion Promoter
Some glass applications may benefit from a compatible adhesion promoter.
But primer is not automatically required for every glass product.
The correct approach is:
Clean → Print Test → Check Adhesion → Add Compatible Pretreatment If Needed → Retest
Step 6: Print a Sample
Use the actual:
- glass
- coating
- ink
- white layer
- varnish setup
- print mode
that will be used in production.
Step 7: Test Adhesion
Only approve the substrate after the sample performs adequately for the intended application.
Do You Need Primer for UV Printing on Glass?
Sometimes.
There is no universal answer.
Primer requirements depend on:
- glass type
- surface treatment
- coating
- UV ink formulation
- required durability
- handling
- cleaning exposure
- final application
A decorative glass plaque displayed indoors does not have the same durability requirements as a frequently handled or regularly cleaned object.
Do not automatically apply primer to every glass product.
And do not assume glass never needs pretreatment.
Test the exact substrate.
White Ink on Clear Glass: Why It Matters
Transparent materials change the way CMYK appears.
CMYK inks are not normally designed to create the same opaque background that white paper provides.
This makes white ink one of the most useful tools in glass UV printing.
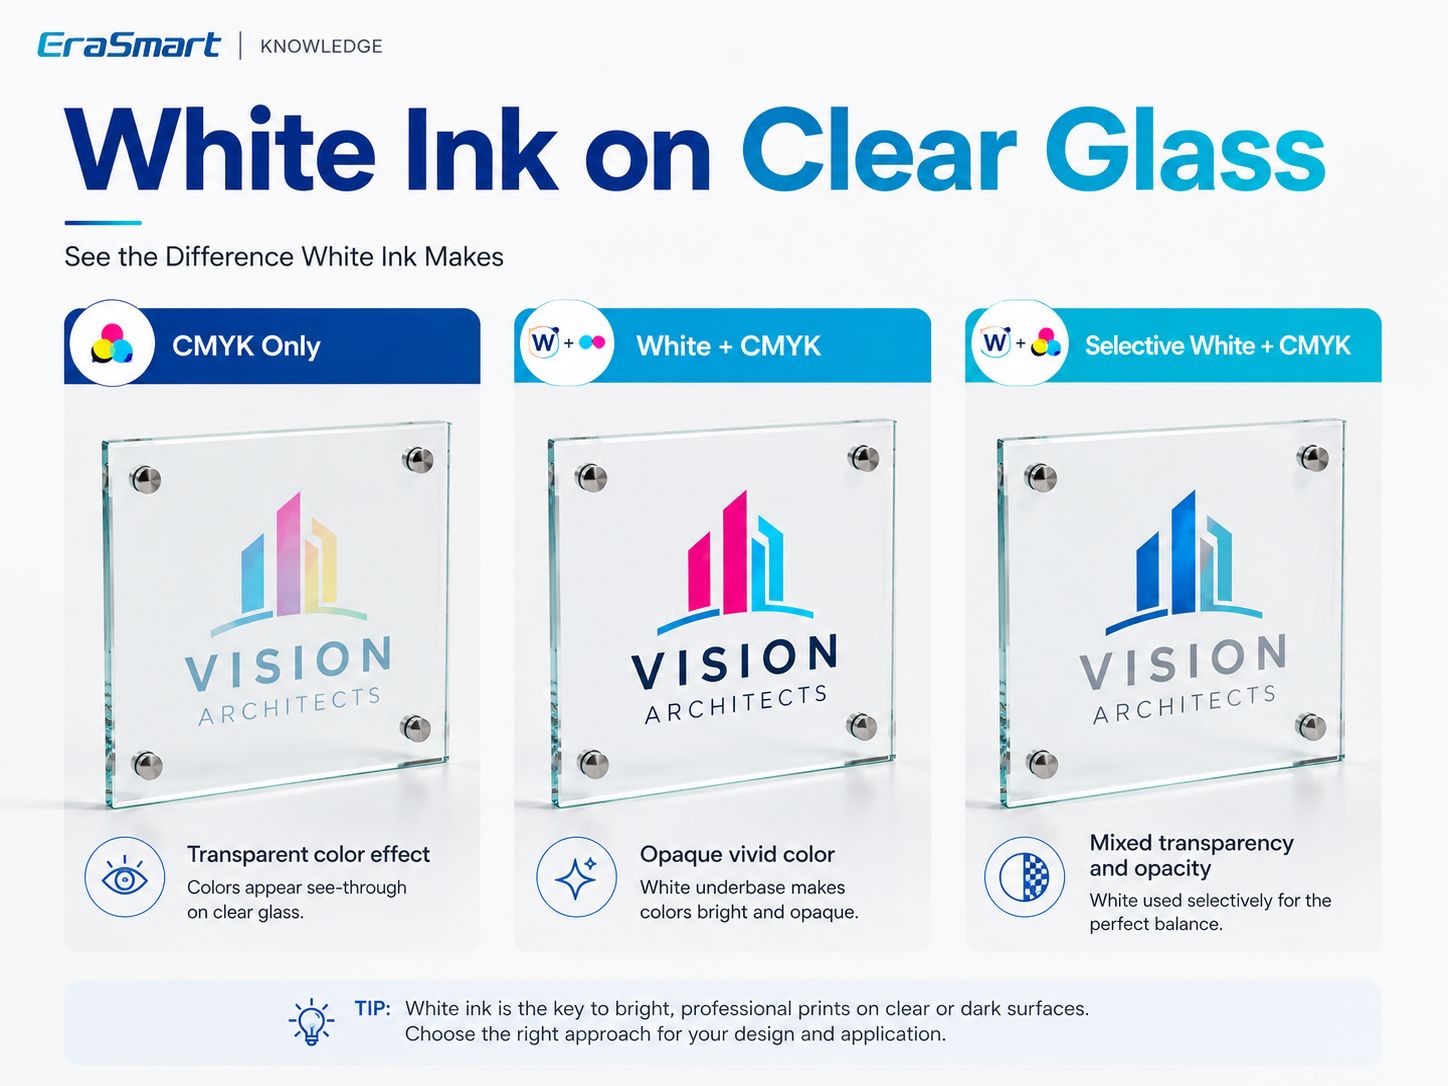
There are three practical approaches.
Option 1: CMYK Only
CMYK printed directly on clear glass creates a more transparent effect.
The background behind the glass remains visible.
This can work well for:
- artistic graphics
- decorative transparency
- stained-glass-style effects
- minimalist signs
- intentionally translucent designs
The trade-off is lower opacity.
Light colors may look weaker depending on what is behind the glass.
Option 2: White + CMYK
A white underbase creates a more opaque foundation.
This produces:
- stronger color
- greater contrast
- more predictable logos
- brighter photos
- improved text visibility
This is useful for:
- corporate signage
- photo panels
- product displays
- awards
- colorful branding
Option 3: Selective White + CMYK
Selective white is often the most visually interesting option.
White is printed only where opacity is required.
For example:
- white behind the company logo
- no white in transparent background areas
- white behind flowers
- clear glass visible between design elements
This gives you both:
transparency + vivid color
in the same product.
CMYK + White + Varnish
On compatible EraSmart UV configurations, varnish can be added for selected effects such as:
- spot gloss
- raised details
- logo highlights
- decorative texture
Use varnish selectively when it improves the design.
Do not treat varnish as an automatic substitute for an industrial protective coating.
Front-Surface Printing vs Reverse Printing on Glass
Glass gives UV printing another important design option:
printing on the back and viewing the image through the glass.
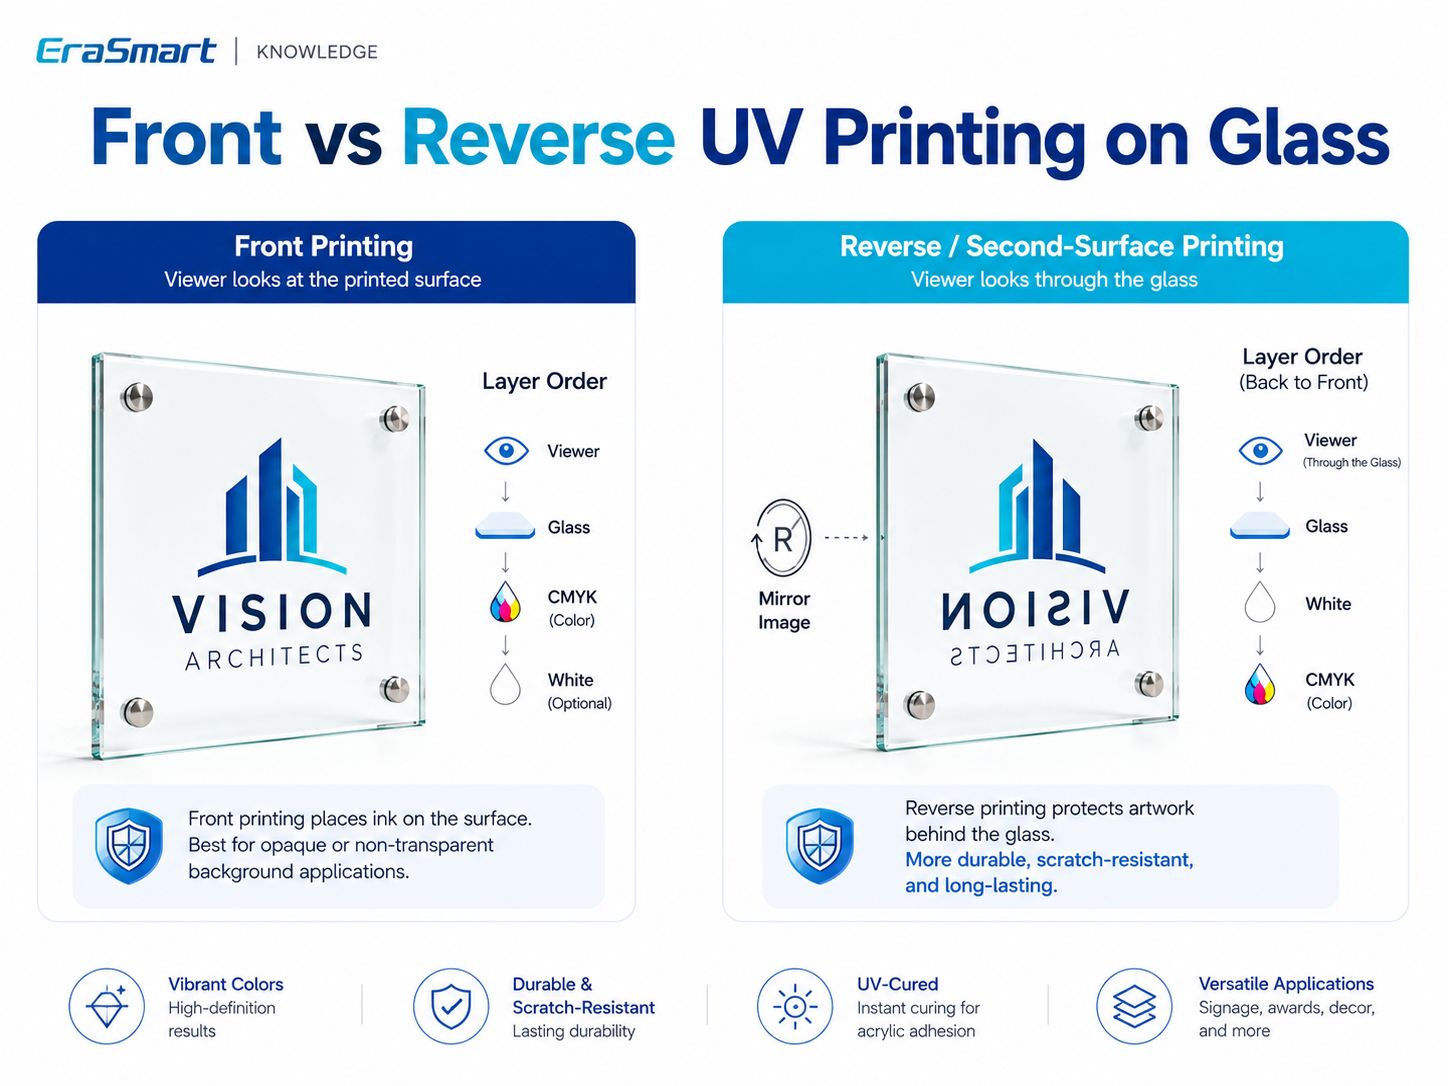
Front-Surface Printing
The artwork is printed on the side facing the viewer.
A common layer strategy is:
Glass → White Underbase → CMYK
when opaque color is required.
Advantages:
- straightforward setup
- suitable for many decorative products
- easy to combine with varnish effects
- useful when the printed surface itself is part of the design
The ink layer remains exposed on the viewing side.
Reverse / Second-Surface Printing
The artwork is printed onto the back side of clear glass and viewed through the glass from the opposite side.
The artwork normally needs to be mirrored.
For an opaque reverse-printed image, a common concept is:
Glass → CMYK → White backing
when viewed through the glass.
The exact RIP layer sequence depends on the printer setup, so always confirm with a physical sample.
Advantages include:
- clean front surface
- glass between the viewer and printed artwork
- premium signage appearance
- strong use in photo panels and decorative displays
Reverse printing is one of the main reasons clear glass can produce visually distinctive UV-printed products.
When Should You Use Front vs Reverse Printing?
| Application | Suggested Direction |
|---|---|
| Raised varnish effect | Front printing |
| Surface texture | Front printing |
| Clear sign with exposed decorative graphics | Front or reverse |
| Premium photo panel | Reverse often attractive |
| Logo viewed through glass | Reverse |
| Product needing tactile varnish | Front |
| Printed layer protected behind glass | Reverse |
There is no universal winner.
Choose according to the desired finish.
How to UV Print on Glass Step by Step
Once the glass and ink configuration have been tested, create a repeatable production workflow.
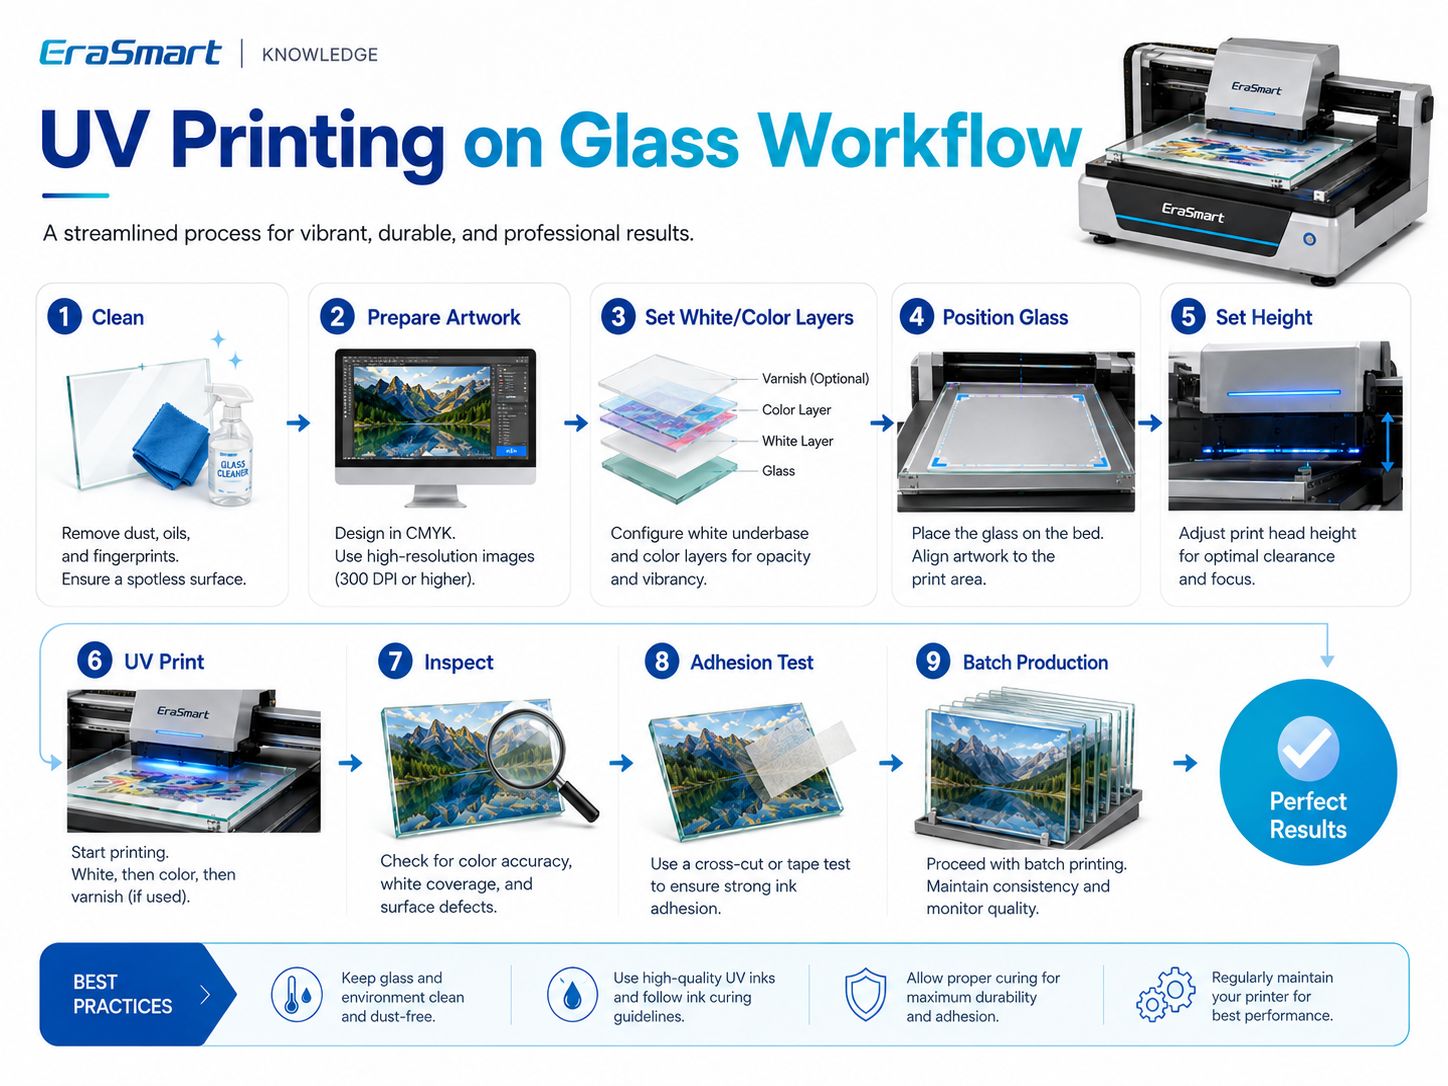
Step 1: Clean the Glass
Remove:
- dust
- oil
- fingerprints
- residue
Step 2: Prepare the Artwork
Confirm:
- final dimensions
- image resolution
- text
- logos
- bleed
- safe margins
Use vector artwork for:
- logos
- text
- QR codes
- fine line graphics
Around 300 DPI at final print size is a practical starting point for close-view raster artwork.
Step 3: Decide Front or Reverse Printing
For reverse printing:
- mirror the artwork
- confirm the layer order
- test how the design looks through the glass
Step 4: Set CMYK, White and Varnish Layers
Choose:
- CMYK only
- White + CMYK
- Selective White + CMYK
- CMYK + White + Varnish
based on the finished visual effect.
Step 5: Position the Glass
Use:
- edge references
- jigs
- fixtures
- templates
for repeat orders.
Step 6: Set the Print Height
Glass must be positioned safely and sufficiently flat.
Correct clearance helps maintain consistent print quality and reduces printhead risk.
Step 7: Print One Sample
Do not start a large batch immediately.
Check:
- color
- white opacity
- alignment
- small text
- image position
- varnish
- transparency
Step 8: Inspect the Finished Print
Look for:
- dust
- banding
- nozzle defects
- layer registration problems
- edge defects
- coating issues
Step 9: Test Adhesion
Check that the ink performs adequately for the actual end use.
Step 10: Standardize the Job
Once approved:
- save the RIP preset
- record the glass type
- record the cleaning process
- lock the jig
- record front/reverse orientation
- save the white-layer setup
Step 11: Start Batch Production
Repeat the approved workflow and perform periodic QC.
How to Test UV Ink Adhesion on Glass
The appropriate test depends on how the finished product will be used.
Initial Rub Check
Useful for identifying obvious adhesion failure.
If the ink lifts easily during basic handling, review:
- cleaning
- surface contamination
- coating compatibility
- pretreatment
Tape-Based Internal Check
A controlled tape test can help compare samples during internal production testing.
If a customer requires a recognized testing standard, follow that specific standard and its complete procedure.
Scratch / Abrasion Evaluation
This is more important for frequently handled products such as:
- counter displays
- QR signs
- awards
- gift products
than for protected decorative panels.
Cleaning Resistance
If the glass will be cleaned regularly, test it using conditions representative of real use.
Moisture Exposure
For glass products used in humid environments, test the complete printed product according to the actual environment.
Do not make blanket claims such as:
- dishwasher safe
- chemical resistant
- outdoor permanent
- food safe
unless the finished product has actually been tested and qualified for that use.
Direct UV Printing vs UV DTF for Glass
EraSmart offers both UV flatbed printers and UV DTF printers.
They serve different product shapes.
Direct UV Flatbed Printing
Best suited to:
- glass panels
- plaques
- flat awards
- photo panels
- flat signs
- QR displays
- flat decorative pieces
The product itself is placed onto the printer bed.
UV DTF
UV DTF may be more practical for:
- glass bottles
- jars
- cups
- irregular finished products
- difficult-to-position areas
- curved products
The graphic is printed onto UV DTF film and then transferred to the compatible object.
This distinction is important:
a standard UV flatbed printer should not automatically be treated as a full 360° bottle printer.
For cylindrical direct printing, an appropriate rotary workflow is needed.
EraSmart’s current UV printing guide likewise distinguishes flatbed UV, UV DTF and rotary UV workflows according to product shape.
UV Printing vs Sublimation on Glass
Both technologies can be used for customized products, but their workflows differ.
| Feature | UV Printing | Sublimation |
|---|---|---|
| Direct printing | Yes | No |
| Special sublimation coating | Not inherently | Usually required |
| White ink | Yes | No |
| Heat press | No | Yes |
| Clear glass effects | Strong flexibility | Depends on compatible coated blank |
| Varnish | Available on supported UV systems | No |
| Flat rigid panels | Good | Requires compatible blank |
| Main challenge | Adhesion | Coating + heat transfer |
Sublimation remains useful for purpose-made coated blanks.
UV printing is attractive when you need:
- direct printing
- white ink
- transparency control
- varnish
- short-run personalization
Glass Products You Can Print with a UV Printer
Glass can support both consumer and B2B customization.
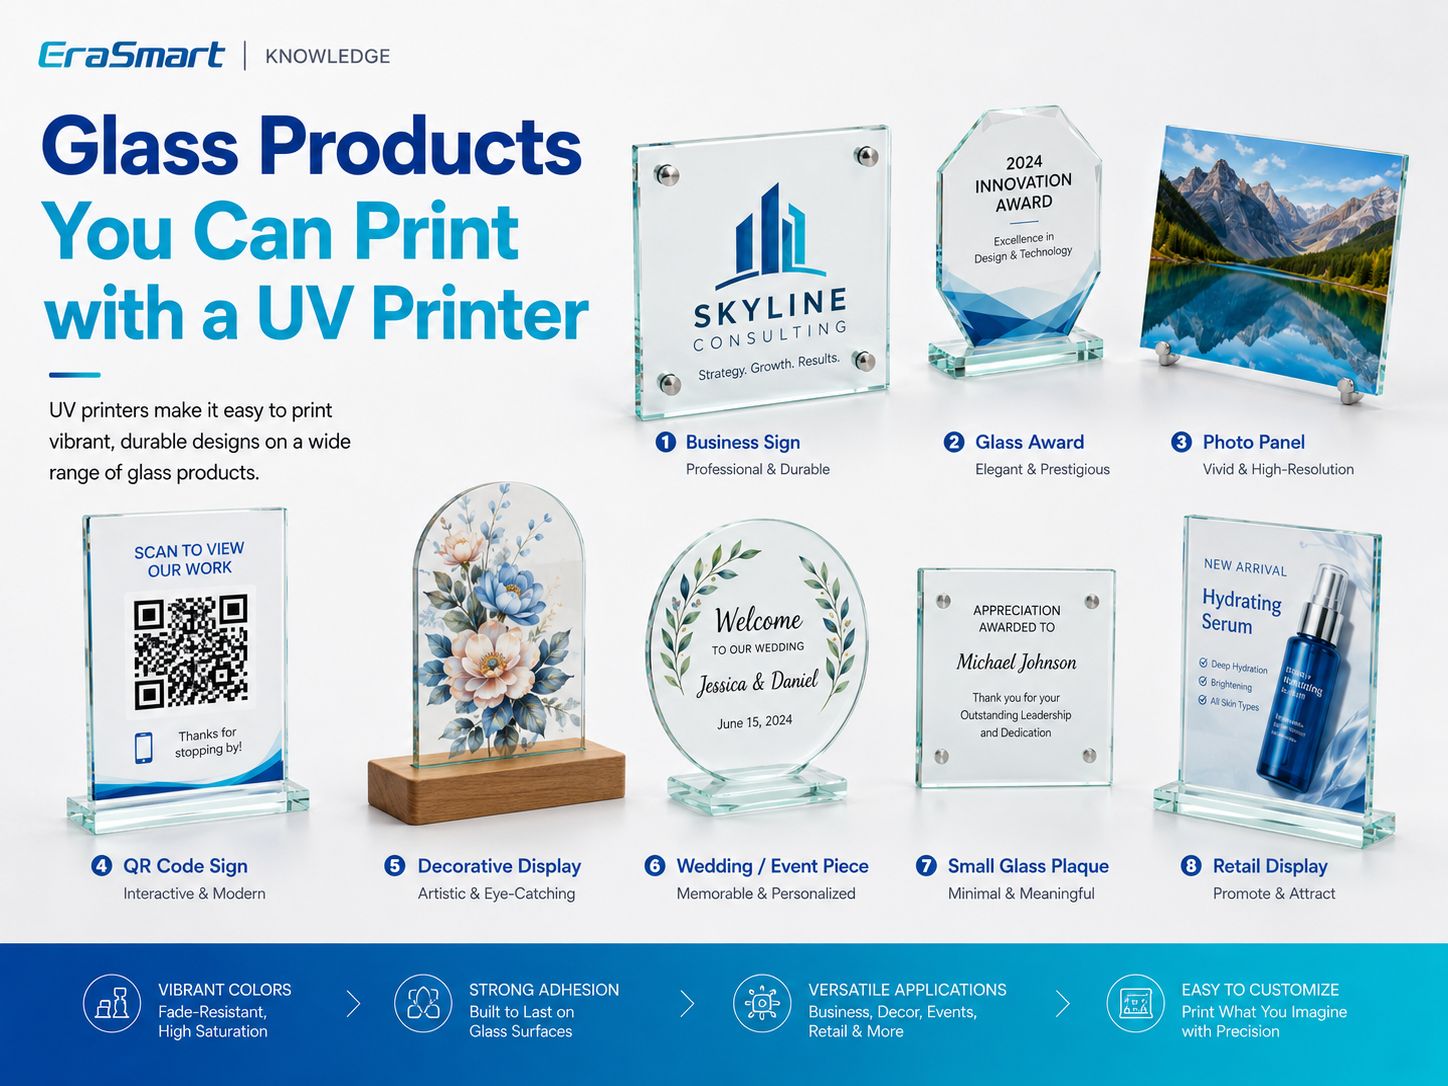
1. Business Signs
Examples include:
- company logos
- office plaques
- reception signs
- directional displays
2. Glass Awards
UV printing can add:
- names
- logos
- event information
- colorful graphics
- white ink
- decorative varnish
to compatible flat award pieces.
3. Photo Panels
Reverse printing can be especially attractive for:
- family photos
- wedding photos
- travel photography
- memorial products
- artwork
4. QR Code Signs
Glass QR signs can be used for:
- menus
- booking pages
- reviews
- Wi-Fi
- social media
- product information
Always physically scan the finished QR code before delivery.
5. Wedding and Event Pieces
Possible products include:
- table numbers
- small welcome signs
- photo plaques
- personalized event décor
- guest information displays
For acrylic-based wedding stationery, you can also read our guide to DIY Wedding Invitations and UV Printing.
6. Decorative Displays
Glass can be used for:
- floral artwork
- abstract graphics
- home décor
- branded displays
7. Small Glass Plaques
Suitable for:
- employee recognition
- thank-you gifts
- branded pieces
- commemorative products
8. Retail Displays
Retailers may use glass panels for:
- product promotions
- brand graphics
- small countertop displays
- launch signage
Why Jigs Matter for Batch Glass Printing
Suppose a customer orders 50 identical glass QR signs.
Manually repositioning each piece by eye is inefficient.
Instead:
- Create a positioning fixture.
- Define fixed X/Y coordinates.
- Use the same glass dimensions.
- Save the RIP preset.
- Print one approved sample.
- Repeat the same positioning.
This helps improve:
- consistency
- production speed
- alignment
- waste control
For personalized products, the blank can remain in the same fixture while the artwork changes digitally.
Which EraSmart UV Printer Is Suitable for Glass Printing?
Printer selection should follow your actual glass dimensions and production needs.
EraSmart A3 PRO UV Printer — Dual XP600
The EraSmart Digital Inkjet A3 UV Printer — Dual XP600 is an A3-class UV flatbed designed for personalized customization and small-batch production.
Key specifications include:
| Specification | A3 PRO |
|---|---|
| Printheads | Dual XP600 |
| Print Area | 350 × 450 mm |
| Print Height | 0–130 mm |
| Resolution | Up to 1440 dpi |
| Ink Configuration | CMYK + WW + VVVVVV |
| White Ink Circulation | Yes |
| Automatic Cleaning | Yes |
| Suction Platform | Yes |
| Height Measurement | Infrared |
| RIP | Riin / EraRip |
EraSmart currently lists glass among the supported materials for this model, together with acrylic, metal, wood, ceramic, PVC and other substrates.
This format is suitable for products such as:
- glass plaques
- photo panels
- awards
- signs
- QR displays
- small decorative pieces
EraSmart A2 UV Printer
For larger flat glass products, the EraSmart A2 UV Printer provides a larger platform.
Key specifications include:
- Dual XP600 printheads
- 420 × 600 mm print area
- 0–130 mm adjustable print height
- CMYK + WW + VVVVVV
- up to 1440 dpi
- suction platform
- automatic cleaning
Glass is also listed among its supported materials.
The larger working area can help with:
- larger panels
- larger plaques
- signage
- multiple smaller pieces in one print layout
Choose the printer according to your most common products—not simply according to the largest available machine.
Common Problems When UV Printing on Glass
UV Ink Scratches Off Easily
Possible causes:
- fingerprints
- oil
- incompatible coating
- inadequate cleaning
- insufficient adhesion
- unsuitable pretreatment
Do not start by changing resolution.
First check the substrate.
Colors Look Too Transparent
This is common when CMYK is printed directly onto clear glass.
Try:
- White + CMYK
- selective white
- reverse printing with white backing
depending on the desired effect.
White Ink Looks Uneven
Check:
- white ink circulation
- nozzle status
- RIP settings
- layer density
- maintenance condition
White UV ink contains heavier pigments and requires appropriate circulation and maintenance.
White and CMYK Are Misaligned
Check:
- printhead calibration
- RIP layer configuration
- nozzle condition
- registration
Dust Appears Under the Print
Glass makes dust particularly visible.
Improve:
- cleaning
- workspace cleanliness
- handling
- storage before printing
Small Text Is Hard to Read
Possible causes:
- no white underbase
- transparent background
- low-resolution artwork
- text too small
Use vector artwork and physically inspect the finished sample.
Batch Position Changes
Use:
- jigs
- templates
- edge references
- saved coordinates
instead of manually positioning every piece.
Safety and Application Limits
A UV printer being able to print on glass does not mean every glass application is automatically appropriate.
Drinking Glasses
Avoid making assumptions about:
- drinking rims
- food-contact areas
- dishwasher resistance
unless the complete ink/substrate/product system is certified or tested for that use.
Outdoor Glass
Outdoor durability depends on:
- UV ink
- glass coating
- surface preparation
- environmental exposure
- cleaning
- weather
Do not promise universal outdoor lifetime without testing.
Structural Glass
UV printing should not be presented as changing or certifying the structural safety characteristics of architectural glass.
If a product is subject to construction, safety or other regulatory requirements, evaluate the finished product according to the applicable standards.
How to Choose a UV Printer for Glass
Before selecting a machine, answer these questions.
What Is Your Largest Glass Product?
Printer bed size should follow your real product dimensions.
Are Your Products Flat?
Flat products are the natural fit for UV flatbed printing.
Do You Need White Ink?
White is particularly important for:
- clear glass
- colored glass
- logos
- photographs
- small text
Do You Need Reverse Printing?
Make sure your RIP workflow supports the required mirrored artwork and layer structure.
Do You Need Varnish?
Varnish can increase perceived value for selected products but is not necessary for every job.
Will You Print Bottles or Jars?
If curved products are central to your business, evaluate:
- UV DTF
- appropriate rotary printing
instead of assuming a standard flatbed workflow is sufficient.
What Is Your Monthly Volume?
Higher repeat volume makes:
- fixtures
- saved RIP presets
- standardized blanks
- batch QC
more important.
Final Answer: Is UV Printing Good for Glass?
Yes.
UV printing is a flexible solution for producing:
- glass signs
- awards
- photo panels
- QR displays
- decorative plaques
- wedding products
- retail displays
But glass should not be treated as a universally easy substrate.
The most important production factors are:
surface cleanliness + adhesion + white ink strategy + print orientation
Use:
- CMYK only for transparent color effects
- White + CMYK for stronger opacity
- Selective White + CMYK for mixed transparent and opaque designs
- Reverse printing when you want the artwork viewed through the glass
- Varnish for selected premium effects
And follow this production logic:
Inspect → Clean → Test → Print Sample → Check Adhesion → Approve → Standardize → Batch Produce
For flat glass products, explore the EraSmart UV Printer range.
For bottles, jars and other curved finished products, consider whether an EraSmart UV DTF Printer provides a more practical workflow.
FAQ
Can UV printers print directly on glass?
Yes. UV flatbed printers can print directly on many suitable glass surfaces, but adhesion and surface cleanliness should be tested before production.
Does UV ink stick to glass?
It can, but adhesion depends on the exact glass, surface coating, cleanliness, ink and pretreatment. Do not assume all glass behaves the same.
Do I need primer before UV printing glass?
Not always. Some surfaces may print adequately after proper cleaning, while others may benefit from a compatible adhesion promoter. Test first.
Do I need white ink on clear glass?
Not always.
Use CMYK only when you want transparency.
Use white beneath or behind CMYK when you want stronger opacity and brighter color.
Can I print on clear glass?
Yes. Clear glass is particularly useful for transparent graphics, white ink effects and reverse printing.
Can you UV print on frosted glass?
Yes, depending on how the frosted finish was produced and how the surface behaves with the ink. Test the exact product.
Can UV printers print on tempered glass?
Potentially, yes. The actual surface treatment and coating should be tested before production.
What is reverse printing on glass?
Reverse or second-surface printing places the artwork on the back of clear glass and allows the viewer to see it through the glass from the front.
Does reverse glass printing require mirrored artwork?
Usually yes. The artwork normally needs to be mirrored before printing on the back side.
Can UV printers print glass bottles?
Direct flatbed printing is best suited to flat surfaces. Cylindrical bottles require an appropriate rotary workflow, or UV DTF may be a more practical alternative.
Can UV-printed glass go in a dishwasher?
Do not assume so. Dishwasher resistance depends on the ink, adhesion, glass, pretreatment and complete finished-product testing.
Can UV printers print photographs on glass?
Yes. White ink and reverse printing can both be used to create premium photo-panel effects.
Which EraSmart UV printer can print glass?
The EraSmart A3 PRO Dual XP600 supports a 350 × 450 mm print area, while the EraSmart A2 UV Printer provides a larger 420 × 600 mm platform.
Build a Reliable Glass Printing Workflow
If you are evaluating a UV printer for glass products, tell EraSmart:
- glass type
- product dimensions
- clear / frosted / colored surface
- coating information
- whether you need white ink
- whether you want front or reverse printing
- expected production volume
- whether the product is flat or curved
We can help you compare the right EraSmart UV Printer or UV DTF Printer workflow for your actual products.
Clean the surface. Control the white layer. Test adhesion. Then scale production.
MAY BE YOU LIKE ALSO

Copyright 2020 © EraSmart. | Sitemap