Small Size Flatbed Inkjet Printer Manufacturer

EraSmart UV Printer for Ceramics Printing
UV printing makes it possible to print full-color graphics, white ink and decorative varnish effects directly onto many suitable ceramic surfaces.
For custom print shops, gift businesses, interior décor companies and personalized-product studios, common ceramic applications include:
- ceramic tiles
- photo tiles
- decorative plaques
- coasters
- QR code tiles
- wedding and event pieces
- wall-art tiles
- multi-tile murals
- branded hospitality décor
However, ceramic is not one uniform printing surface.
A smooth glazed tile, an unglazed porous tile, a matte decorative ceramic piece and a sublimation-coated blank can all behave differently with UV ink.
For professional production, the correct question is not simply:
Can a UV printer print ceramic?
The better question is:
How does this exact ceramic surface behave with the ink, white layer, primer and final application?
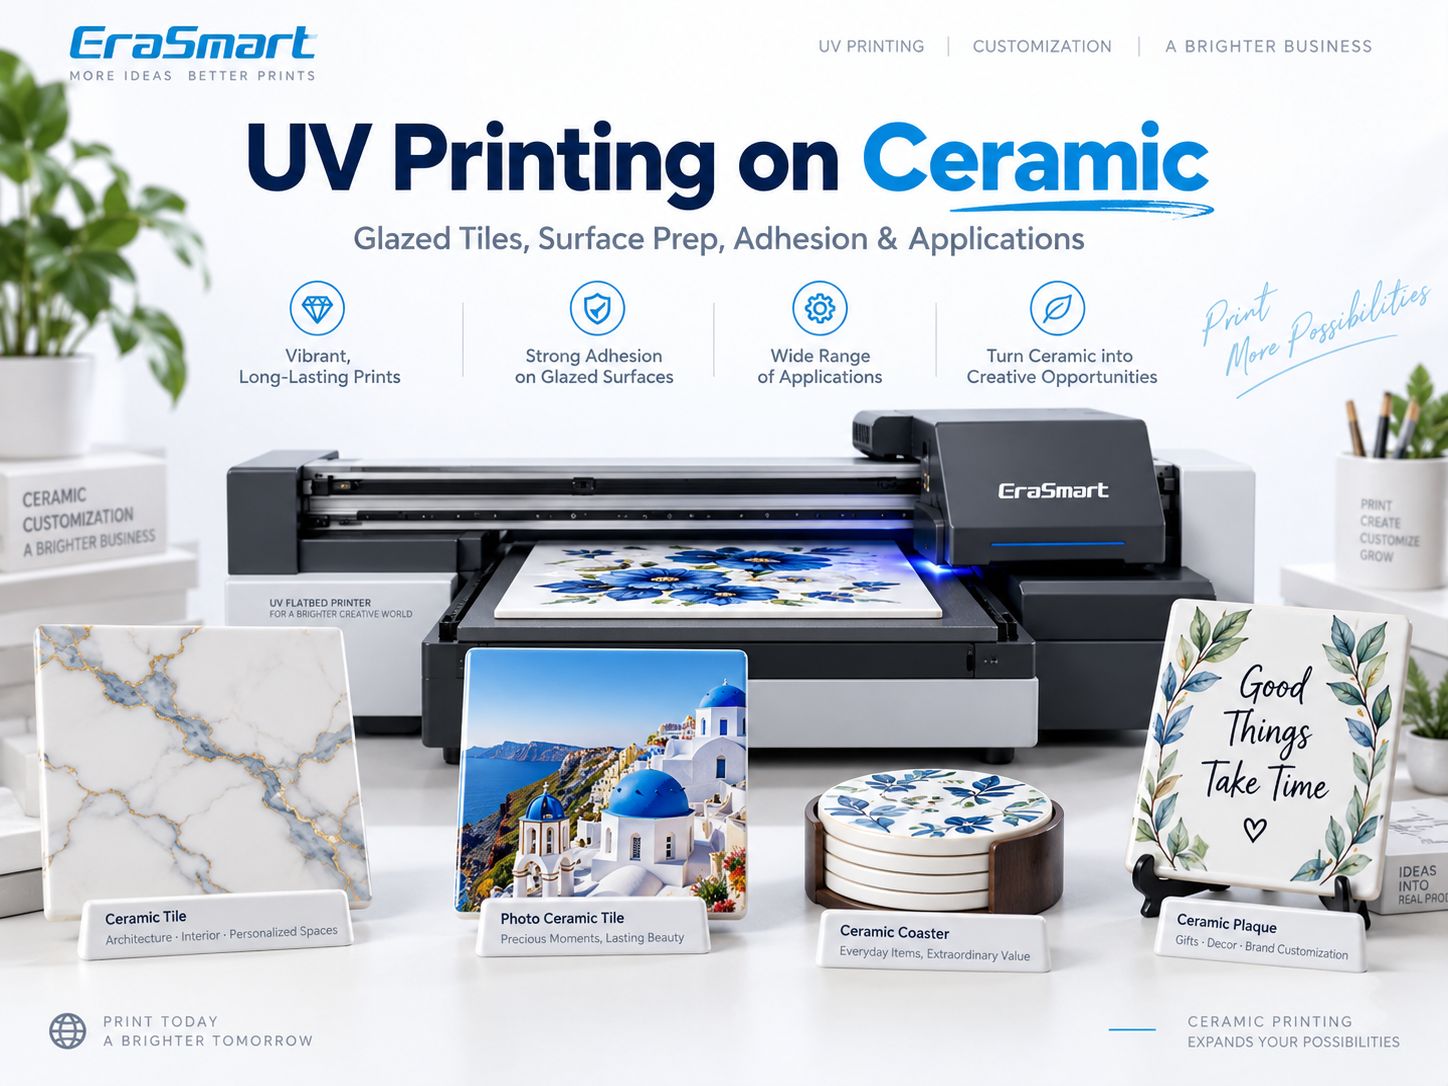
EraSmart classifies ceramic as a material that is suitable for UV printing after testing, with surface glaze, curvature and adhesion among the main considerations.
The recommended production logic is:
Identify the ceramic → Clean → Prepare the artwork → Select CMYK / White / Varnish layers → Print a sample → Test adhesion → Standardize the setup → Begin production
Quick Answer: Can a UV Printer Print on Ceramic?
Yes.
UV flatbed printers can print directly onto many suitable ceramic tiles, plaques and decorative pieces.
| Question | Practical Answer |
|---|---|
| Can UV printers print ceramic? | Yes, after testing |
| Best shape for flatbed printing | Flat tiles and plaques |
| Main challenge | Adhesion |
| White ink | Useful on colored or dark ceramic |
| Primer | Depends on the surface |
| Heat press | No |
| Glazed ceramic | Printable after adhesion testing |
| Unglazed ceramic | Printable, but texture and porosity affect results |
| Ceramic mugs | Better evaluated with UV DTF, rotary UV or other suitable workflow |
| Typical applications | Tiles, plaques, coasters, photo products, décor |
A flat white ceramic tile may be one of the easier ceramic products to customize.
A glossy curved mug is a very different production problem.
How Does UV Printing on Ceramic Work?
UV printing is a direct digital printing process.
The basic workflow is:
- Prepare the artwork.
- Process the design in RIP software.
- Define CMYK, white and varnish layers.
- Place the ceramic item on the print platform.
- Set the correct printing height.
- Jet UV-curable ink onto the surface.
- UV LED light cures the ink during printing.
- Inspect the sample.
- Test adhesion before production.
Unlike sublimation, direct UV printing does not require transfer paper or a heat press.
For a deeper explanation of the ink itself, see What Is UV Ink?.
For the relationship between color, white ink and varnish, see the UV Ink Guide: CMYK, White and Varnish.
What Types of Ceramic Can You UV Print?
The finish of the ceramic surface strongly affects the printing result.
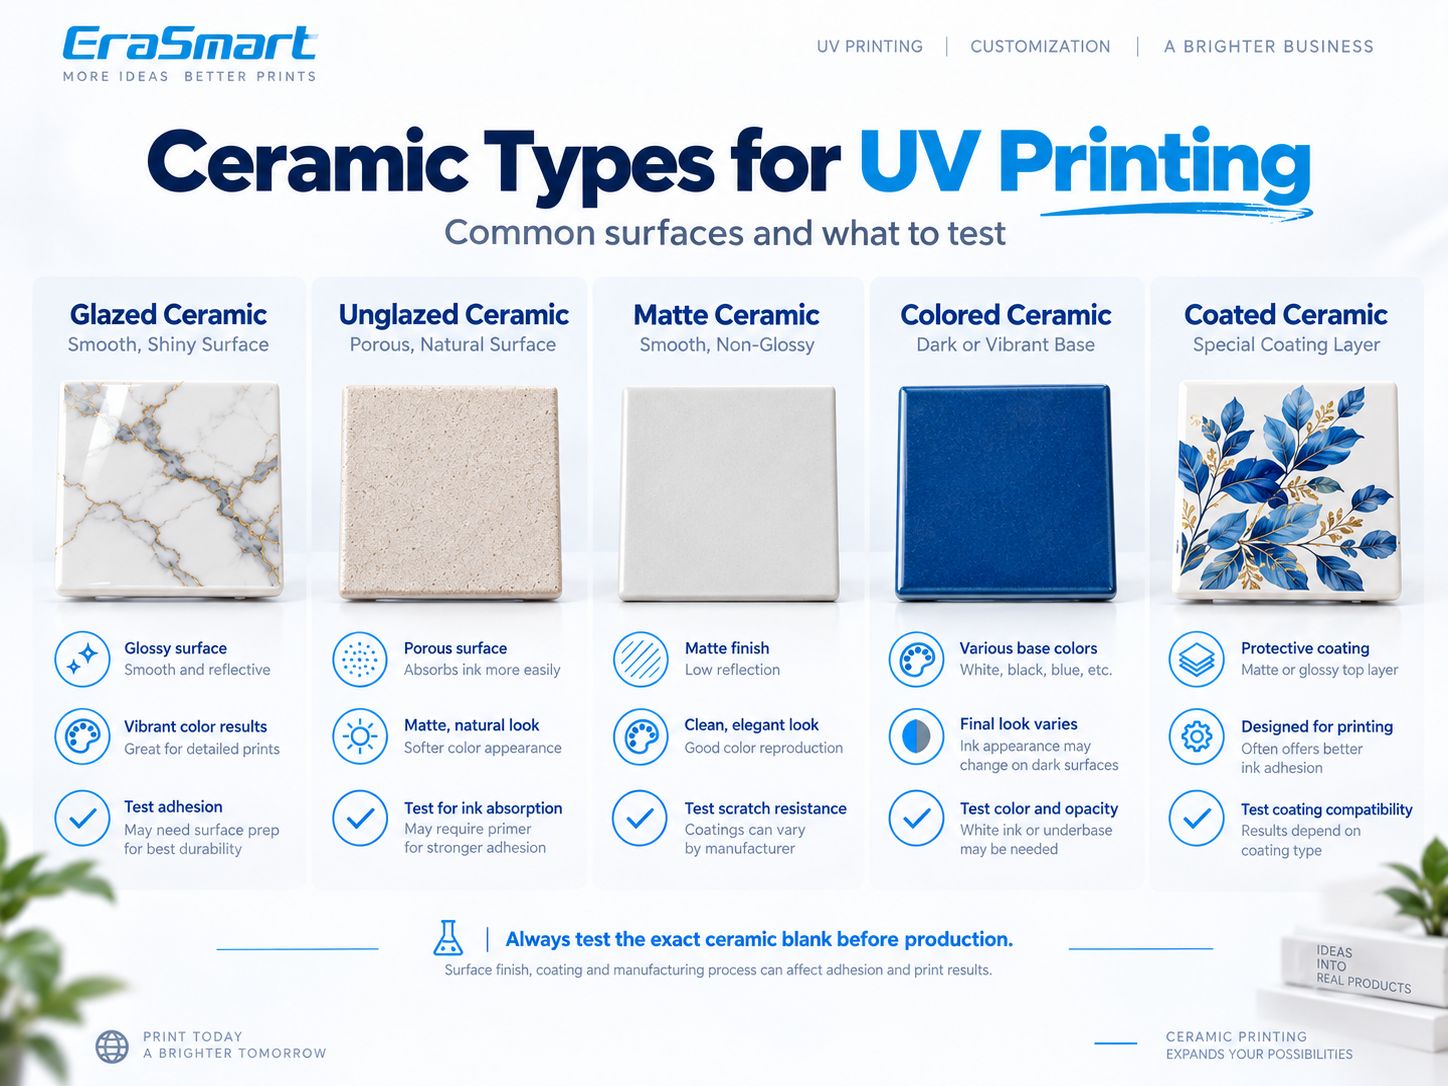
Common categories include:
- glazed ceramic
- unglazed ceramic
- matte ceramic
- colored ceramic
- coated ceramic
Glazed Ceramic
Glazed ceramic has a smooth, sealed surface.
Typical examples include:
- glazed tiles
- decorative plaques
- glossy ceramic blanks
Advantages:
- clean premium appearance
- smooth detail
- good surface for photos and graphics
Main challenge:
adhesion
Because the glaze is smooth and non-porous, UV ink remains on the surface.
Depending on the glaze, proper cleaning or a compatible adhesion promoter may be necessary.
Always test the actual blank.
Unglazed Ceramic
Unglazed ceramic has a more natural and porous surface.
This can include:
- unfinished tiles
- matte pottery
- porous decorative ceramics
Possible advantages:
- more textured handmade look
- less glossy surface
- different visual interaction with ink
Possible challenges:
- inconsistent absorption
- texture
- dust
- variable detail reproduction
Do not assume unglazed ceramic automatically gives better adhesion.
The surface still needs testing.
Matte Ceramic
Matte ceramic sits somewhere between rough unglazed material and glossy glazed products.
It can work well for:
- decorative tiles
- photo plaques
- interior décor
But matte finishes may come from different manufacturing processes.
Two matte tiles can therefore behave differently.
Colored Ceramic
Dark or colored ceramic changes the way CMYK appears.
For example, printing a light blue image directly onto a dark navy tile without white ink will not produce the same appearance as printing it on white ceramic.
White underbase is often useful for:
- strong brand colors
- photographs
- fine text
- illustrations
- light-colored graphics
Coated Ceramic
Some ceramic products have a separate surface coating.
Examples include:
- sublimation-coated tiles
- treated decorative blanks
- specialty ceramic products
In this case, the UV ink is interacting with the coating, not just the ceramic underneath.
The coating therefore becomes part of the adhesion system.
Test the exact blank before production.
Glazed vs Unglazed Ceramic: What Is the Difference for UV Printing?
| Factor | Glazed Ceramic | Unglazed Ceramic |
|---|---|---|
| Surface | Smooth, sealed | More porous / textured |
| Appearance | Glossy or satin | Natural / matte |
| Ink absorption | Very low | Higher |
| Detail | Often sharper | Depends on texture |
| Main risk | Adhesion | Texture / porosity |
| Primer | May be useful | Depends on surface |
| White ink | Depends on color | Depends on color |
| Best use | Signs, photo tiles, décor | Rustic / decorative pieces |
Neither is automatically better.
The right choice depends on:
- design
- surface quality
- required adhesion
- intended use
- production consistency
How to Prepare Ceramic Before UV Printing
Preparation is one of the most important parts of ceramic UV printing.
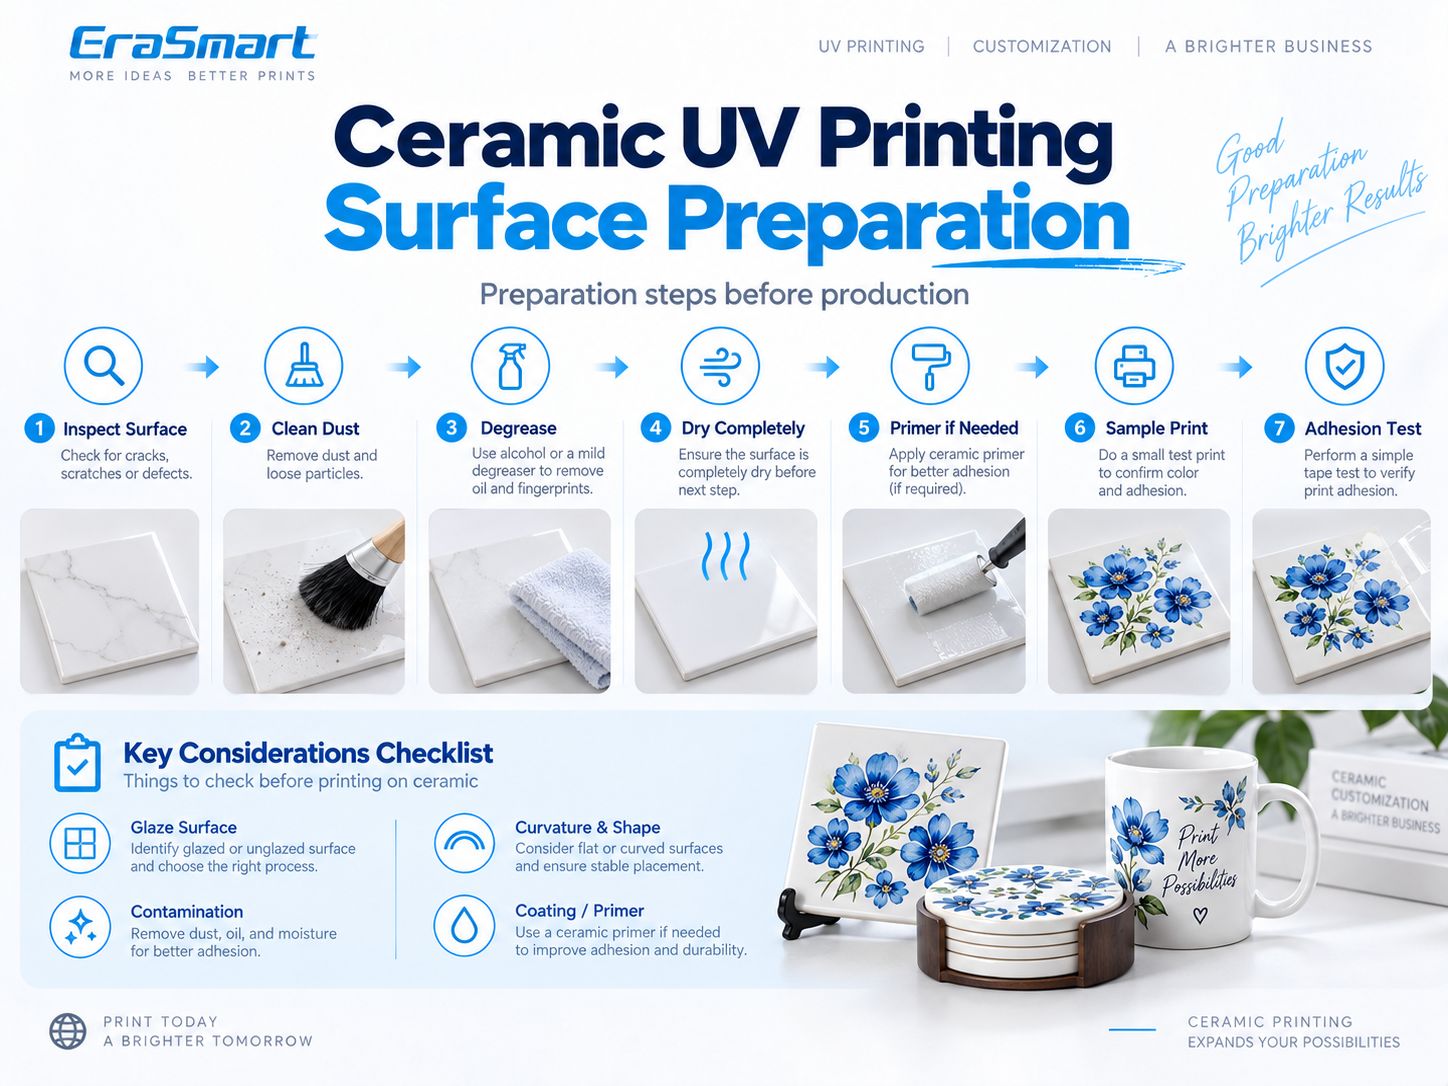
Step 1: Inspect the Surface
Check for:
- cracks
- chips
- scratches
- glaze defects
- dust
- oil
- protective film
- coating differences
- warping
Do not expect printing to hide substrate defects.
Step 2: Remove Dust
Ceramic tiles may collect dust during:
- storage
- cutting
- packaging
- transportation
Use an appropriate lint-free cleaning method.
Step 3: Degrease
Fingerprints, polishing residue and manufacturing contamination can affect adhesion.
Use a compatible cleaning method for the specific ceramic surface.
Step 4: Dry Completely
Do not print on a damp surface.
Residual moisture or cleaning fluid can affect the result.
Step 5: Evaluate Primer or Adhesion Promoter
Some glazed surfaces may benefit from a compatible ceramic or glass-type adhesion promoter.
But primer should not automatically be applied to every ceramic product.
Use this process:
Clean → Print Sample → Test Adhesion → Add Compatible Pretreatment If Needed → Retest
Step 6: Print a Sample
Use the same:
- ceramic blank
- artwork
- white layer
- varnish layer
- RIP configuration
that you intend to use for the full job.
Step 7: Test Adhesion
Do not judge the material only by appearance.
A print can look perfect but still be unsuitable for the intended handling or cleaning conditions.
Do You Need Primer for UV Printing on Ceramic?
Sometimes.
The answer depends on:
- ceramic glaze
- surface coating
- UV ink
- required durability
- end use
- cleaning exposure
- handling frequency
A decorative wall tile has different requirements from a frequently handled coaster.
A smooth glossy glazed tile may require a different process from an unglazed matte plaque.
Therefore:
Do not assume primer is always required.
And:
Do not assume primer is never required.
Test first.
White Ink on Ceramic: When Do You Need It?
White ceramic is already a naturally useful background for CMYK.
Colored ceramic is different.
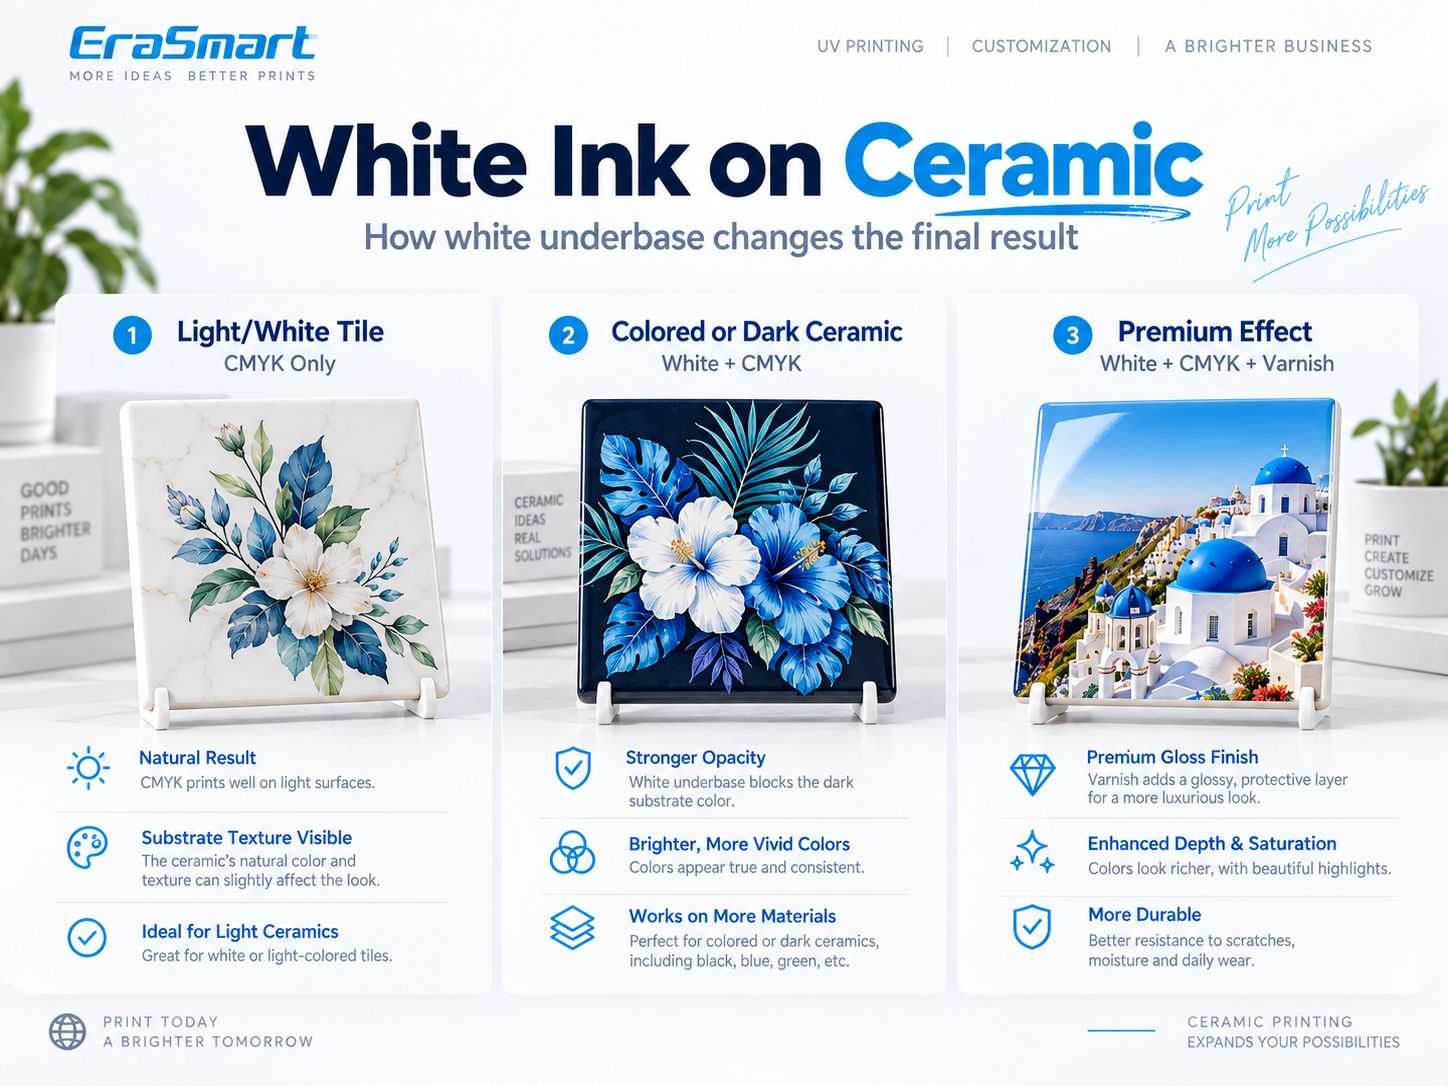
There are three common approaches.
Option 1: CMYK Only on Light or White Ceramic
On white ceramic, CMYK can produce strong color without requiring a complete white underbase.
This is useful for:
- photo tiles
- floral designs
- illustrations
- logos
- decorative plaques
The existing white ceramic surface acts as the visual background.
Option 2: White + CMYK on Colored Ceramic
Dark and colored ceramic can interfere with CMYK.
A white underbase helps produce:
- stronger opacity
- brighter colors
- clearer photographs
- more predictable logos
- readable light-colored text
This is especially important for:
- dark blue tiles
- black ceramic
- colored decorative blanks
Option 3: White + CMYK + Varnish
On compatible EraSmart configurations, varnish can be added selectively.
Possible effects include:
- spot gloss
- raised details
- highlighted logos
- texture
- premium decorative accents
Use varnish as a design element rather than coating every surface automatically.
Varnish should also not be treated as a universal protective coating for heavy-use applications.
How to UV Print on Ceramic Step by Step
Once the ceramic blank and surface treatment have been approved, build a repeatable workflow.
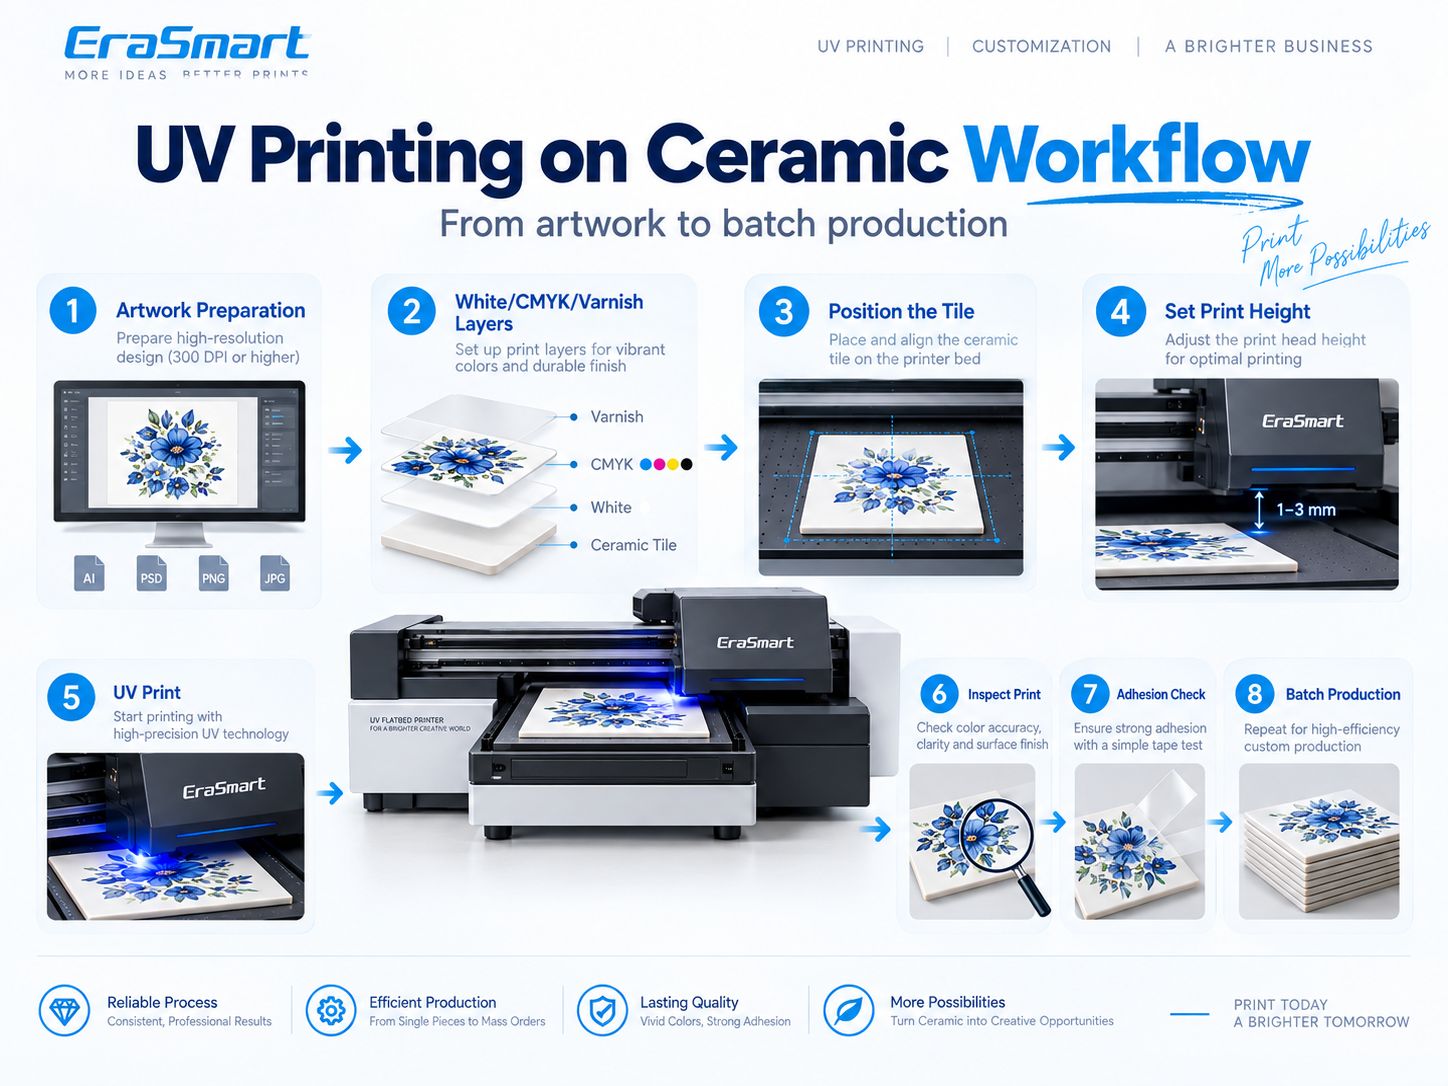
Step 1: Prepare the Artwork
Confirm:
- final dimensions
- image quality
- orientation
- bleed
- safe margins
- text
- logos
- personalization
Use vector artwork where possible for:
- text
- logos
- QR codes
- line graphics
For raster artwork viewed from close range, around 300 DPI at final size is a practical starting point.
Step 2: Prepare White / CMYK / Varnish Layers
Choose between:
- CMYK only
- White + CMYK
- Selective White + CMYK
- White + CMYK + Varnish
according to the product.
Step 3: Position the Ceramic Tile
Place the tile securely on the printer bed.
For repeat production, use:
- jigs
- fixtures
- corner references
- templates
- fixed X/Y coordinates
Step 4: Set the Print Height
Correct printhead clearance helps maintain:
- sharp detail
- consistent jetting
- safer operation
Do not rely on one universal printhead-gap number for every ceramic product.
Follow the printer setup and actual substrate thickness.
Step 5: Print One Sample
Before running a batch, inspect:
- color
- white opacity
- alignment
- varnish
- small text
- surface appearance
Step 6: Inspect the Print
Look for:
- banding
- nozzle defects
- dust
- layer misregistration
- incorrect positioning
- substrate defects
Step 7: Test Adhesion
Check the finished sample according to the actual product use.
Step 8: Standardize the Workflow
Once approved:
- save the RIP preset
- record the ceramic blank
- record the cleaning method
- lock the jig position
- save white / varnish settings
Step 9: Begin Batch Production
Repeat the approved setup and perform periodic QC.
How to Test UV Ink Adhesion on Ceramic
Adhesion testing should match the final product.
Basic Rub Check
Useful for identifying obvious adhesion failure.
Tape-Based Internal Check
A controlled tape test can help compare samples.
If a customer requires a formal recognized standard, follow the exact test method and conditions rather than relying on a simple shop test.
Scratch / Abrasion Evaluation
Important for:
- coasters
- frequently handled tiles
- hospitality products
- gift products
Cleaning Resistance
If the product will be wiped or cleaned regularly, test using realistic cleaning conditions.
Moisture Exposure
Products used in kitchens, bathrooms or hospitality environments may experience humidity or splashing.
Test the complete printed product before making durability claims.
Ceramic Tiles vs Ceramic Mugs
These products should not be treated as the same printing workflow.
Flat Ceramic Tiles
Flat tiles are well suited to UV flatbed printing because they provide:
- flat placement
- repeatable positioning
- easy fixture design
- predictable print height
Typical products:
- photo tiles
- wall art
- signs
- QR tiles
- decorative panels
Ceramic Mugs
Mugs are strongly curved.
A standard flatbed UV printer is not automatically a full 360° mug printer.
For curved ceramic products, evaluate:
- UV DTF
- appropriate rotary UV printing
- sublimation
- another dedicated cylindrical workflow
For many small businesses, UV DTF printing can be a practical option for decorating compatible curved ceramic products.
Direct UV Printing vs UV DTF for Ceramic
| Product | Better Starting Direction |
|---|---|
| Flat ceramic tile | UV Flatbed |
| Photo tile | UV Flatbed |
| Ceramic plaque | UV Flatbed |
| Flat coaster | UV Flatbed |
| Large flat tile | UV Flatbed |
| Mug | UV DTF / rotary / sublimation |
| Curved cup | UV DTF / rotary |
| Irregular ceramic object | Evaluate UV DTF |
The correct workflow depends primarily on geometry.
UV Printing vs Sublimation on Ceramic
Both are useful, but they solve different production problems.
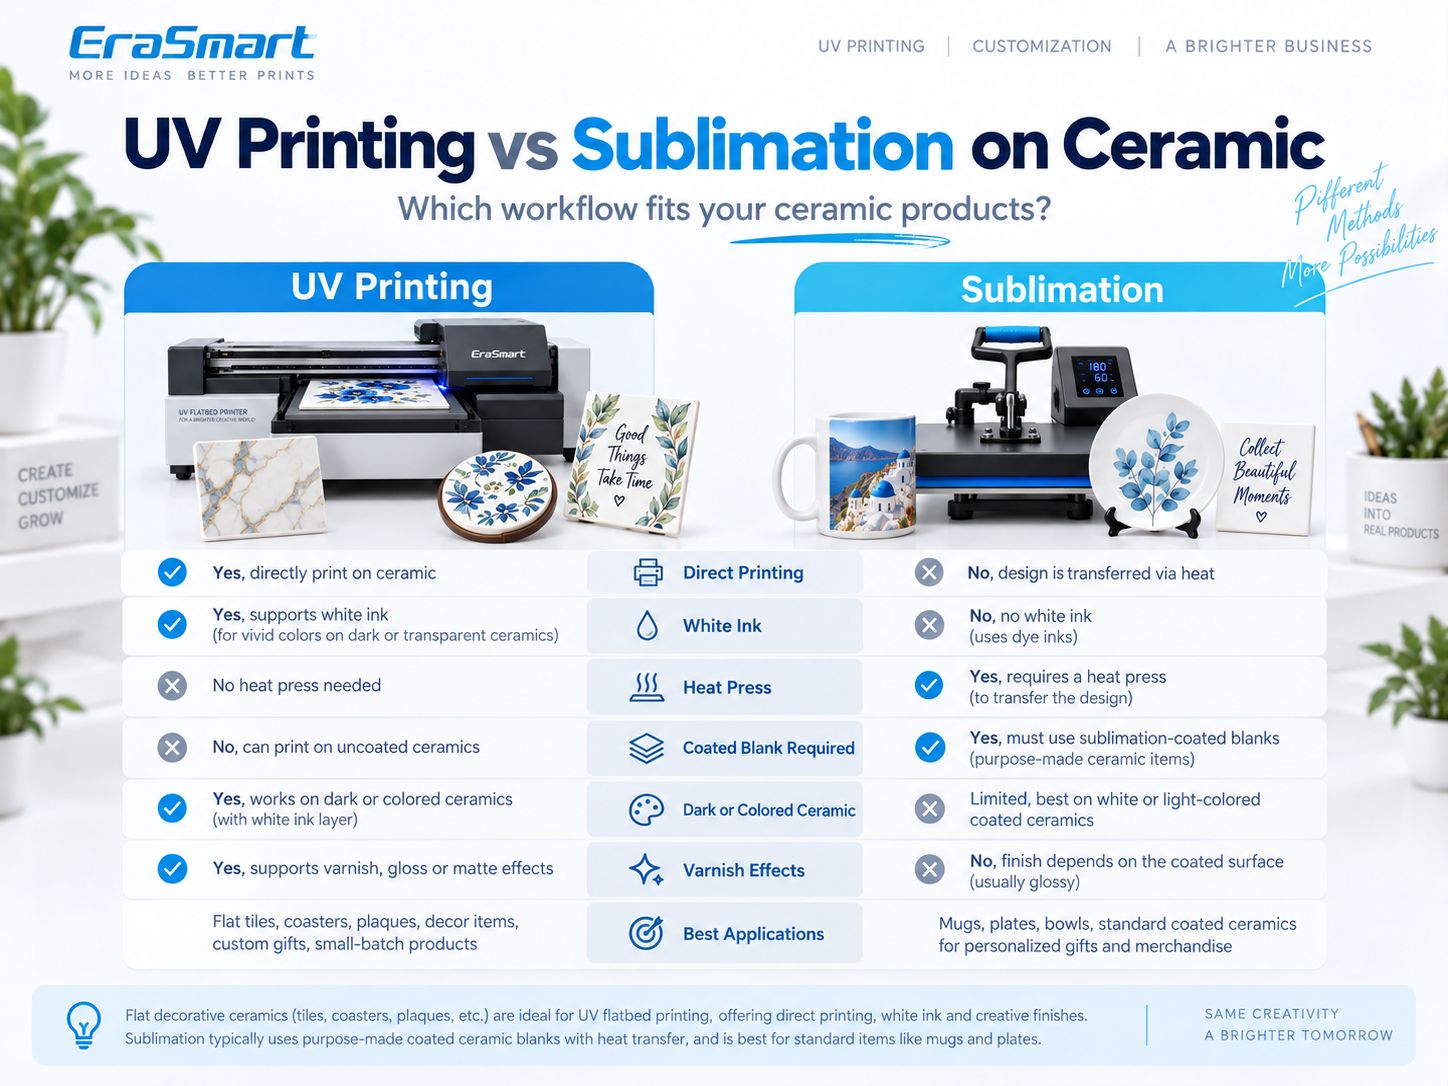
| Feature | UV Printing | Sublimation |
|---|---|---|
| Direct printing | Yes | No |
| Heat press | No | Yes |
| Special sublimation coating | Not inherently required | Required |
| White ink | Yes | No |
| Dark ceramic | White underbase possible | Difficult |
| Varnish | Available on supported systems | No |
| Flat ceramic tiles | Good after testing | Good with coated blanks |
| Standard mugs | Flatbed not ideal | Very common workflow |
| Short-run customization | Excellent | Excellent |
| Main challenge | Adhesion | Coating + heat transfer |
When UV Printing Makes More Sense
Choose UV printing when you need:
- direct printing
- white ink
- colored or dark ceramic
- varnish
- flat tiles
- variable small-batch products
- mixed material production
When Sublimation Makes More Sense
Sublimation remains a strong option for:
- standard coated mugs
- purpose-made sublimation tiles
- polyester-coated ceramic blanks
- established heat-transfer workflows
Neither technology is universally better.
Choose according to the product.
How to Print a Multi-Tile Ceramic Mural
One interesting commercial ceramic application is splitting one large image across multiple tiles.
For example, one artwork can be divided into:
- 2 × 2 tiles
- 3 × 3 tiles
- 4 × 4 tiles
to create a larger installation.
Step 1: Define the Finished Mural Size
Start with the final wall dimensions.
Step 2: Divide the Artwork Into a Grid
Split the design according to the tile size.
Step 3: Keep Tile Orientation Consistent
Label each tile:
- A1
- A2
- B1
- B2
or use another clear grid system.
Step 4: Use Tiles From the Same Batch
Small differences in:
- white tone
- glaze
- dimensions
- surface finish
can become visible when tiles sit next to each other.
Step 5: Use a Repeatable Jig
Keep every tile aligned in the same print position.
Step 6: Check Seam Alignment
Important visual elements should line up correctly from tile to tile.
Step 7: Create an Installation Map
Provide the correct tile sequence when the mural is packed.
This reduces installation errors.
Ceramic Products You Can Print with a UV Printer
Ceramic offers many commercial product opportunities.
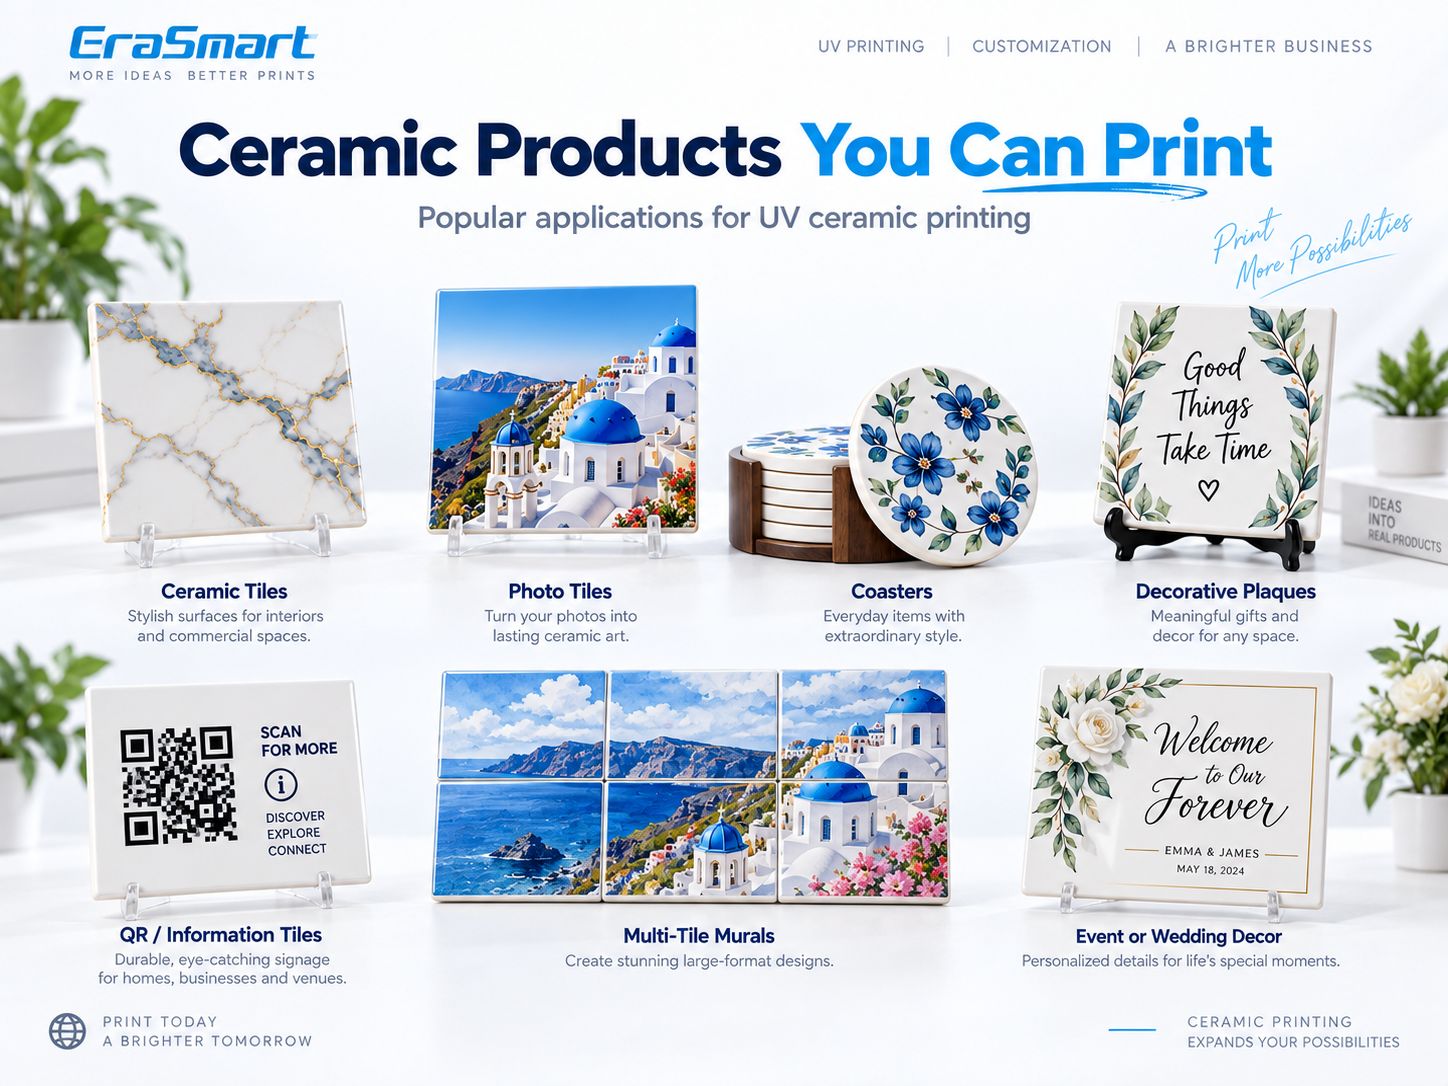
1. Decorative Ceramic Tiles
Applications include:
- kitchen décor
- wall art
- interior design
- hospitality décor
- branded spaces
2. Photo Tiles
Popular for:
- family photography
- weddings
- travel photos
- pet photos
- memorial products
3. Ceramic Coasters
Suitable for:
- gifts
- cafés
- hotels
- wedding favors
- branded merchandise
Because coasters are handled frequently, test abrasion and moisture resistance according to their intended use.
4. Ceramic Plaques
Possible uses:
- decorative signs
- personalized messages
- awards
- home décor
- commemorative products
5. QR Code Tiles
Ceramic QR products can be used for:
- hotel information
- restaurant menus
- reviews
- Wi-Fi
- booking links
- tourism information
Always scan the finished physical QR code before delivery.
6. Multi-Tile Murals
Useful for:
- interior decoration
- restaurants
- hotels
- art installations
- branded spaces
7. Wedding and Event Décor
Examples:
- welcome pieces
- table décor
- commemorative tiles
- custom plaques
- photo products
8. Retail and Hospitality Branding
Ceramic can support:
- logo tiles
- decorative signs
- branded table pieces
- display items
Which EraSmart UV Printer Is Suitable for Ceramic?
The right machine depends on product size and production volume.
EraSmart A3 PRO UV Printer — Dual XP600
The EraSmart Digital Inkjet A3 UV Printer — Dual XP600 is designed for personalized customization and small-batch production.
Key specifications include:
| Specification | A3 PRO |
|---|---|
| Printheads | Dual XP600 |
| Print Area | 350 × 450 mm |
| Print Height | 0–130 mm |
| Resolution | Up to 1440 dpi |
| Ink Configuration | CMYK + WW + VVVVVV |
| White Ink Circulation | Yes |
| Timing Automatic Cleaning | Yes |
| Suction Platform | Yes |
| Height Measurement | Infrared |
| RIP | Riin / EraRip |
Ceramic is officially included among its supported materials.
The A3 PRO is suitable for products such as:
- smaller ceramic tiles
- photo tiles
- plaques
- coasters
- decorative ceramic pieces
EraSmart A2 UV Printer
For larger ceramic pieces or larger batch layouts, the EraSmart A2 UV Printer provides a larger platform.
Key specifications include:
- Dual XP600 printheads
- 420 × 600 mm printing area
- 0–130 mm printing height
- CMYK + WW + VVVVVV
- up to 1440 dpi
- suction platform
- automatic cleaning
- Riin / EraRip
Ceramics are also listed among the supported materials.
The larger area is useful for:
- larger ceramic panels
- decorative tiles
- multiple small tiles in one layout
- mural production
- higher batch efficiency
Choose the printer according to your actual product dimensions.
Why Fixtures Matter for Ceramic Batch Printing
Suppose a customer orders 60 identical photo tiles.
Manually positioning each tile by eye creates unnecessary variation.
A better process is:
- Build a fixed jig.
- Use the same tile size.
- Lock X/Y coordinates.
- Save the RIP preset.
- Print one approved sample.
- Repeat the same setup.
- Check quality at intervals.
Fixtures help improve:
- registration
- speed
- consistency
- waste control
For personalized tiles, the blank position can stay the same while names or images change digitally.
Common Problems When UV Printing on Ceramic
Ink Scratches Off the Glaze
Possible causes include:
- fingerprints
- oil
- incompatible glaze
- inadequate cleaning
- insufficient adhesion
- unsuitable pretreatment
Focus on the substrate first.
Color Looks Weak on Dark Ceramic
Use a white underbase where stronger opacity is needed.
Small Text Looks Blurry
Check:
- artwork
- printhead clearance
- surface texture
- tile flatness
- nozzle condition
Vector text is preferable.
White Ink Looks Uneven
Check:
- white ink circulation
- nozzle status
- RIP white settings
- maintenance condition
Varnish Looks Uneven
Check:
- varnish mask
- substrate flatness
- printhead condition
- RIP layer configuration
Tile Position Changes Between Prints
Use:
- jig
- template
- fixed corner stops
- saved coordinates
instead of manual placement.
Tile Surface Color Varies Between Batches
Ceramic blanks from different production batches may have small differences.
For mural or high-end orders, try to use blanks from the same batch.
Safety and Application Limits
UV printing a ceramic object does not automatically make it suitable for every end use.
Food Contact
Do not assume standard UV ink is approved for direct food-contact surfaces.
Avoid making food-safety claims unless the complete ink/substrate/product system has been tested and certified for the intended use.
Drinking Rims
For cups or mugs, do not place standard decorative UV ink in direct mouth-contact areas unless the system is specifically qualified for that application.
Dishwasher Resistance
Do not automatically claim:
dishwasher safe
unless the complete printed product has passed appropriate testing.
Flooring
A printed tile being visually attractive does not automatically make it suitable for high-traffic flooring.
Floor tiles may require specific:
- abrasion resistance
- slip resistance
- wear testing
- coating systems
Outdoor Use
Outdoor performance depends on:
- ceramic
- ink
- surface preparation
- primer
- exposure
- moisture
- cleaning
Test the finished product before making outdoor lifetime claims.
How to Choose a UV Printer for Ceramic
Before buying a printer, answer these questions.
What Ceramic Products Will You Sell?
Tiles?
Photo plaques?
Coasters?
Mugs?
The shape determines the workflow.
What Is the Largest Flat Product?
This determines the required print bed.
Is the Ceramic Glazed?
If yes, adhesion testing becomes especially important.
Is the Ceramic Dark or Colored?
If yes, white ink may be necessary.
Do You Need Varnish?
Varnish is useful for premium effects but is not necessary for every product.
Is the Product Flat or Curved?
Flat products fit UV flatbed printing naturally.
Curved mugs may require:
- UV DTF
- rotary UV printing
- sublimation
How Many Pieces Will You Produce?
For repeat orders, consider:
- fixtures
- saved RIP presets
- standardized blanks
- batch QC
Final Answer: Is UV Printing Good for Ceramic?
Yes.
UV printing is a practical digital customization method for many suitable ceramic products, especially:
- flat tiles
- photo tiles
- plaques
- coasters
- QR tiles
- decorative panels
- event pieces
But ceramic should not be treated as one uniform material.
The main production variables are:
surface glaze + cleanliness + adhesion + curvature + white ink strategy
Use:
- CMYK only on white or light ceramic when sufficient
- White + CMYK for dark or colored ceramic
- Varnish for selected decorative effects
- UV flatbed printing for flat tiles and plaques
- UV DTF / rotary / sublimation when the product is strongly curved
The most reliable workflow is:
Inspect → Clean → Test → Print Sample → Check Adhesion → Approve → Standardize → Batch Produce
For flat ceramic products, explore the EraSmart UV Printer range.
For curved ceramic products, evaluate whether an EraSmart UV DTF Printer is a better fit.
FAQ
Can a UV printer print directly on ceramic?
Yes. UV flatbed printers can print directly onto many suitable ceramic tiles, plaques and decorative pieces after material testing.
Can you UV print glazed ceramic?
Yes, but glazed ceramic is smooth and non-porous, so cleaning and adhesion testing are particularly important.
Can you UV print unglazed ceramic?
Yes. Unglazed ceramic can be printed, but surface texture and porosity can affect detail and consistency.
Do you need primer for UV printing ceramic?
Not always. Primer depends on the glaze, coating, ink and required adhesion. Test the exact blank first.
Do I need white ink on ceramic?
Not always.
White ceramic may not need a full white underbase.
Dark or colored ceramic often benefits from white under CMYK.
Can you print photos on ceramic tiles?
Yes. Ceramic photo tiles are a suitable UV flatbed application when the surface and adhesion have been tested.
Can UV printers print ceramic mugs?
A standard flatbed is best suited to flat surfaces. Curved mugs usually require an appropriate rotary workflow, UV DTF or another suitable printing method.
Is UV printing better than sublimation for ceramic?
Neither is universally better. UV printing offers direct printing, white ink and varnish, while sublimation is very well suited to standard coated mugs and tiles.
Can UV-printed ceramic go in a dishwasher?
Do not assume so. Dishwasher resistance depends on the ceramic, coating, ink, adhesion and complete finished-product testing.
Can UV-printed ceramic be used for food contact?
Do not assume standard decorative UV ink is suitable for direct food-contact surfaces unless the finished product system is specifically tested and certified.
Can I print QR codes on ceramic tiles?
Yes. Use high-contrast artwork and physically scan the finished tile before delivery.
Which EraSmart UV printer is suitable for ceramic tiles?
The EraSmart A3 PRO Dual XP600 provides a 350 × 450 mm working area, while the EraSmart A2 UV Printer provides a larger 420 × 600 mm platform.
Build a Reliable Ceramic Printing Workflow
If you are evaluating a UV printer for ceramic products, tell EraSmart:
- ceramic type
- product dimensions
- glazed / unglazed / matte surface
- product color
- whether white ink is required
- whether varnish is required
- flat or curved shape
- expected monthly volume
- intended use
Our team can help you compare the right EraSmart UV Printer or UV DTF Printer workflow for your actual products.
MAY BE YOU LIKE ALSO

Copyright 2020 © EraSmart. | Sitemap