작은 크기의 플랫 베드 잉크젯 프린터 제조업체

White Ink Printing Guide: How to Print White on Dark, Colored & Transparent Materials
White ink is one of the most important differences between ordinary CMYK printing and professional DTF, UV and UV DTF printing.
A standard CMYK printer normally assumes that the printing surface is already white.
If your artwork contains a white logo, standard CMYK printing usually does not create white ink. It simply leaves that area unprinted.
That works on white paper.
It does not work the same way on:
- black acrylic
- dark plastic
- 스테인레스 스틸
- 컬러 세라믹
- transparent glass
- clear acrylic
- 어두운 옷
Professional white ink printing solves this by adding a dedicated white ink channel that can be controlled separately from CMYK.
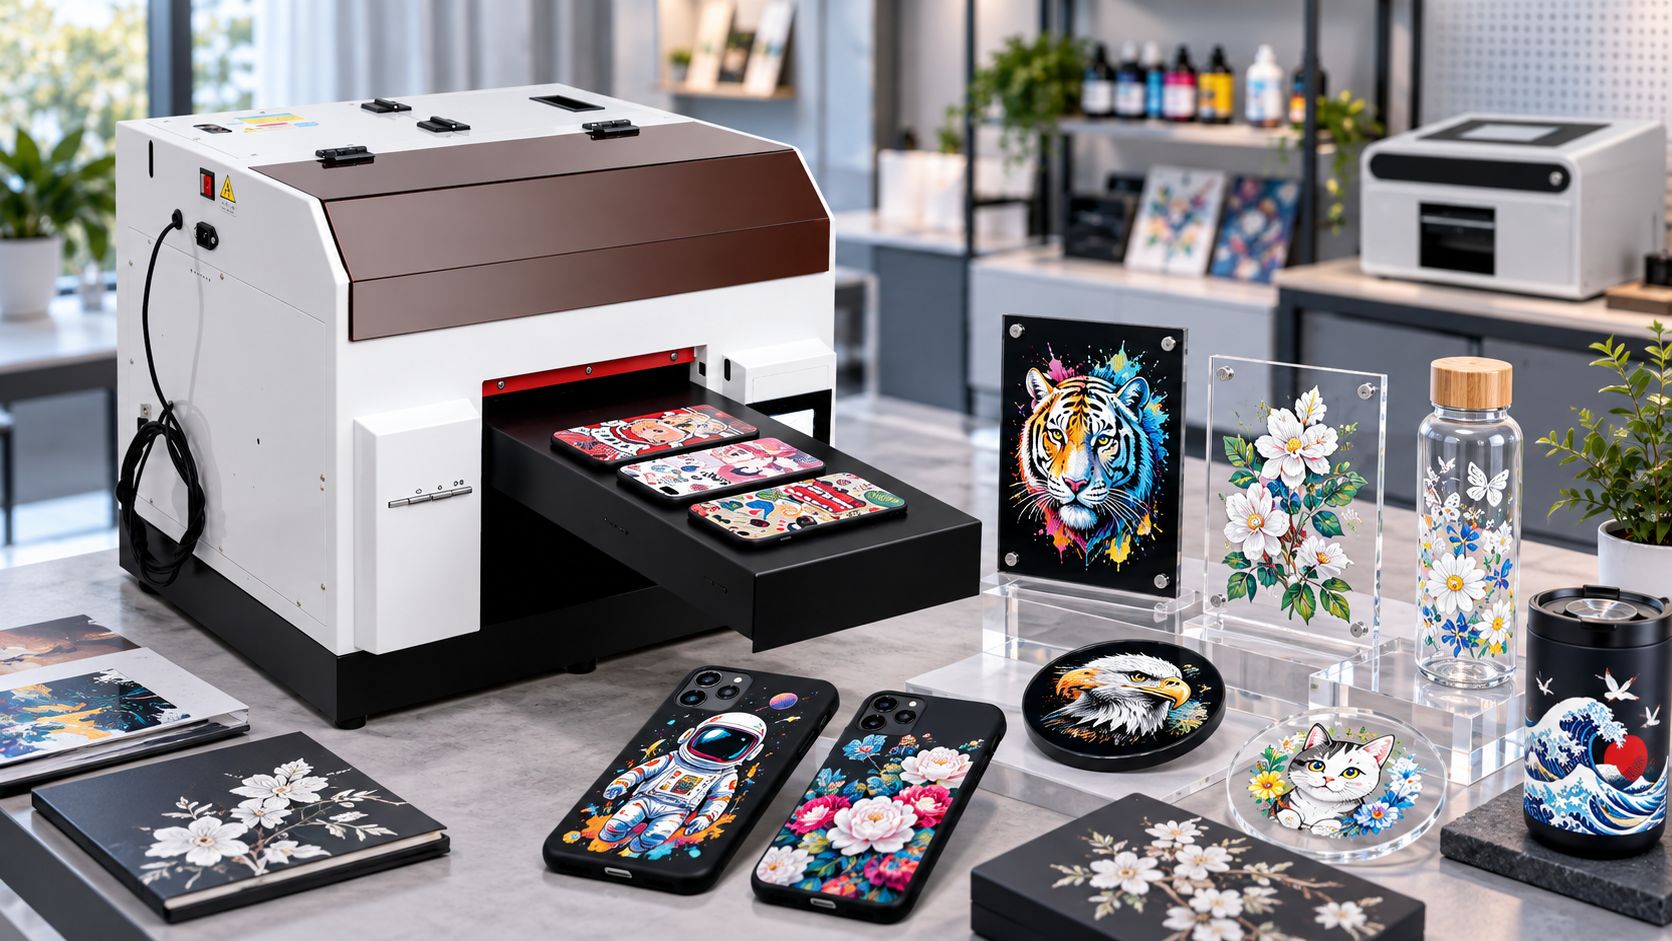
Depending on the workflow, white ink can be used as:
- an underbase beneath CMYK
- a backing layer behind transparent prints
- a standalone white graphic
- a selective white layer
- part of a multi-layer raised structure
The most important rule is:
White on the computer screen is not the same thing as a white ink channel in the printer.
This guide explains how white ink works, when you need it, how to prepare white layers, how it differs across UV, DTF and UV DTF printing, and how to troubleshoot common white ink problems.
Quick Answer: How Do You Print White Ink?
To physically print white, you need:
- A printer designed with a white ink system.
- Compatible white ink.
- RIP software that can control the white channel.
- Artwork or a white mask that tells the printer where white ink is required.
- Correct layer order.
- A maintained white ink circulation and printhead system.
For dark rigid products, a common layer concept is:
Material → White Ink → CMYK
For transparent reverse printing, the layer structure may instead be:
Viewer → Transparent Material → CMYK → White Backing
The exact order depends on:
- product
- viewing direction
- 삽화
- RIP 설정
- 프린터 구성
Why Can’t Most CMYK Printers Print White?
Traditional CMYK printing is built around four process colors:
- 청록색
- 마젠타
- 노란색
- 검은색
These colors are combined to reproduce photographs, illustrations, logos and gradients.
But there is normally no white channel.
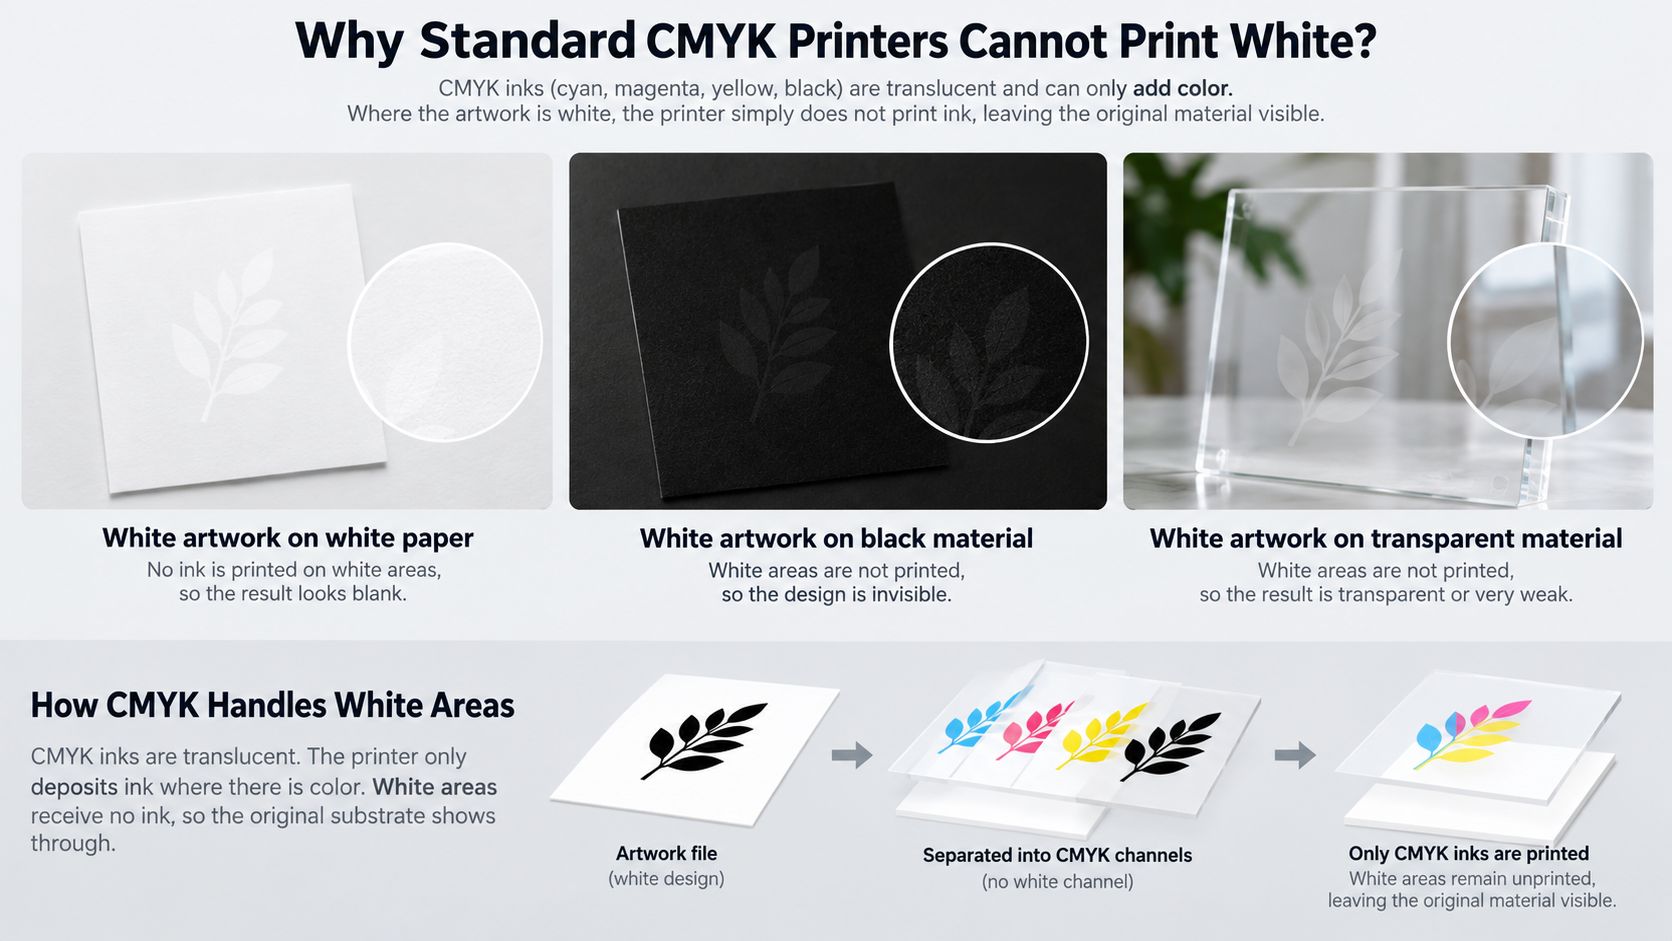
White on White Paper
If a design contains white areas, the printer typically deposits no CMYK ink there.
The white paper itself provides the white.
White on Black Material
The same logic fails.
If the printer deposits no ink, the black substrate remains visible.
The printer does not automatically replace that empty area with white.
White on Transparent Material
On clear acrylic or glass, an unprinted white area simply remains transparent.
This is why dedicated white ink is required when you want real white graphics or an opaque background.
Important: RGB White Is Not White Ink
On a computer, white may be represented as:
RGB: 255 / 255 / 255
or in CMYK artwork as:
C0 M0 Y0 K0
But this normally means:
No process-color ink.
It does not automatically mean:
Print white ink.
The printer needs a dedicated white channel controlled through the RIP software.
That distinction is critical when preparing artwork for professional white ink printing.
What Makes White Ink Different?
White ink must block the color of the material underneath it.
That means it requires a highly opaque pigment system.
This makes white ink different from normal CMYK inks, which are designed to combine visually and create process color.
The higher pigment loading of white ink also means it requires more careful management.
Common considerations include:
- 안료 침전
- 순환
- agitation depending on printer design
- 노즐 상태
- capping
- 청소
- idle-time maintenance
For a broader explanation of UV ink chemistry and curing, read:
The 5 Main Ways White Ink Is Used
White ink is not only used for one purpose.
1. White Underbase
A white underbase is printed underneath CMYK.
Typical structure:
Dark Material → White → CMYK
This helps isolate the color image from the substrate.
다음과 같은 경우에 유용합니다.
- black acrylic
- 어두운 휴대폰 케이스
- 컬러 플라스틱
- 어두운 금속
- 컬러 세라믹
- dark promotional products
2. White Backing
White can be printed behind color when working with transparent materials.
This is common in:
- clear acrylic
- 유리
- transparent plastic
White backing prevents CMYK from appearing too transparent.
3. Standalone White Graphics
White does not always need CMYK.
예는 다음과 같습니다:
- white logo on black acrylic
- white text on dark metal
- white pattern on a black phone case
- minimalist white graphics on colored products
4. Selective White
You can print white only in selected areas.
For example, on clear acrylic:
- 로고 뒤의 흰색
- white behind text
- no white behind transparent decorative sections
이는 다음의 조합을 생성합니다:
opacity + transparency
in the same design.
5. Multiple White Ink Layers
On supported workflows, repeated white layers can also be used to build additional physical thickness.
This is different from simply increasing white opacity.
For EraSmart’s dedicated raised-logo workflow, see:
UV DTF 인쇄에서 흰색 잉크 레이어가 3D 입체 효과를 생성하는 방법
How a White Ink Underbase Works on Dark Materials
Dark substrates can absorb the visual impact of CMYK because process-color inks are not intended to completely hide a dark background.
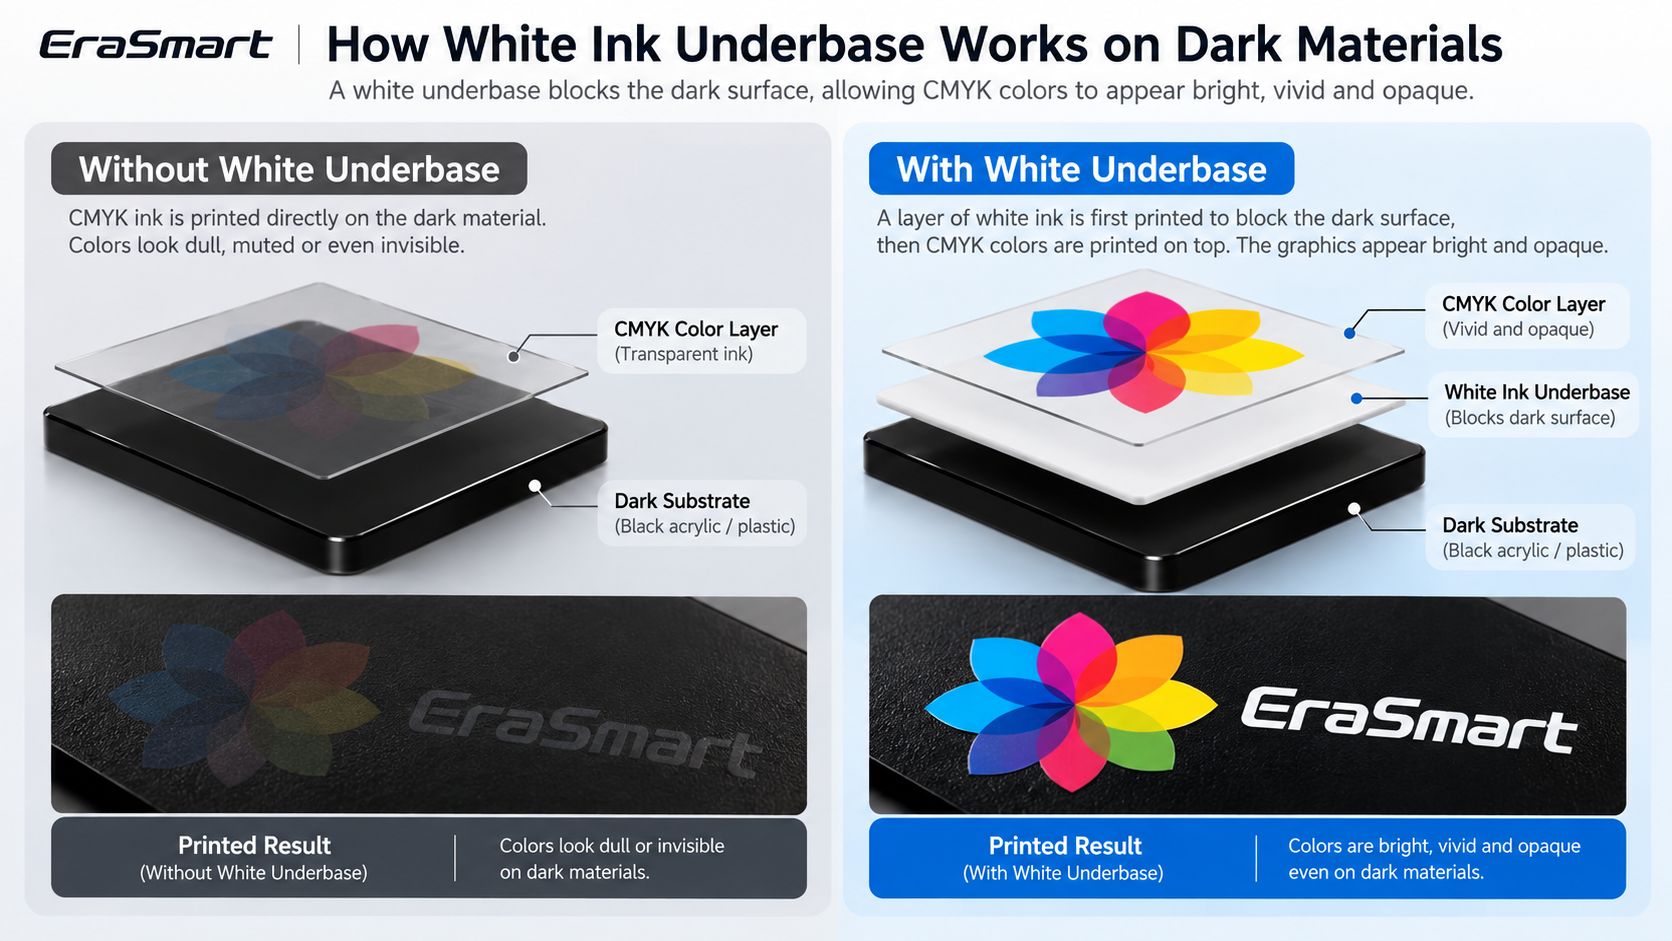
Without White Underbase
Structure:
Dark Material → CMYK
가능한 결과:
- 흐릿한 색상
- weak yellow
- weak cyan
- low contrast
- artwork influenced by substrate color
With White Underbase
Structure:
Dark Material → White → CMYK
가능한 결과:
- 더 강한 불투명도
- 더 밝은 CMYK
- improved contrast
- 보다 예측 가능한 브랜드 색상
The white layer acts like a printable white canvas.
White Ink Density: More Is Not Always Better
It can be tempting to assume:
More white ink = better print.
That is not always true.
Excessive white ink can increase:
- 잉크 소비
- 인쇄 시간
- 층 두께
- curing demand
and may affect the finished appearance.
The correct white density depends on:
- substrate color
- 재료
- 삽화
- 인쇄기
- 인쇄 모드
- desired opacity
Use the RIP settings validated for your actual workflow rather than applying one universal white percentage.
How to Print White Ink on Dark Materials
A practical UV printing workflow is:
1단계: 작품 준비
식별하다:
- CMYK areas
- white areas
- 투명한 영역
- varnish areas if required
Step 2: Create the White Layer
The RIP needs a defined white mask.
Depending on the software, this may be generated from:
- artwork objects
- spot color
- image transparency
- automatic white generation
Step 3: Choose the Layer Order
For a dark opaque product, a typical structure is:
Material → White → CMYK
Step 4: Check White Ink Output
Before production, run:
- 노즐 점검
- white-channel check
- registration check
Step 5: Print a Sample
검사:
- 불투명
- 색상 밝기
- edge registration
- 작은 텍스트
- white uniformity
Step 6: Save the Successful Preset
Once the result is approved, record the RIP setup for repeat jobs.
Printing White Ink on Transparent Materials
Transparent materials create additional possibilities because the design can be viewed through the substrate.
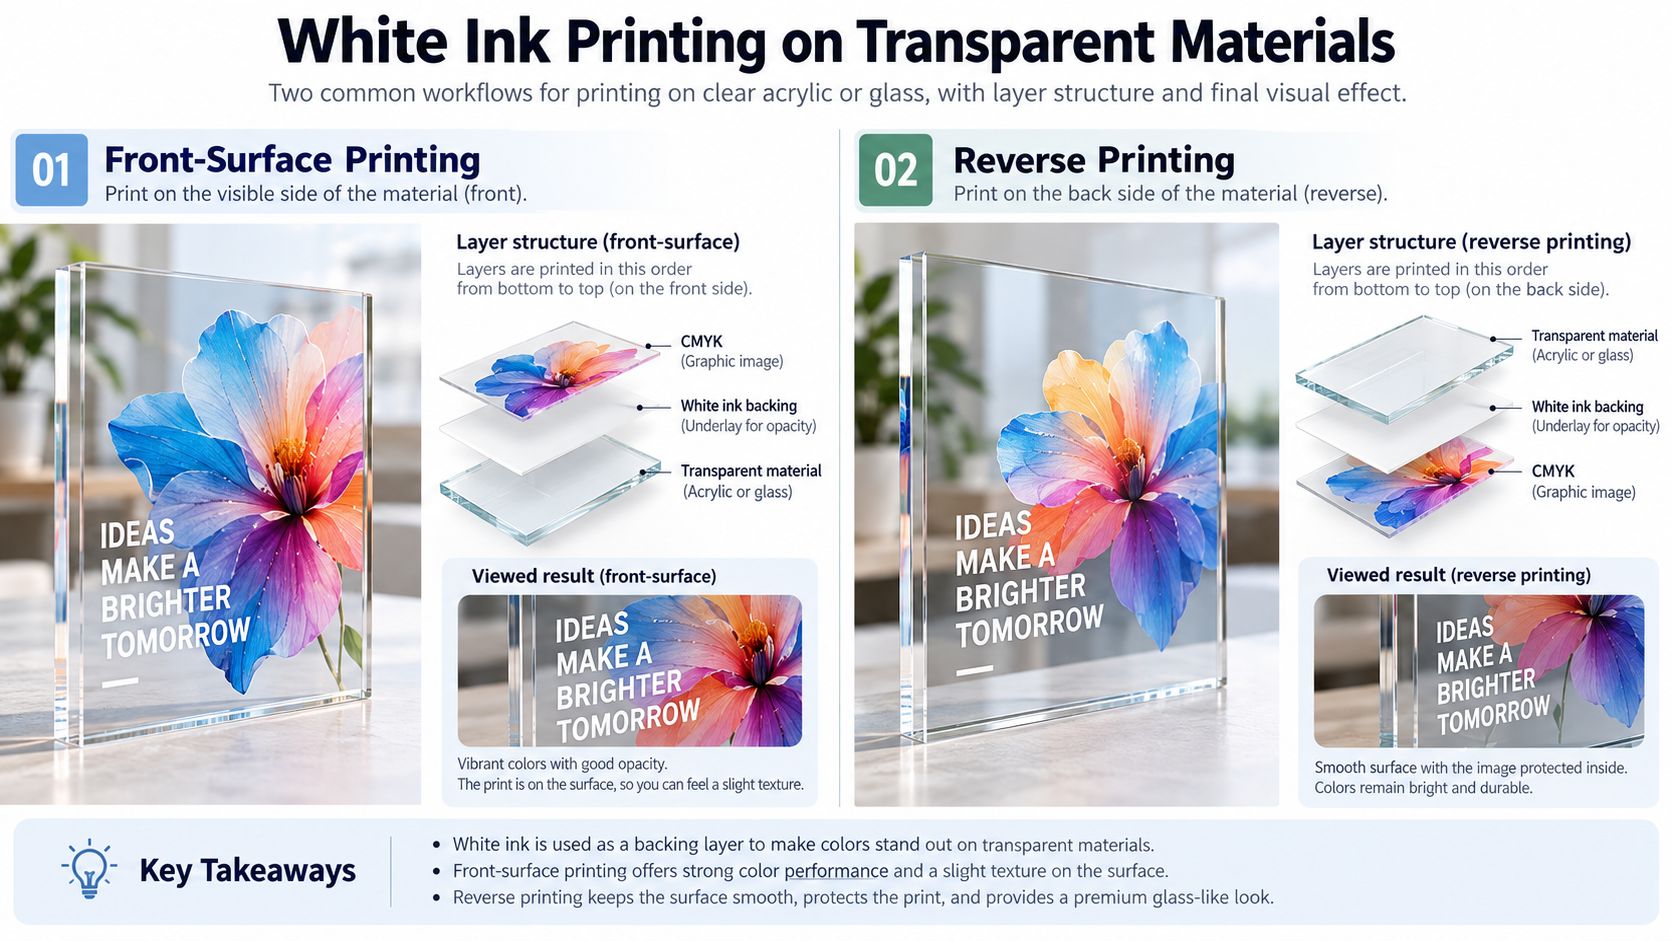
There are two major approaches.
전면 인쇄
작품은 보는 사람을 바라보는 면에 인쇄됩니다.
A common opaque-color structure is:
Transparent Material → White → CMYK
depending on viewing direction and printer layer configuration.
This is useful when you want:
- direct surface graphics
- tactile varnish
- front-facing texture
역방향 / 2면 인쇄
The artwork is printed on the back of the transparent material and viewed through the front.
일반적으로 아트웍은 미러링되어야 합니다.
A typical visual concept is:
Viewer → Clear Material → CMYK → White
The white layer sits behind the color.
이로 인해 다음이 생성될 수 있습니다.
- smooth front surface
- premium glass-like appearance
- protected-looking graphics
- strong color viewed through the substrate
For a detailed glass workflow, see:
For acrylic applications, see:
Selective White on Clear Acrylic and Glass
You do not need to cover the entire design with white.
Suppose your artwork contains:
- colorful flower
- 회사 로고
- transparent decorative background
You might use:
White behind flower + logo
while leaving:
background without white
This keeps selected parts transparent.
The result can look more premium than applying a solid white rectangle behind the entire artwork.
White Ink Printing on Metal
Metal is another interesting case because sometimes you want to hide the metallic appearance—and sometimes you want to preserve it.
Use White Underbase
Choose white when you want:
- 더 강한 색상
- opaque logo
- more predictable branding
- reduced metallic influence
Do Not Use White Underbase
CMYK directly over suitable metal can intentionally preserve some of the metallic appearance.
This can create a different visual effect.
There is no single correct method.
For surface preparation and adhesion, see:
White Ink Printing on Wood
Wood provides another example where white ink is a design decision rather than an automatic requirement.
CMYK만
Lets the natural:
- 곡물
- 색상
- 조직
show through the artwork.
흰색 + CMYK
Creates:
- 더 강한 불투명도
- brighter color
- more predictable image reproduction
선택적 흰색
Combines:
- visible natural wood
- high-opacity design areas
See:
White Ink Printing on Plastic
Plastic varies significantly by type.
For dark plastic:
흰색 + CMYK
is often useful for strong color.
For transparent plastic:
선택적 흰색
can help control opacity.
But successful printing also depends on:
- 폴리머 유형
- 코팅
- 표면 에너지
- 청소
- 부착
See:
White Ink Printing on Ceramic
White ceramic often already provides a useful neutral base.
Therefore, a full white underbase may not always be necessary.
에:
- 블랙 세라믹
- blue ceramic
- colored tiles
- dark plaques
white becomes much more useful.
For the complete ceramic workflow, see:
UV vs DTF vs UV DTF White Ink
EraSmart uses white ink across several different printing technologies.
But these are different ink systems.
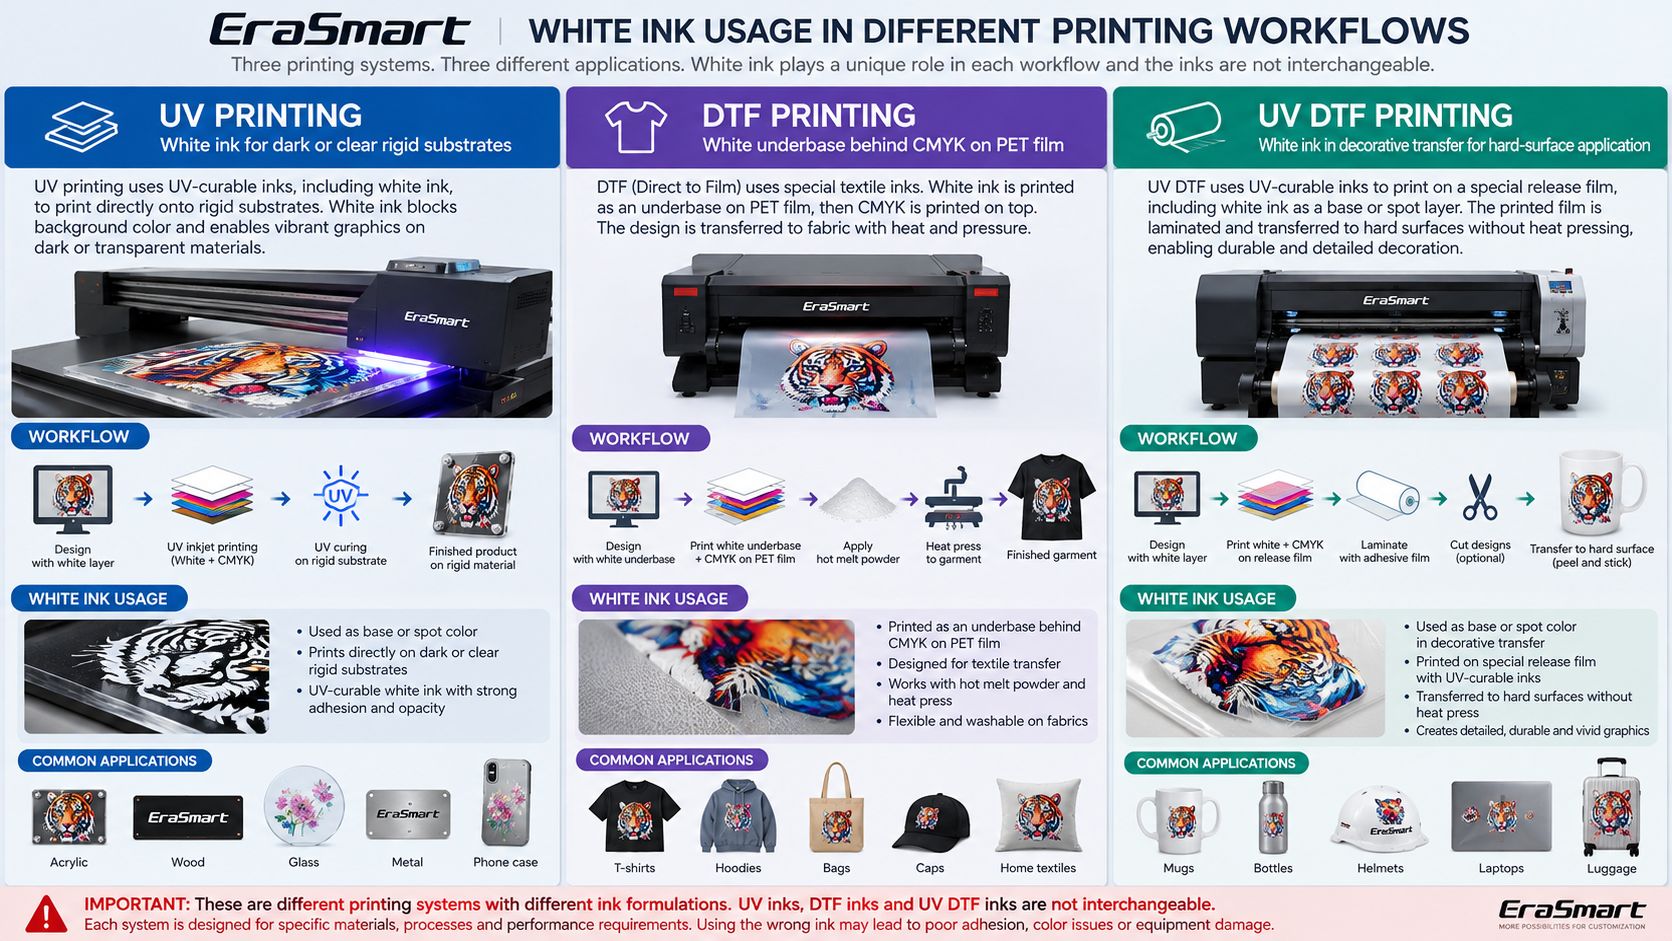
UV Printing White Ink
Main purpose:
- dark rigid products
- transparent products
- colored substrates
- standalone white graphics
- 흰색 밑받침
일반적인 제품은 다음과 같습니다.
- 아크릴
- 유리
- 금속
- 목재
- 플라스틱
- 세라믹
- 전화 케이스
탐구하다:
DTF Printing White Ink
In textile DTF, white ink is typically part of the transfer structure.
단순화된 프로세스는 다음과 같습니다.
PET Film → CMYK → White → Adhesive Powder → Cure → Garment
After transfer, white acts as the base behind the color, especially on:
- 검정색 티셔츠
- 어두운 후드
- colored garments
This helps CMYK remain visible and vibrant.
탐구하다:
UV DTF White Ink
UV DTF uses UV-curable ink printed onto a special transfer film system.
White ink helps provide:
- 불투명
- 역행
- visibility on dark objects
- color stability
일반적인 제품은 다음과 같습니다.
- 병
- 텀블러
- 항아리
- 유리
- hard-surface promotional products
For the complete workflow, see:
탐구하다:
Can You Use the Same White Ink in UV, DTF and UV DTF Printers?
아니요.
Do not treat all products labeled “white ink” as interchangeable.
These workflows use different ink chemistry and printing systems.
| 작업 흐름 | Main Ink Type | 주요 응용 프로그램 |
|---|---|---|
| UV 인쇄 | UV 경화형 잉크 | Direct hard-surface printing |
| DTF 인쇄 | 섬유 DTF 잉크 | Garment transfer |
| UV DTF | UV-curable transfer system | 단단한 표면 데칼 |
Always use ink designed and approved for the specific printer system.
잘못된 잉크를 사용하면 다음과 같은 문제가 발생할 수 있습니다.
- poor output
- 접착 문제
- curing problems
- 노즐 문제
- ink-system damage
How White Ink Affects Color Accuracy
White ink is also part of color management.
On a dark product, weak white coverage can make CMYK appear:
- dull
- dirty
- 어두운
- inconsistent
If white coverage changes between jobs, the same CMYK artwork may look different.
This is why color accuracy is not controlled by CMYK alone.
The complete result can depend on:
Artwork + RIP + CMYK + White Ink + Material + Printhead + Curing + Environment
For more detail, read:
Common White Ink Printing Problems
White ink needs more maintenance than many operators initially expect.
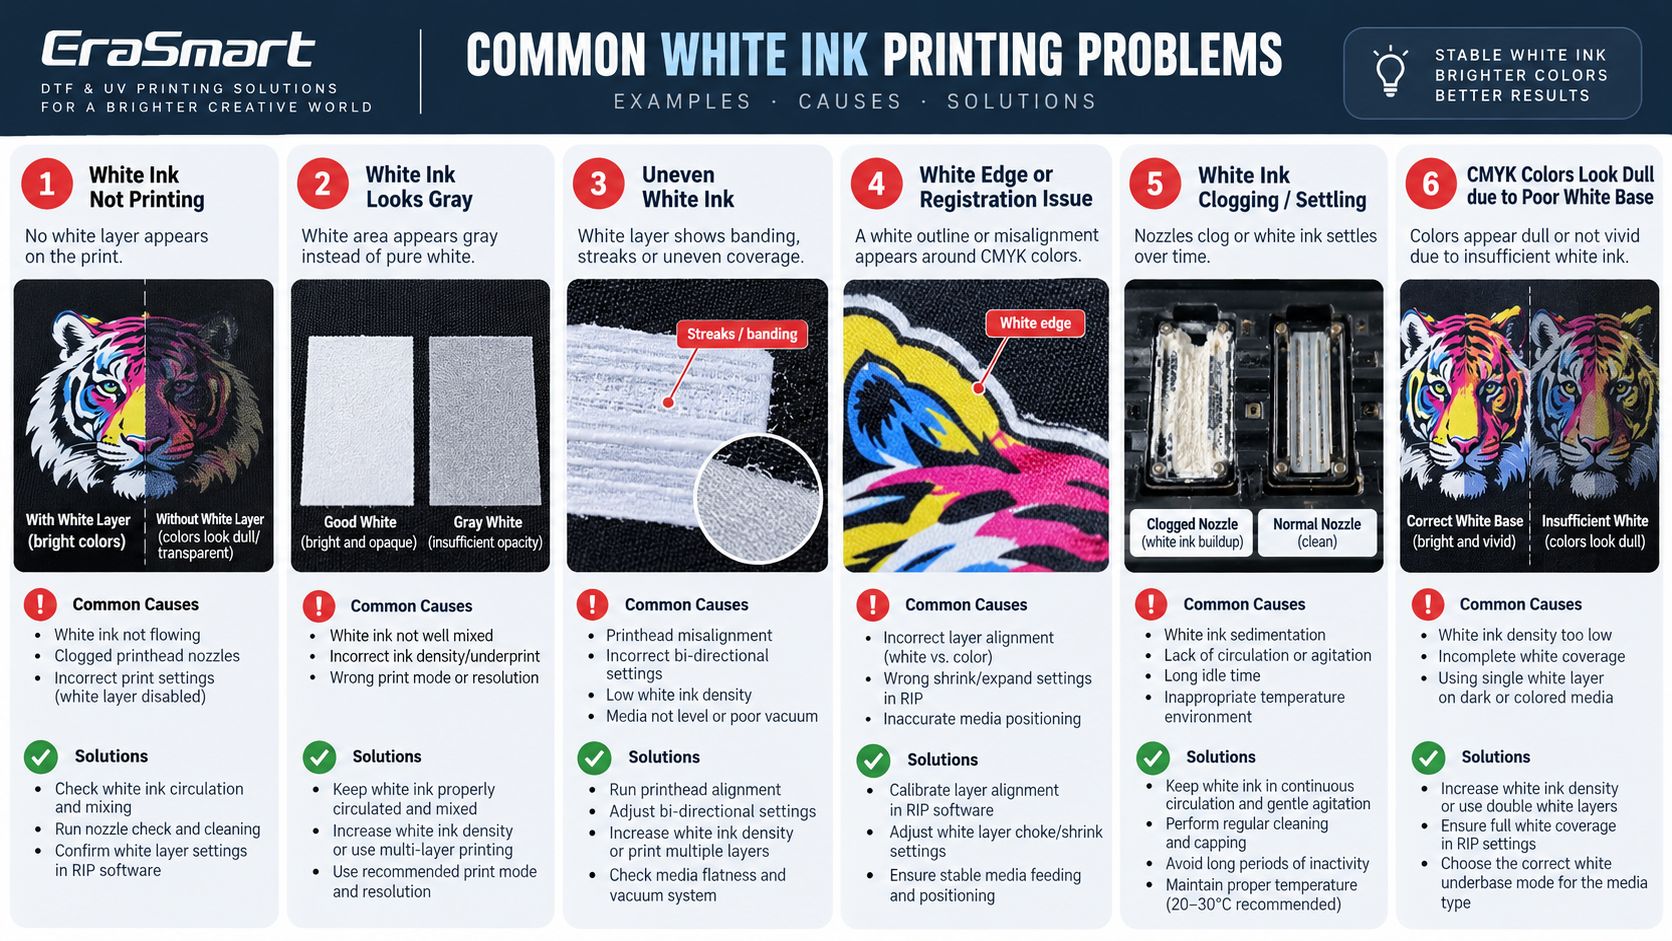
Problem 1: White Ink Does Not Print
가능한 원인은 다음과 같습니다.
- 누락된 노즐
- 막힌 노즐
- incorrect RIP white settings
- white channel disabled
- ink-flow problem
- maintenance issue
확인해야 할 사항
- 노즐 점검을 실행하십시오.
- Confirm white layer in RIP.
- 흰색 잉크 순환을 확인하십시오.
- Inspect the maintenance system.
- Follow the printer’s cleaning procedure.
Problem 2: White Ink Looks Gray
가능한 원인은 다음과 같습니다.
- insufficient opacity
- weak white coverage
- nozzle loss
- pigment instability
- incorrect print mode
Do not immediately increase white density to the maximum.
First check nozzle condition and ink-system stability.
Problem 3: White Ink Is Uneven
Symptoms may include:
- streaks
- 밴딩
- inconsistent density
가능한 원인:
- 누락된 노즐
- white ink settling
- circulation problem
- printhead alignment
- RIP 설정
Problem 4: White Border Around CMYK
Sometimes a visible white outline appears around the colored artwork.
This can result from:
- layer-registration error
- white mask too large
- RIP spread / choke settings
- positioning error
Professional RIP software may provide controls for slightly reducing or expanding the white mask.
The correct amount should be validated with a physical sample.
Do not use one universal choke value for every printer and artwork.
Problem 5: White Ink Settles or Clogs
White pigment is heavier than process-color pigment.
Over time, settling can contribute to:
- reduced opacity
- 노즐 문제
- inconsistent output
This is why many professional systems use features such as:
- 흰색 잉크 순환
- agitation
- 자동 청소
- scheduled maintenance
depending on printer configuration.
Problem 6: CMYK Still Looks Dull
If a dark product still looks dull after using white ink, check:
- 흰색 불투명도
- 화이트 커버리지
- 노즐 상태
- 삽화
- RIP 프로필
- CMYK output
- 재료 표면
The problem may not be CMYK itself.
Why White Ink Needs More Maintenance
White pigment systems naturally require more attention.
A white ink printer may include circulation to help keep pigment suspended.
But circulation does not mean:
maintenance is no longer necessary.
You still need to monitor:
- 노즐 상태
- 순환
- capping
- 와이퍼
- ink level
- idle time
- environment
Follow the maintenance instructions for your specific EraSmart printer.
Daily White Ink Checks
A practical routine can include:
- inspect white ink condition
- confirm circulation if equipped
- run nozzle check
- inspect white output
- keep the capping area clean
- verify white layer before important jobs
The exact maintenance routine depends on the printer model.
Do not apply one universal cleaning schedule to every printer.
White Ink After Long Idle Periods
White ink systems should not simply be left unused for long periods without following the printer’s idle procedure.
If the machine will not be used for an extended period:
- follow the model-specific shutdown procedure
- maintain the capping system
- follow ink-system instructions
- avoid improvised flushing procedures
Incorrect long-term storage can create more problems than normal daily printing.
When Do You Need White Ink?
The answer depends on both the material and the design.
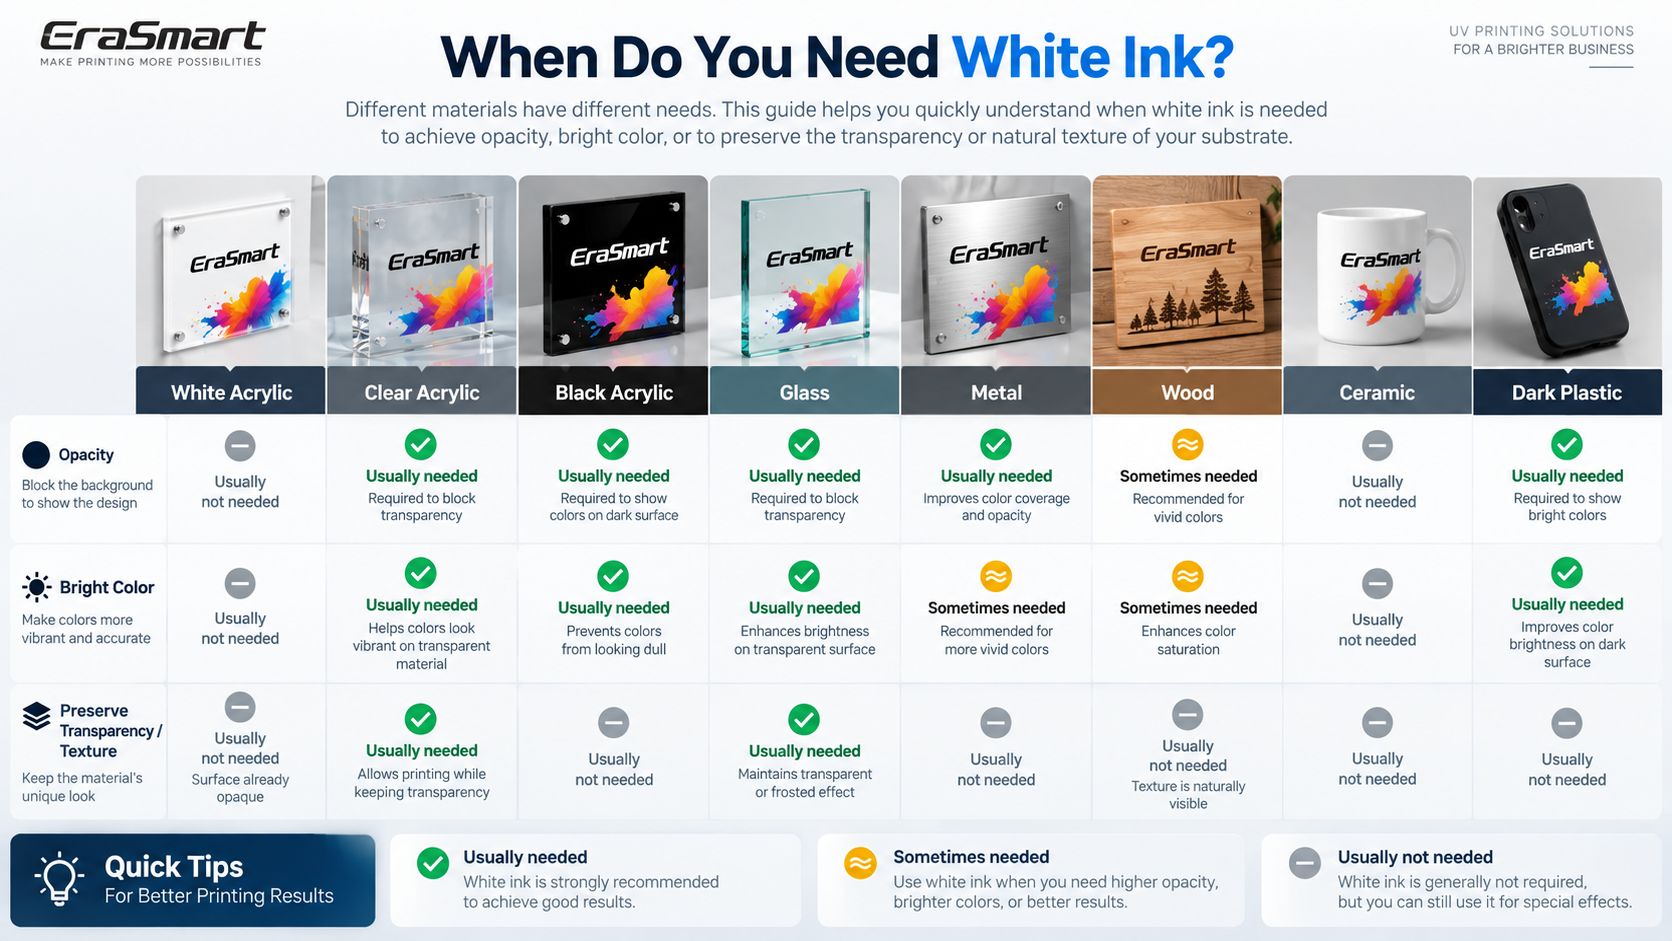
| 재료 | White Ink Recommendation | 왜 |
|---|---|---|
| 흰색 아크릴 | 일반적으로 선택 사항 | Surface already provides white background |
| 투명 아크릴 | Often useful | Controls opacity |
| Black acrylic | Usually required for vivid CMYK | Blocks dark substrate |
| Clear glass | Often useful | Creates white backing and opacity |
| 금속 | Depends on effect | Can hide or preserve metallic appearance |
| Natural wood | Depends on design | Can preserve or cover wood grain |
| White ceramic | 일반적으로 선택 사항 | Ceramic provides white background |
| Colored ceramic | Often useful | Improves opacity |
| 어두운 플라스틱 | Usually useful | Blocks substrate color |
| Transparent plastic | Often useful | Controls transparent/opaque areas |
This table is only a starting point.
The correct setup still depends on:
- 삽화
- 제품 색상
- 투명도
- desired visual effect
When You May Not Need White Ink
White ink is powerful, but it is not automatically necessary.
You may intentionally skip it when printing on:
White Materials
The substrate already provides a white background.
Natural Wood
You want the wood grain to remain visible.
Brushed Metal
You want a metallic effect to show through the color.
Clear Acrylic or Glass
You deliberately want a translucent design.
Reducing unnecessary white ink can also:
- reduce ink usage
- shorten production time
- create more interesting material effects
The goal is not to use maximum white ink.
The goal is to use the right white ink strategy.
White Ink vs Varnish
White ink and varnish serve completely different functions.
흰색 잉크
Controls:
- 불투명
- background blocking
- white graphics
- CMYK support
광택
Controls:
- 광택
- 선택된 하이라이트
- 조직
- decorative surface effects
For a complete explanation, see:
White Ink vs Primer
These should also not be confused.
흰색 잉크
Changes the visual appearance of the print.
뇌관
May be used to improve adhesion on specific difficult substrates.
White ink does ~ 아니다 automatically solve poor adhesion.
For example, a beautiful opaque white print can still fail an adhesion test if the substrate:
- is oily
- has an incompatible coating
- has low surface energy
- requires pretreatment
이는 특히 다음과 같은 경우에 중요합니다.
- 유리
- 금속
- 플라스틱
- 유약 세라믹
How to Prepare Artwork for White Ink
Before sending a job to the printer, decide:
What Should Be White?
예:
- 텍스트
- 심벌 마크
- complete underbase
What Should Remain Transparent?
중요 사항:
- 유리
- 아크릴
- transparent signs
Where Is CMYK Required?
Is Varnish Required?
What Side Will the Customer View?
This changes layer order for reverse printing.
A good artwork file should separate visual intent from production intent.
The computer image alone does not tell the machine how to build the physical ink layers.
How to Test White Ink Before Production
For a new material:
1단계
작은 샘플을 인쇄하십시오.
2단계
Check white opacity.
3단계
Check CMYK brightness.
4단계
Check registration between white and color.
5단계
Check material adhesion.
6단계
Test the actual viewing conditions.
For transparent materials, place the sample against:
- white background
- 어두운 배경
- natural lighting
because transparency can dramatically change the perceived result.
7단계
Save the successful RIP preset.
This is especially valuable for repeat orders.
Which White Ink Printing System Should You Choose?
Choose according to the final product.
Hard, Flat Products
예:
- 아크릴
- 금속
- 목재
- 유리 패널
- 세라믹 타일
- 전화 케이스
다음으로 시작하세요:
의복
예:
- 티셔츠
- 후드티
- 토트백
- 운동복
다음으로 시작하세요:
Curved and Irregular Hard Products
예:
- 병
- 텀블러
- 항아리
- 포장
- 단단한 표면 데칼
고려하다:
The correct machine is determined by the product workflow—not simply by the fact that all three technologies use white ink.
Final Answer: How Does White Ink Printing Work?
Standard CMYK printing normally relies on the substrate to provide white.
Professional white ink printing adds a dedicated white channel so the printer can create real white graphics and opaque backing layers.
The most common strategies are:
화이트 베이스
Dark Material → White → CMYK
Standalone White
Dark Material → White Graphic
Transparent Front Printing
Clear Material → White + CMYK
역방향 인쇄
Viewer → Clear Material → CMYK → White
선택적 흰색
White only where opacity is required
White ink gives DTF, UV and UV DTF printing the ability to work on products that ordinary CMYK printing cannot handle effectively.
But successful white ink production requires more than simply installing a white ink bottle.
당신은 다음이 필요합니다
correct artwork + RIP control + layer order + white ink circulation + nozzle maintenance + material testing
The goal is not maximum white ink.
목표는 다음과 같습니다.
Use white exactly where it improves opacity, color and design.
For deeper reading:
UV Ink Guide: CMYK, White Ink & Varnish
FAQ
Can a normal printer print white ink?
Most standard CMYK printers do not have a dedicated white ink channel. White areas are normally created by leaving the white paper or substrate unprinted.
Why doesn’t CMYK create white?
CMYK inks add cyan, magenta, yellow and black color. Removing all four process colors leaves the substrate visible; it does not generate physical white ink.
How do you print white on black material?
Use a printer with a dedicated white ink channel. White can be printed alone or as an underbase beneath CMYK.
Why do I need white ink under CMYK?
On dark or colored substrates, white blocks the background and gives CMYK a neutral base, improving opacity and visual brightness.
Do you need white ink on clear acrylic?
Often, but not always. Use white when you need opacity. Skip or selectively apply white when transparency is part of the design.
Do you need white ink on glass?
White ink is useful for opaque graphics, strong colors and reverse printing, but translucent designs can intentionally use CMYK without a full white backing.
Do you need white ink on white ceramic?
Often not for normal CMYK graphics because the ceramic itself provides a white background.
Do you need white ink when printing on wood?
It depends on the design. Use CMYK only to preserve natural grain or add white beneath CMYK for stronger opacity.
Can white ink be printed by itself?
Yes. White ink can be used for standalone logos, text and decorative graphics on dark or colored materials.
What is selective white ink?
Selective white means printing white only beneath specific areas of the design while leaving other areas transparent or showing the natural substrate.
What is a white underbase?
A white underbase is a layer of white ink printed beneath CMYK to reduce the influence of a dark, colored or transparent substrate.
Why is my white ink gray instead of white?
Possible causes include weak opacity, missing nozzles, pigment settling, insufficient white coverage or incorrect RIP settings.
흰색 잉크가 더 쉽게 막히는 이유는 무엇입니까?
White ink contains a dense opaque pigment system, so circulation, maintenance, capping and correct idle procedures are especially important.
Why is there a white outline around my CMYK artwork?
The white mask may extend beyond the CMYK image or the layers may be misregistered. Check printhead calibration and the RIP white choke/spread settings.
Can I use UV white ink in a DTF printer?
No. UV printing and textile DTF use different ink chemistries and production systems.
Can DTF white ink be used in a UV DTF printer?
No. Use only ink designed and approved for the specific printer system.
Is white ink always necessary on dark material?
If you need bright, opaque CMYK, it is usually important. For certain intentional dark or translucent effects, you may choose another design approach.
Does more white ink always improve print quality?
No. White density should be matched to the material, artwork and desired opacity. More ink is not automatically better.
Is white ink the same as primer?
No. White ink controls appearance and opacity. Primer is used in certain workflows to improve substrate adhesion.
Is white ink the same as varnish?
No. White ink provides opacity. Varnish provides gloss, highlights or decorative texture.
Which EraSmart printer should I choose for white ink printing?
Choose according to the product:
- UV 프린터 for suitable rigid products
- DTF 프린터 for textile transfers
- UV DTF 프린터 for hard-surface transfer applications
Build the Right White Ink Workflow
If you are choosing an EraSmart printer, tell us:
- what products you want to print
- 재료
- 제품 색상
- transparent or opaque substrate
- flat or curved surface
- required print size
- whether you need white-only graphics
- whether you need varnish
- 생산량
The right workflow depends on the product—not simply on whether the printer has white ink.
Control the white layer. Control the color. Build a repeatable printing workflow.
당신도 좋아할 수도 있습니다

Copyright 2020 © Erasmart. | 사이트 맵